取扱説明書
AXA35
はじめに
本書は、本製品の設置と使用をできるだけ簡単に行えるよう作成しています。記載内容は印刷時点で正確性を慎重に確認しています。ただし Cambridge Audio は継続的な改善を方針としています。そのため設計や仕様は予告なく変更する場合があります。
This guide is designed to make installing and using this product as easy as possible. Information in this document has been carefully checked for accuracy at the time of printing; however, Cambridge Audio’s policy is one of continuous improvement, therefore design and specifications are subject to change without prior notice.
本書には著作権で保護された専有情報が含まれています。すべての権利は当社に帰属します。本マニュアルのいかなる部分も、製造元の事前の書面による許可なく、機械的・電子的・その他の手段や形式で複製してはなりません。すべての商標および登録商標は、それぞれの所有者に帰属します。
This document contains proprietary information protected by copyright. All rights are reserved. No part of this manual may be reproduced by any mechanical, electronic or other means, in any form, without prior written permission of the manufacturer. All trademarks and registered trademarks are the property of their respective owners.
© Copyright Cambridge Audio Ltd
© Copyright Cambridge Audio Ltd
今後の新製品情報、ソフトウェアアップデート、限定オファーをお受け取りいただくため、https://www.cambridgeaudio.com/register より製品登録をお願いします。
For upcoming news on future products, software updates and exclusive offers, make sure you register your product at https://www.cambridgeaudio.com/register
このマニュアル内の画像の一部は、元の PDF から自動生成されたものです。自動処理の都合上、製品の細部や配線図などが実際と異なる場合があります。正確な形状・寸法・配線は、実機および製品ページの写真、同梱の正規マニュアル(英語版)をあわせてご確認ください。
AXA35 の同梱品
AXA35 のパッケージには次の内容が同梱されています:
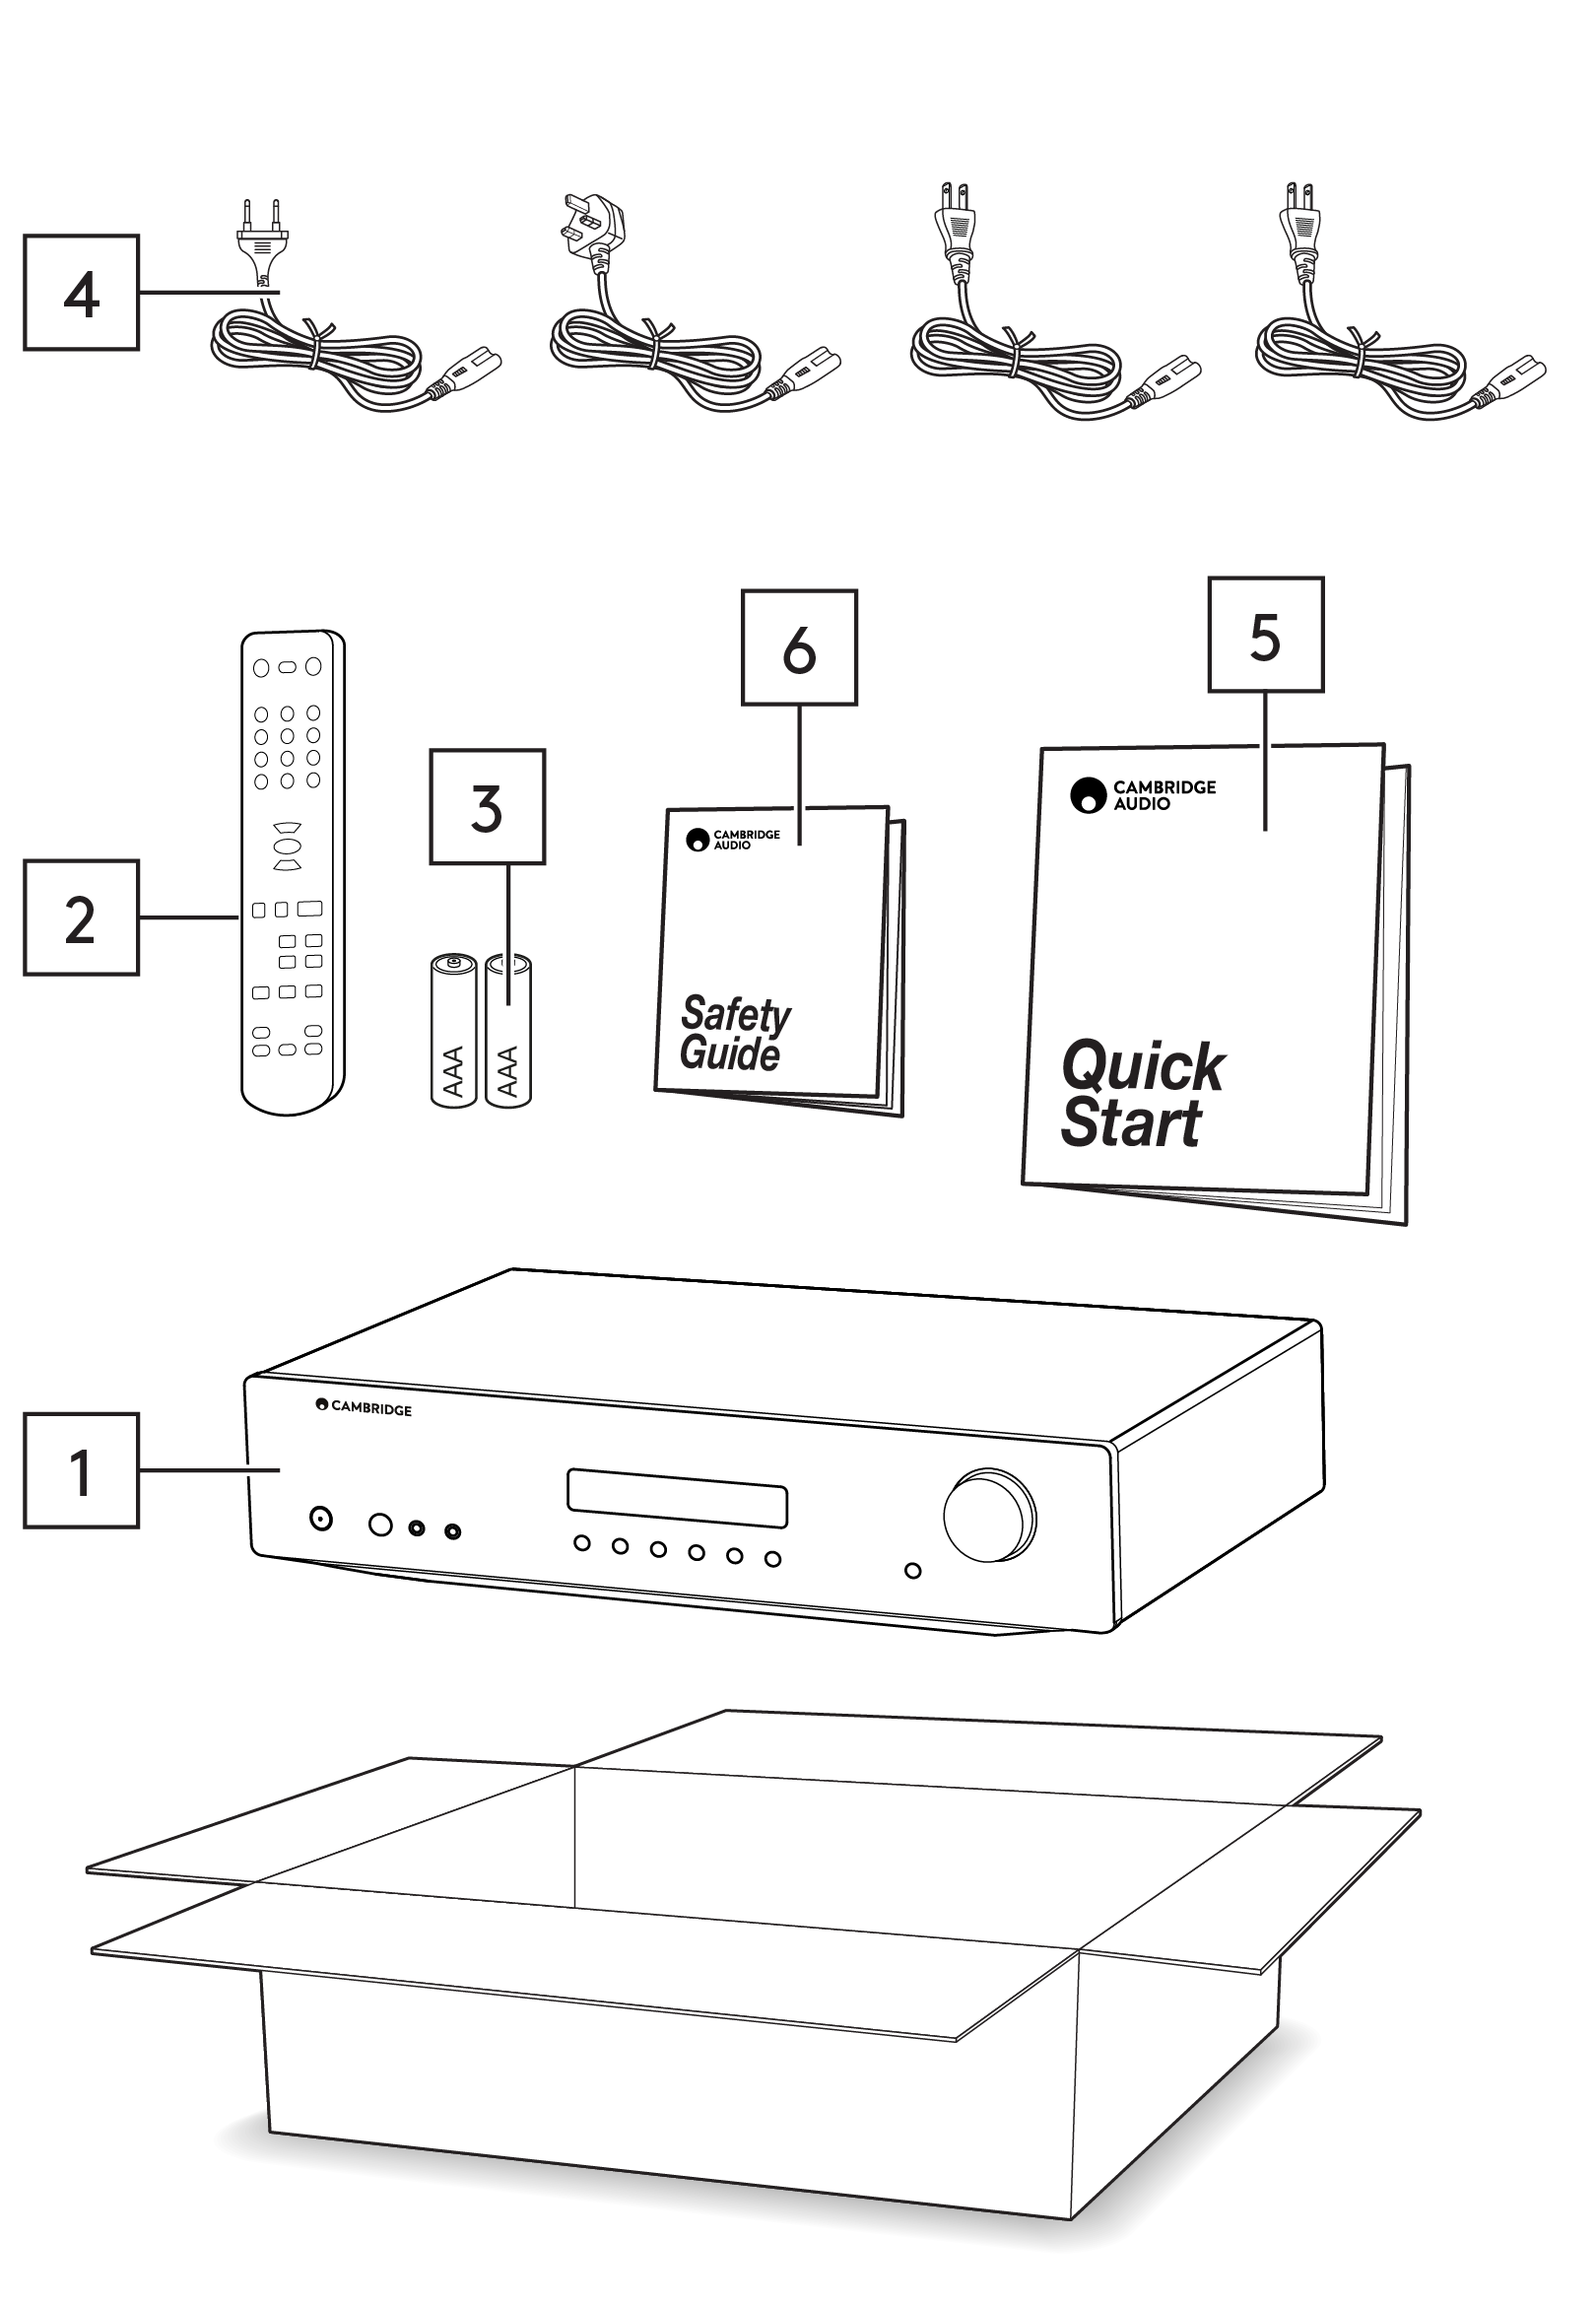
1. AXA35 インテグレーテッドアンプ。2. リモコン。3. 単 4 形電池 2 本。4. UK 電源ケーブル(購入国により異なります)。EU 電源ケーブル(購入国により異なります)。CU 電源ケーブル(購入国により異なります)。JP 電源ケーブル(購入国により異なります)。5. クイックスタートガイド。6. 安全ガイド。
1. AXA35 integrated amplifier. 2. Remote control. 3. 2 x AAA batteries. 4. UK mains lead (depending on which country the AXA35 was purchased). EU mains lead (depending on which country the AXA35 was purchased). CU mains lead (depending on which country the AXA35 was purchased). JP mains lead (depending on which country the AXA35 was purchased). 5. Quick start guide. 6. Safety guide.
フロントパネルの操作部
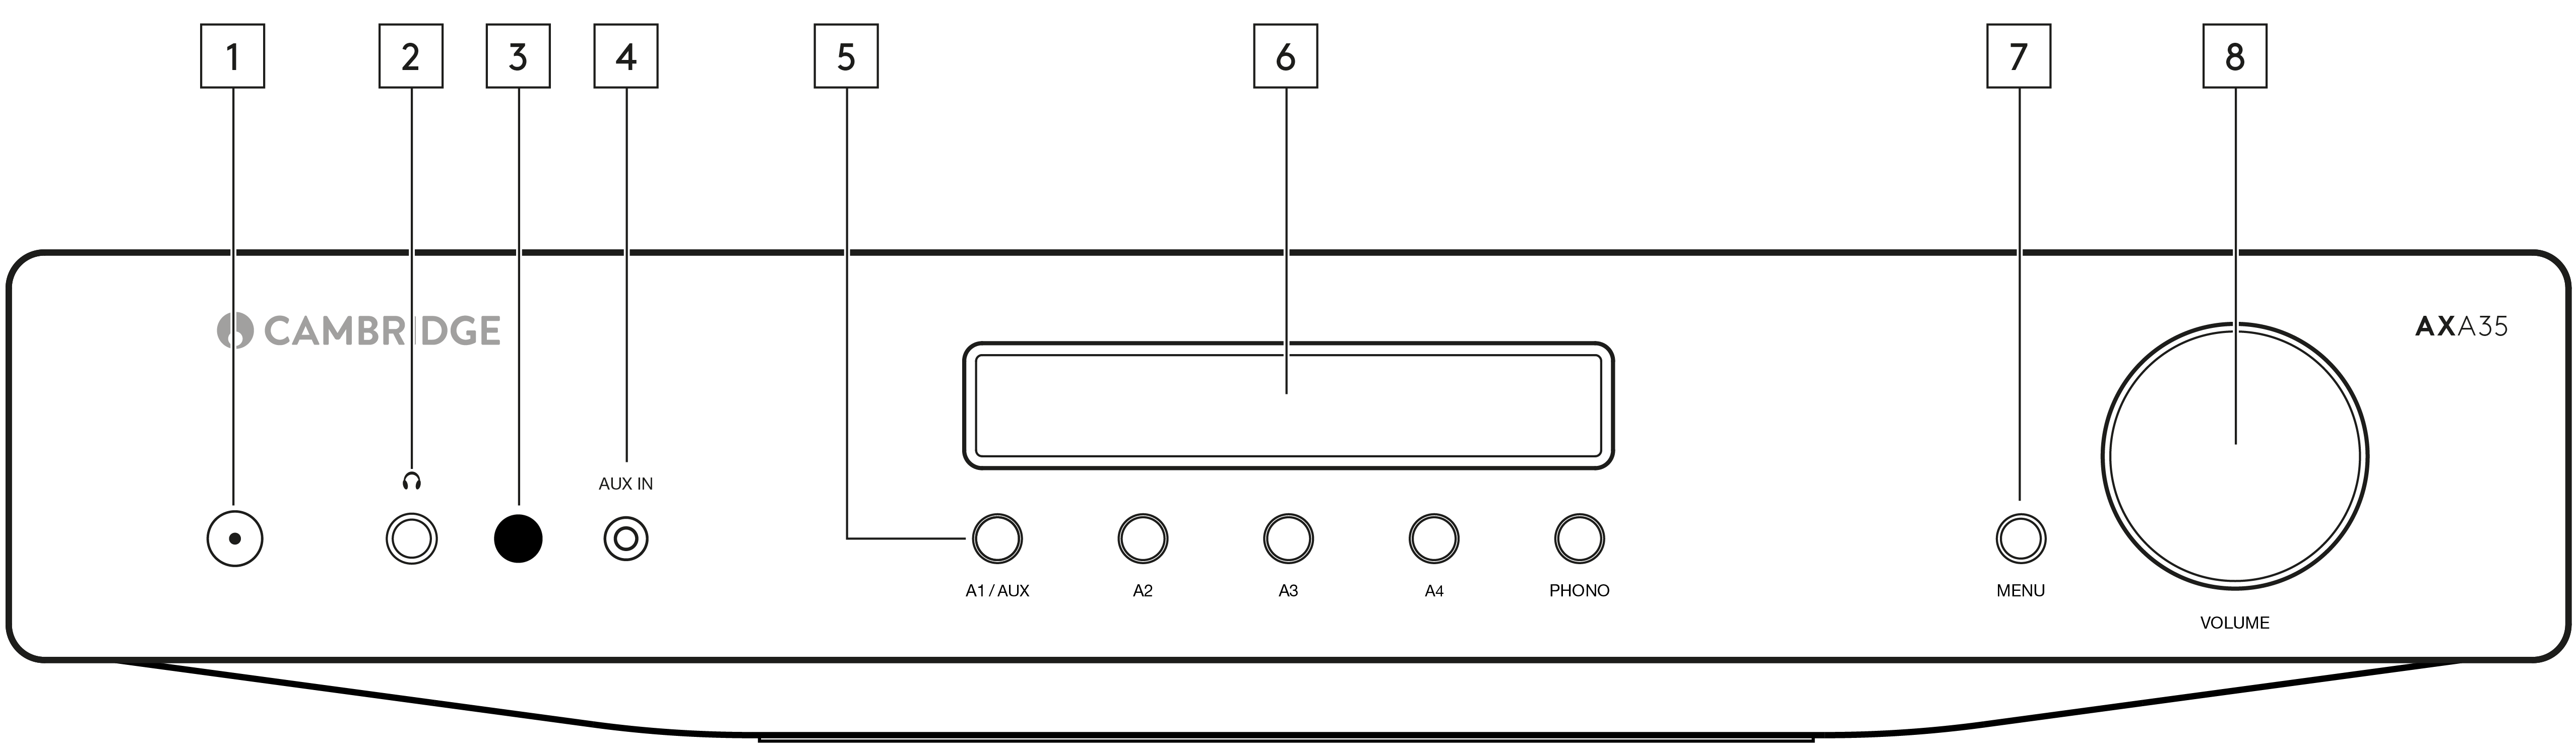
1. 電源ボタン — 本機をスタンバイモード(LED が暗く点灯)とオン(LED が明るく点灯)で切り替えます。スタンバイモードは消費電力 0.5W 未満の低消費電力モードです。
1. Power button - Switches the unit between Standby mode (indicated by dim LED) and On (indicated by bright LED). Standby mode is a low power mode where the power consumption is less than 0.5 Watts.
本製品は工場出荷時に APD(自動電源オフ)が有効になっています。20 分間操作がないと、自動的にスタンバイへ切り替わります。
This product has APD (Auto Power Down) enabled as default. After inactivity of 20 minutes, the product will automatically switch to Standby.
自動電源オフ(APD)
Auto Power Down (APD)
本機の APD 設定はオン/オフを切り替えられます。電源ボタンを LED が連続して点滅するまで長押しして調整します。下記の 2 つの表示で、どちらが選択されているかを確認できます。
You can enable and disable the unit’s APD setting. This can be adjusted by pressing and holding the Power button until the LED flashes in sequence. The two options below show which option is selected.
スタンバイ LED が 5 回点滅 — APD 無効
Standby flashes 5 times - APD disabled
スタンバイ LED が 10 回点滅 — APD 有効
Standby flashes 10 times - APD enabled
注:APD 機能を変更する前に、本機がオンになっていることを確認してください。
Note: Make sure the unit is On, before making changes to the APD function.
2. ヘッドホン端子 — 1/4 インチジャックプラグのステレオヘッドホンを接続できます。インピーダンス 32〜600 オームのヘッドホンを推奨します。
2. Headphone socket - This socket allows for the connection of stereo headphones with a 1/4 inch jack plug. Headphones with an impedance of between 32 and 600 ohms are recommended.
注:ヘッドホンを接続すると、スピーカー出力は自動的にミュートされます。
Note: Connecting headphones will automatically mute the loudspeaker outputs.
3. 赤外線センサー — 付属リモコンからの IR 信号を受信します。
3. Infrared sensor - Receives IR commands from the supplied remote control.
リモコンとセンサーの間に障害物のない見通しが必要です。
An unobstructed line of sight between the remote control and the sensor is required.
4. Aux 入力 — 3.5mm ステレオ Aux ケーブルで、スマートフォンなどの携帯オーディオ機器を本機の前面に直接接続できる入力です。
4. Aux in - This source input allows you to connect a portable audio device, such as a smart phone, directly into the front of the unit using a 3.5mm stereo Aux lead.
プラグを差し込むと、この入力が自動的に選択されます。ただしステレオジャックが接続されている間も、A1 以外の入力は選択可能です。ステレオジャックが接続されている間、本機前面の A1/AUX ボタンでこの入力を選択できます。
Once plugged in, this input is automatically selected, although other inputs apart from A1 can still be selected once a stereo-jack is plugged in. The A1/AUX button on the front of the unit will select this input whilst a stereo-jack is plugged in.
注:フロントパネルの Aux 入力にソースを接続すると、A1 入力より優先されます。フロントパネルからジャックを抜くと、A1 入力が自動的に再び有効になります。
Note: Plugging a source into the front panel Aux input overrides the A1 input. Simply remove the jack from the front panel to automatically re-enable the A1 input.
注:Aux 機器の出力レベルは低めの傾向があるため、Aux 入力を選択している場合に限り、AXA35 は現在の音量設定に 10dB を加算します。
Note: Also be aware that as the output level of Aux players tends to be quite low, the AXA35 adds 10dB to the current volume setting when (and only when) the Aux input is selected.
5. 入力ソースボタン(A1、A2、A3、A4、Phono)— 該当するソースボタンを押して、希望の入力ソースを選択します。選択した信号は Rec Out 端子にも出力され、録音できます。録音中は入力を切り替えないでください。
5. Input source buttons (A1, A2, A3, A4, Phono) - Press the relevant source button to select the desired input source. The signal selected is also fed to the Rec Out sockets so that it may be recorded. The input should not be changed whilst recording.
注:正しい入力ソースを選択していないと、アンプから音は出ません。
Note: There will be no sound from the amp if the correct input source isn’t selected.
6. ディスプレイ — 選択中の入力ソース、音量、トーン/バランスレベルなどの情報を表示します。
6. Display - Used to display information such as the selected input source, volume and tone/ balance levels.
注:ご購入直後、ディスプレイ上面には保護フィルムが貼られています。はがしてクリアな表示でご使用ください。
Note: When first purchased, the display will have a protective film over the top. Peel this off for a clear display.
7. メニューボタン — 1 回押すと「bass(低音)」を選択します。2 回押すと「treble(高音)」、3 回押すと「balance(バランス)」を選択します。いずれかを選択中は、音量つまみでレベルを調整します。
7. Menu button - Pressing this once will select the 'bass' option. Pressing a second time will select the 'treble' option, and pressing a third time will select the 'balance' option. When one of these options is selected, the volume control will adjust the level.
しばらく操作しないと、ディスプレイにソースが表示され、音量つまみは音量調整に戻ります。
If nothing is pressed for a while, the source will be displayed and the volume control will go back to controlling the volume level.
注:bass、treble、balance の設定変更は、本機の電源をオフにして再びオンにしても保存されます。
Note: Any adjustments to the bass, treble, and balance settings are saved when the unit is switched off and back on again.
8. 音量つまみ — 本機の出力レベルを上下します。スピーカーとヘッドホンの音量を調整します。
8. Volume control - Use to increase or decrease the level of the sound from the outputs of the unit. This controls the volume level of the loudspeakers and headphones.
メニューオプション選択中は、音量つまみで bass、treble、balance のレベルも変更できます。
The volume control will also change the level of bass, treble and balance in the menu options.
注:「Rec Out」出力は固定レベルのため、音量つまみでは変更できません。
Note: The volume control does not affect the level of the ‘Rec Out’ output as this has a fixed level.
リアパネルの接続端子
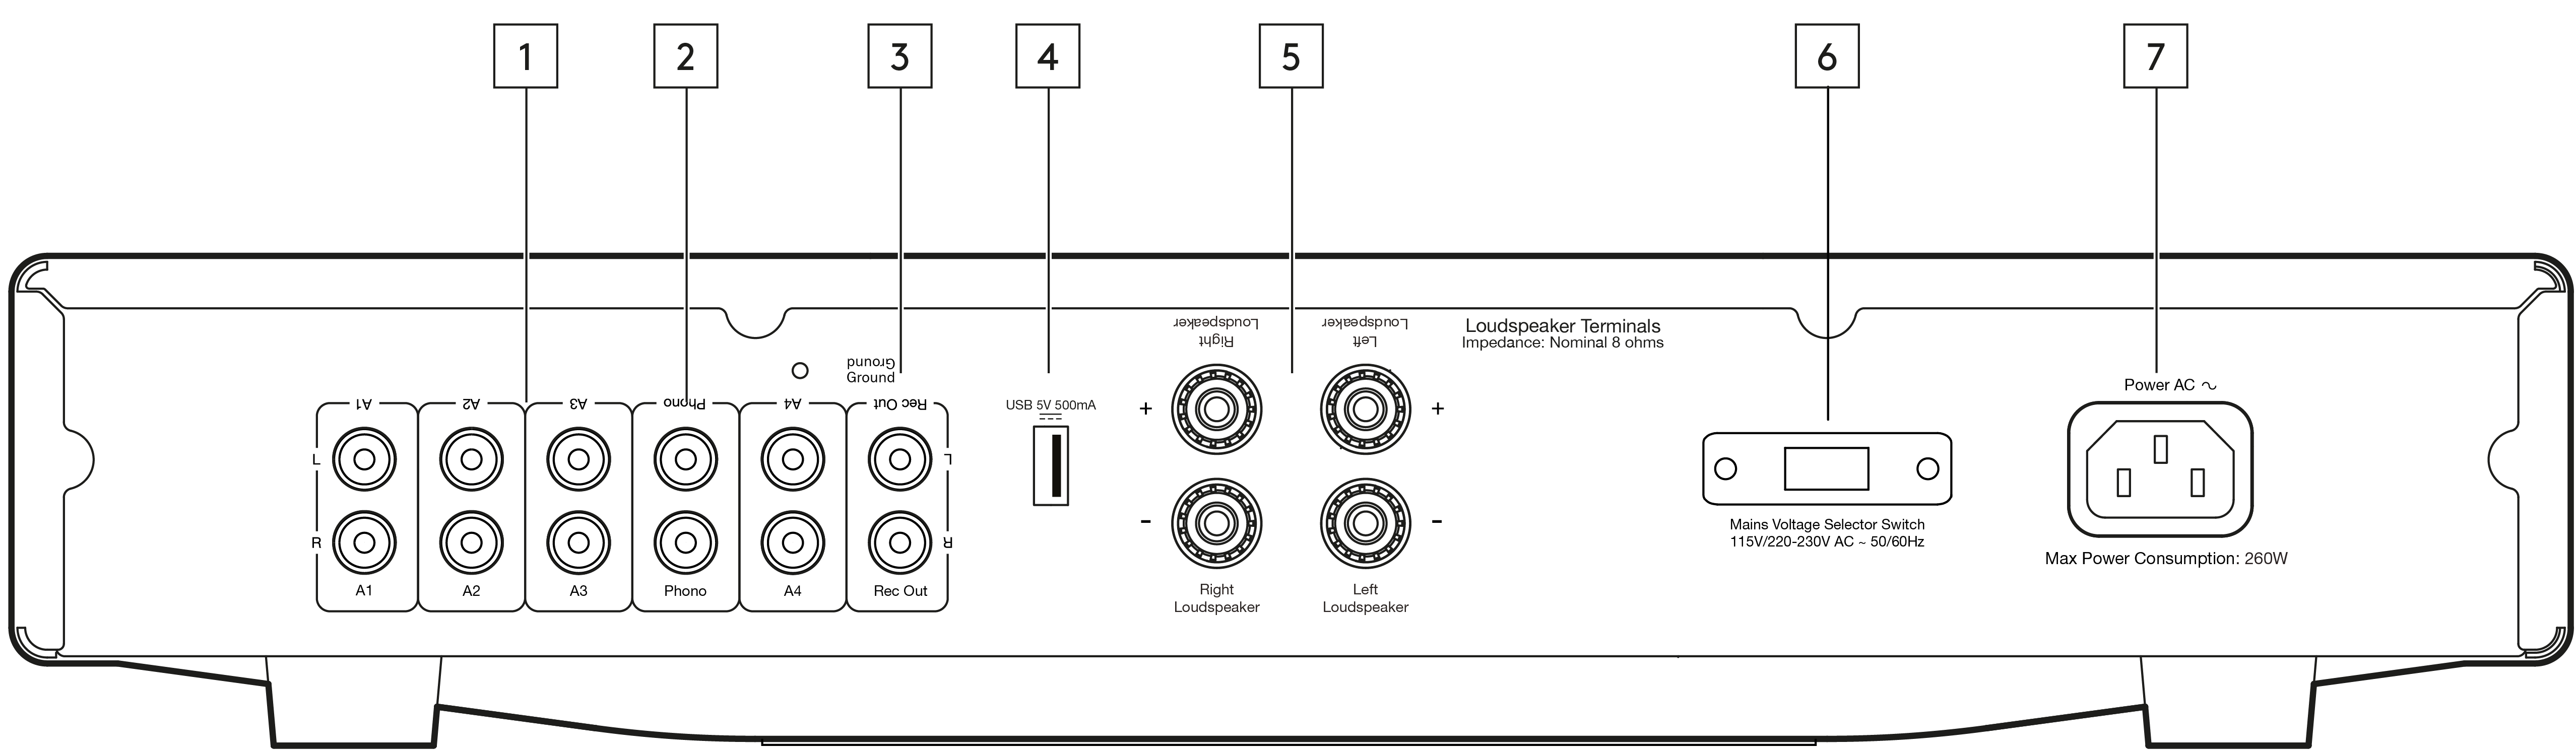
1. オーディオ入力(A1〜A4)— CD プレーヤーの音声出力や、Chromecast Audio などのストリーミング機器(RCA Phono 〜ジャックケーブルが必要)など、各種「ラインレベル」のソース機器に対応する入力です。
1. Audio inputs (A1-A4) - These inputs are suitable for any ‘line level’ source equipment such as the audio outputs of CD players, streaming devices such as a Chromecast Audio (RCA Phono to jack cable required) etc.
2. Phono 入力 — 本機は Phono ステージも内蔵しています。
2. Phono input - This unit also has a built in Phono stage.
MM 型または高出力 MC 型(出力 2〜6mV、負荷インピーダンス 30〜50k オーム)の Phono カートリッジを搭載したレコードプレーヤーを使用できます。
Record players fitted with Phono Cartridges of the Moving Magnet (MM) or high output Moving Coil (MC) type (between 2-6mV output and 30-50k ohms load impedance) can be used.
低出力 MC 型(1mV 未満、通常は負荷インピーダンス 10〜1000 オーム)は直接接続できず、マッチングトランスまたはヘッドアンプが必要です。詳しくは販売店にご相談ください。
Low output Moving Coil types (<1mV and usually 10-1000 ohm load impedance) cannot be directly connected and will require a matching transformer or head amp. Please consult your dealer for details.
注:レコードプレーヤーと AXA35 の両方の「Ground(アース)」端子は、可能であればアース線で接続してください。ノイズやハムを最小限に抑えられます。
Note: The ‘Ground’ terminals on both the record player and the AXA35 should be connected (where possible) with a ground wire for lowest noise/hum pickup.
漏れ磁界の影響により干渉する可能性があるため、ターンテーブルは本機の近くに設置しないでください。
Due to stray magnetic fields, turntables should not be located in close proximity due to possible interference.
3. Rec Out — CD レコーダー、テープデッキ、その他対応する録音機器の録音入力に接続します。
3. Rec out - Connect to the recording input of a CD recorder, tape deck or other compatible recording device etc.
この出力は本機の音量に左右されない一定の高レベル出力です。そのため AXA35 はプリアンプ単体としては使用できず、サブウーファーとの併用にも対応しません。
This output provides a constant high level output that does not fluctuate with the volume of the main unit. For this reason, the AXA35 cannot be used as a Preamplifier only or with a subwoofer.
4. USB 電源 5V 500mA — この USB 端子はスマートフォンなどの機器を充電するための端子です。充電する機器は 5V DC 駆動である必要があります。
4. USB power 5V 500mA - This USB connection is designed to charge a device, such as a smartphone. The charging device needs to require 5V DC to be able to be charged.
注:本端子は入力ではないため、本機にオーディオを直接再生することはできません。
Note: This is not an input so will not allow you to play audio directly to the unit.
注:本ポートで機器を充電しながら、同じ機器をソースとして使用しないでください。グランドループが発生し、再生中にノイズの原因となります。
Note: Do not use this port for charging a device and using it as a source at the same time, as this will create a ground loop that will cause interference during playback.
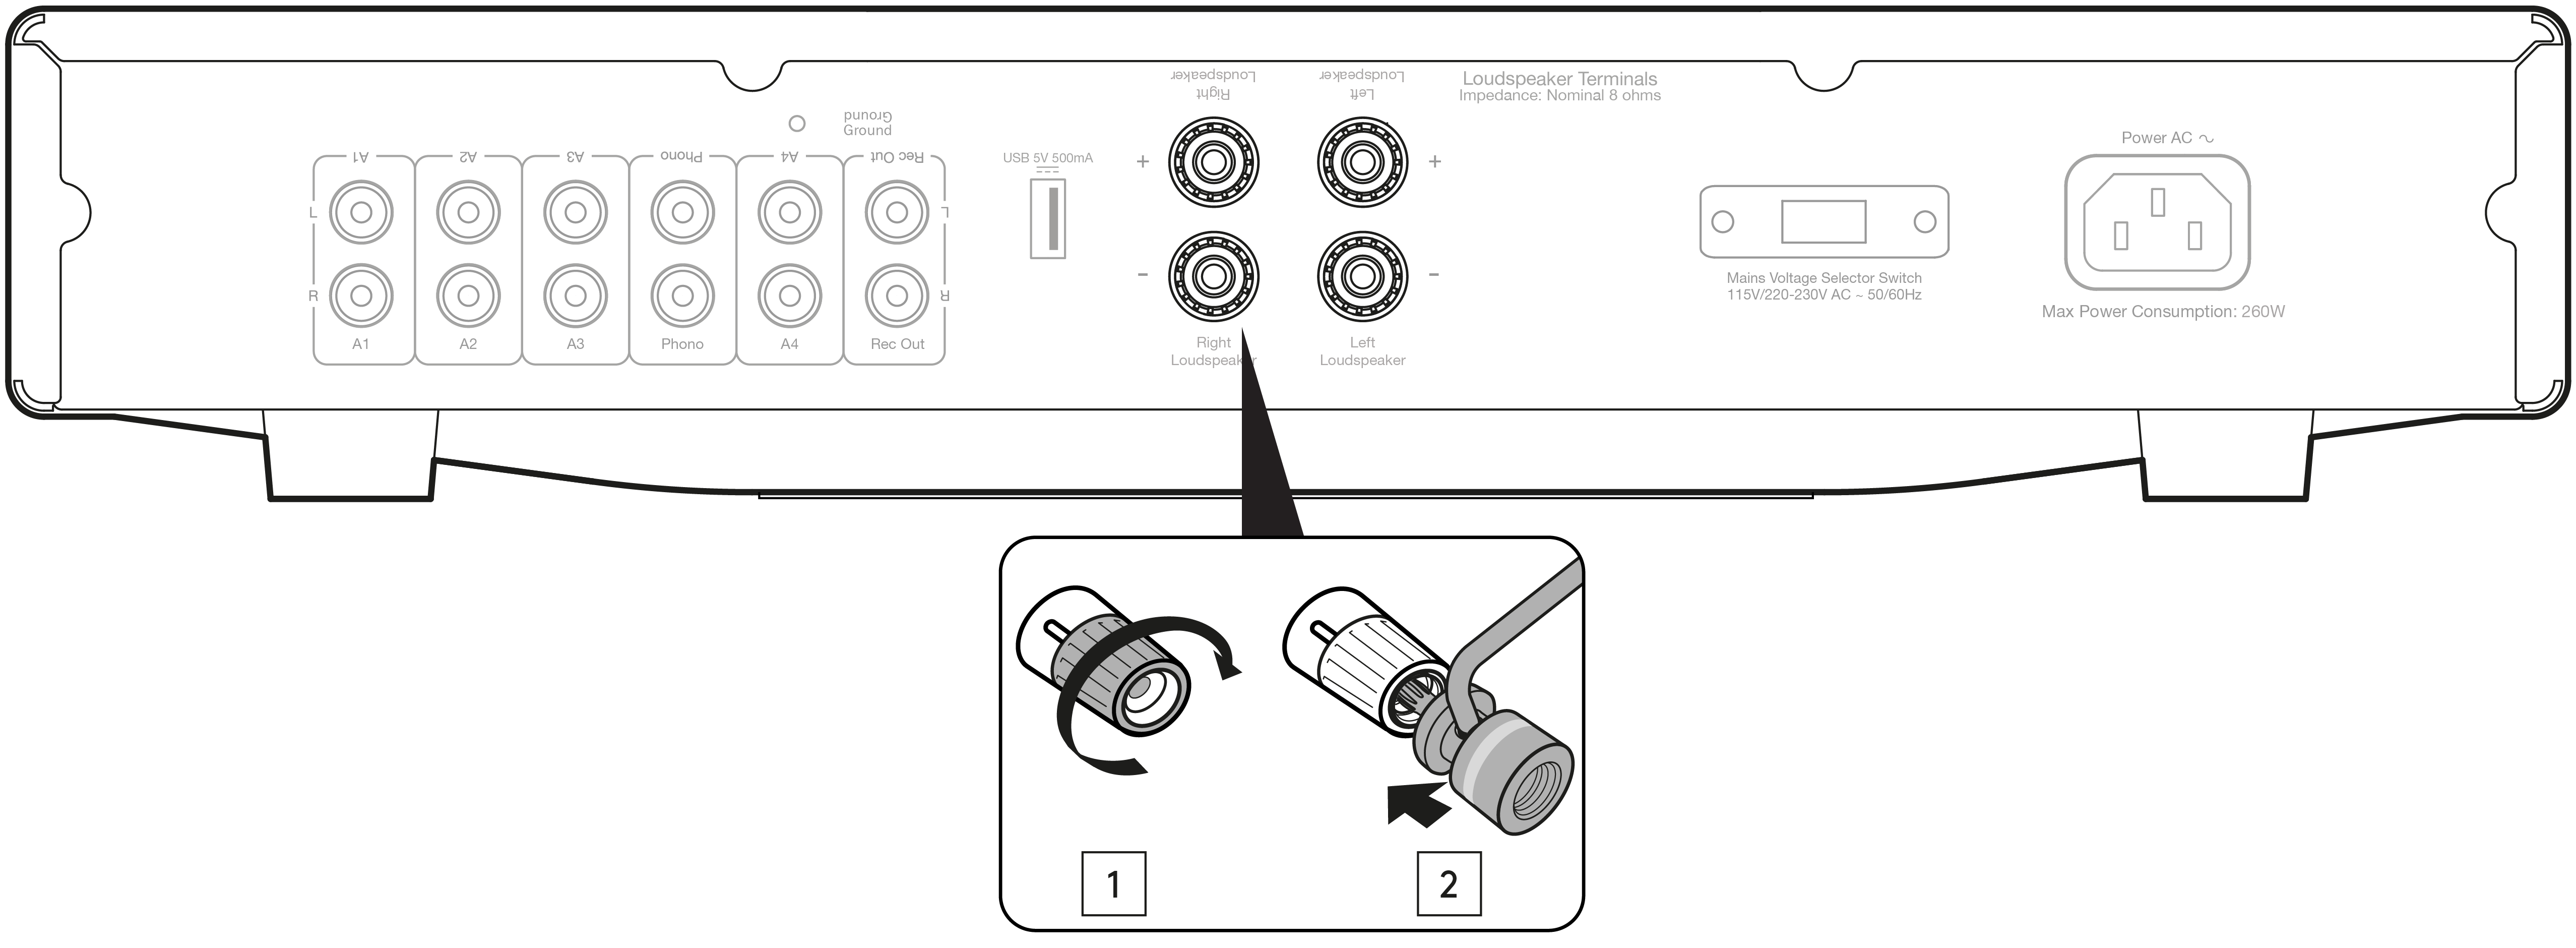
5. スピーカー端子 — 注:バナナプラグを使用する場合は、プラグを差し込む前にスピーカー端子を完全に締め込んでください。
5. Loudspeaker terminals - Note: When using a banana plug, make sure the speaker terminals are completely tightened before inserting the plug.

左チャンネルのスピーカーケーブルは Left のプラス/マイナス端子に、右チャンネルのスピーカーケーブルは Right のプラス/マイナス端子に接続してください。
Connect the wires from your left channel loudspeaker to the Left positive and negative terminals and the wires from the right channel loudspeaker to the Right positive and negative terminals.
いずれの場合も、赤い端子がプラス出力、黒い端子がマイナス出力です。
In each case, the red terminal is the positive output and the black terminal is the negative output.
ケーブルのほつれた素線がスピーカー出力同士を意図せず接続しないよう、十分にご注意ください。本機の故障の原因となります。
Care should be taken to ensure no stray strands of wire are accidentally connecting speaker outputs together as this may cause damage to the unit.
スピーカー端子は確実に締め付け、良好な電気的接続を確保してください。ねじ端子が緩んでいると、音質に影響する場合があります。
Please ensure that the loudspeaker terminals have been tightened adequately to provide a good electrical connection. It is possible for the sound quality to be affected if the screw terminals are loose.
6. 電圧切替スイッチ — サービス用途専用です。
6. Voltage select switch - For servicing use only.
7. AC 電源ソケット — すべての接続が完了したら、AC 電源ケーブルを適切なコンセントに差し込み、本機の電源を入れてください。
7. AC power socket - Once all connections are complete, plug the AC power cable into an appropriate mains socket and turn the unit on.
電源ケーブルは本機に付属のものだけをご使用ください。
Please only use the power lead supplied with the unit.
リモコン
| AXA35 には、本機を操作するためのリモコンが付属しています。また、一部のアイコンボタンで対応する AXC35/AXC25 プレーヤーも操作できます。リモコンを使用する前に、付属の単 4 形電池をセットしてください。1. 電源ボタン — AXA35 を「オン」と低消費電力でエコな「スタンバイ」モードで切り替えます。2. ミュート — 本機の音声をミュートします。もう一度押すとミュートを解除します。3. 音量 — 本機の音量を上下します。bass、treble、balance を選択中は、その設定変更にも使用します。4. メニュー — 「bass」「treble」「balance」を切り替えます。音量ボタンで選択中のレベルを変更します。5. ソースボタン(A1、A2、A3、A4、phono)— 該当するボタンを押して、希望のオーディオソースを選択します。5. ソースボタン(A1、A2、A3、A4、phono)— 該当するボタンを押して、希望のオーディオソースを選択します。 |
|---|
接続方法
スピーカー。
スピーカーのインピーダンスを確認してください。8 オームのスピーカーをご利用いただけます。
Check the impedance of your speakers. You can use speakers with an impedance of 8 Ohms.
赤色のスピーカー端子がプラス(+)、黒色のスピーカー端子がマイナス(-)です。各スピーカーコネクターの極性を正しく合わせてください。極性が逆になると、音が弱くなり位相が乱れ、低音が出にくくなります。
The red coloured speaker terminals are positive (+) and the black speaker terminals are negative (-). Make sure correct polarity is maintained at each speaker connector or the sound can become weak and phased with little bass.
裸線で接続する場合。
スピーカーケーブルの外皮を約 10mm(3/8 インチ)以下剥いて準備してください。10mm を超えるとショートの原因になります。芯線をしっかりよじり、ほつれをなくしてください。スピーカー端子を緩めてケーブルを差し込み、端子を締めてケーブルを固定します。
Prepare the speaker cords for connection by stripping off approximately 10mm (3/8”) or less of the outer insulation. More than 10mm could cause a short circuit. Twist the wires tightly together so there are no loose ends. Unscrew the speaker terminal, insert the speaker cable, tighten the terminal and secure the cable.
注:すべての接続は標準的なスピーカーケーブルを使用して行います。
Note: All connections are made using standard loudspeaker cable.
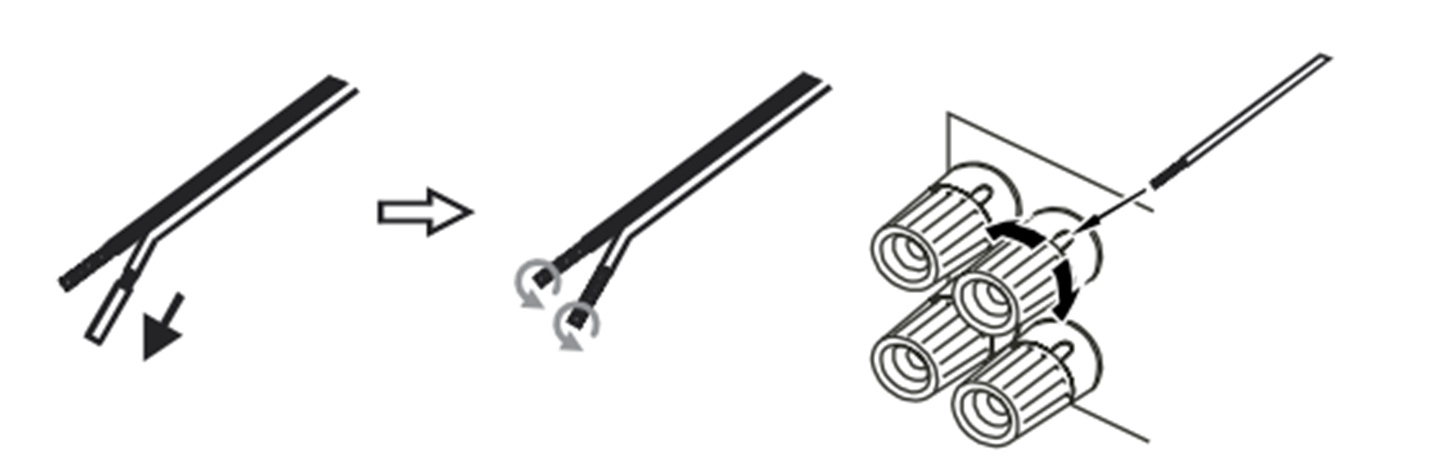
バナナプラグを使用する場合。
確実な接続を確保し、ノイズや干渉の原因となる芯線のほつれを防ぐため、本機ではバナナプラグの使用を推奨します。ケーブルの外皮を剥き、下記の通り芯線をよじってバナナプラグにしっかり接続してください。次にスピーカー端子の先端からダストキャップを外し、無理な力を加えずプラグを奥まで差し込んでください。
We recommend using Banana plugs with our units to establish a secure connection and ensure there are no loose strands of wire that may cause unwanted noise or interference. Once you have stripped the outer insulation of the cable and twisted the wires as indicated below, securely connect these to your banana plugs, remove the dust cap from the end of the speaker terminal and push the plug in as far as possible without applying excessive force.
注:バナナプラグを使用する際は、プラグを差し込む前にスピーカー端子を完全に締めてください。
Note: When using a banana plug, make sure the speaker terminals are completely tightened before inserting the plug.
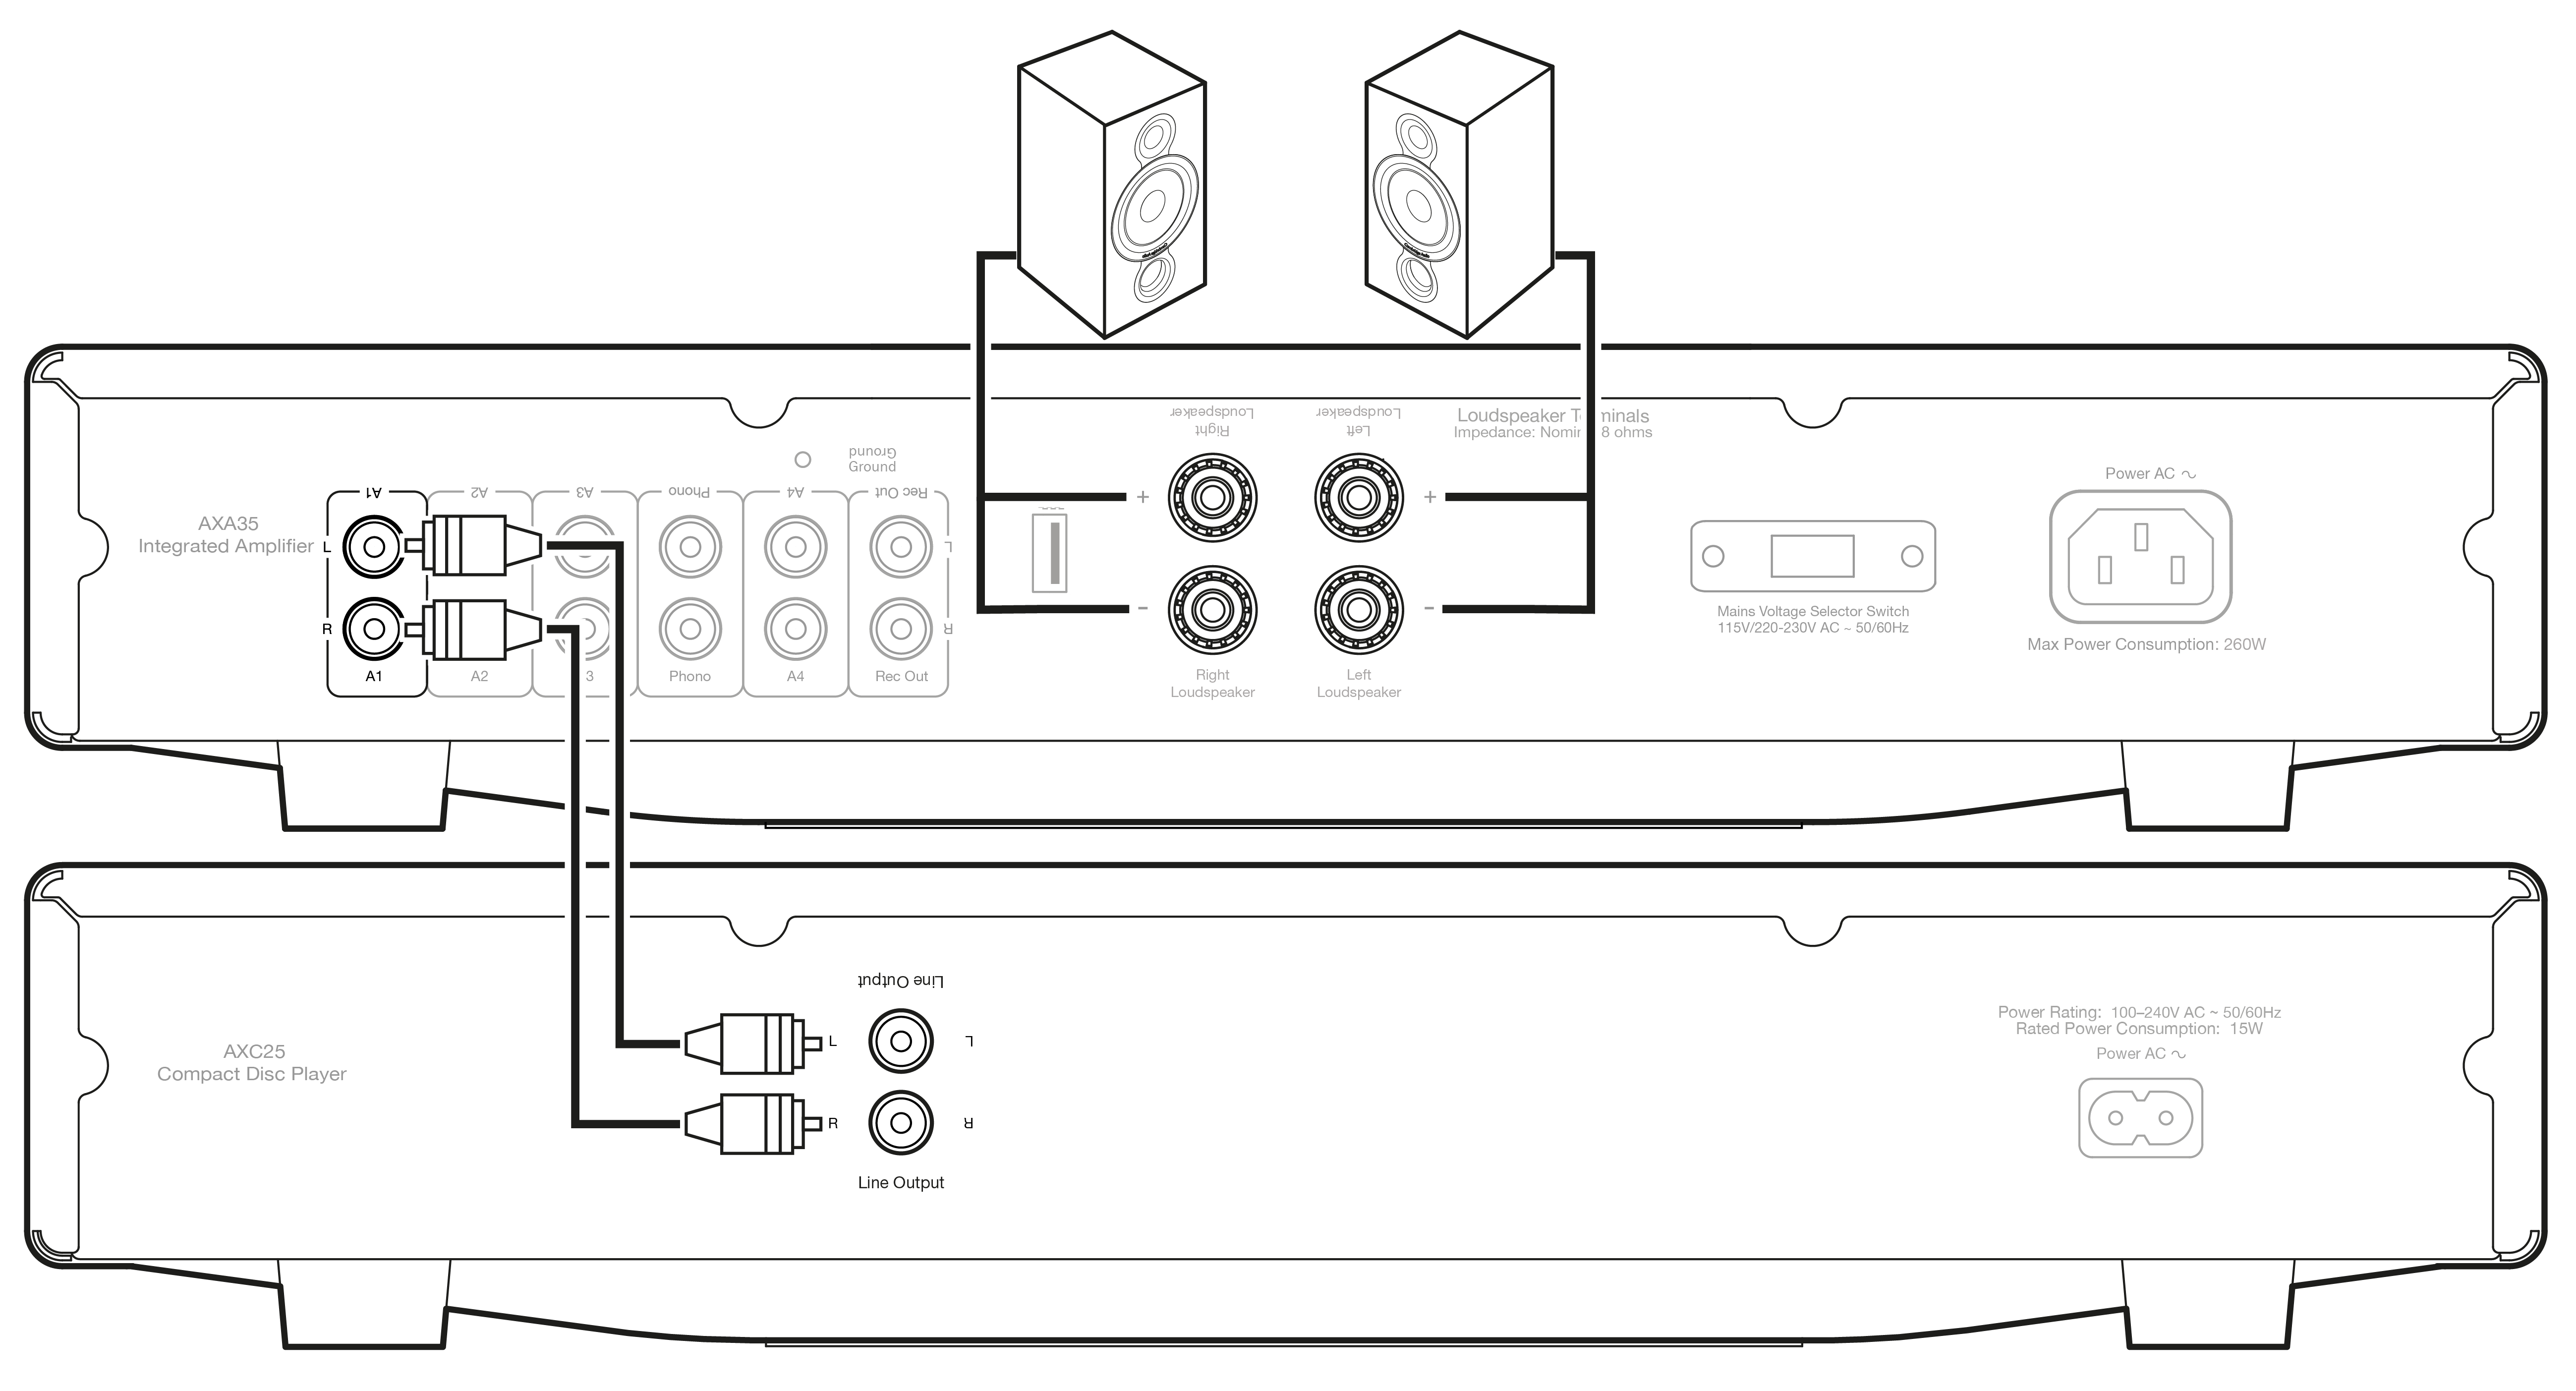
基本的な接続。
「ラインレベル」のソース機器であれば、アンプのオーディオ入力(A1〜A4)に接続できます。
Any ‘line level’ source equipment can be connected to the audio inputs on the amplifier (A1 to A4).
下図は、AXA35 と CD プレーヤーを A1 アナログ入力で接続し、スピーカー一組を接続した基本的な接続例です。
The diagram below shows the basic connection of the AXA35 to a CD player using the A1 analogue input and a pair of loudspeakers.
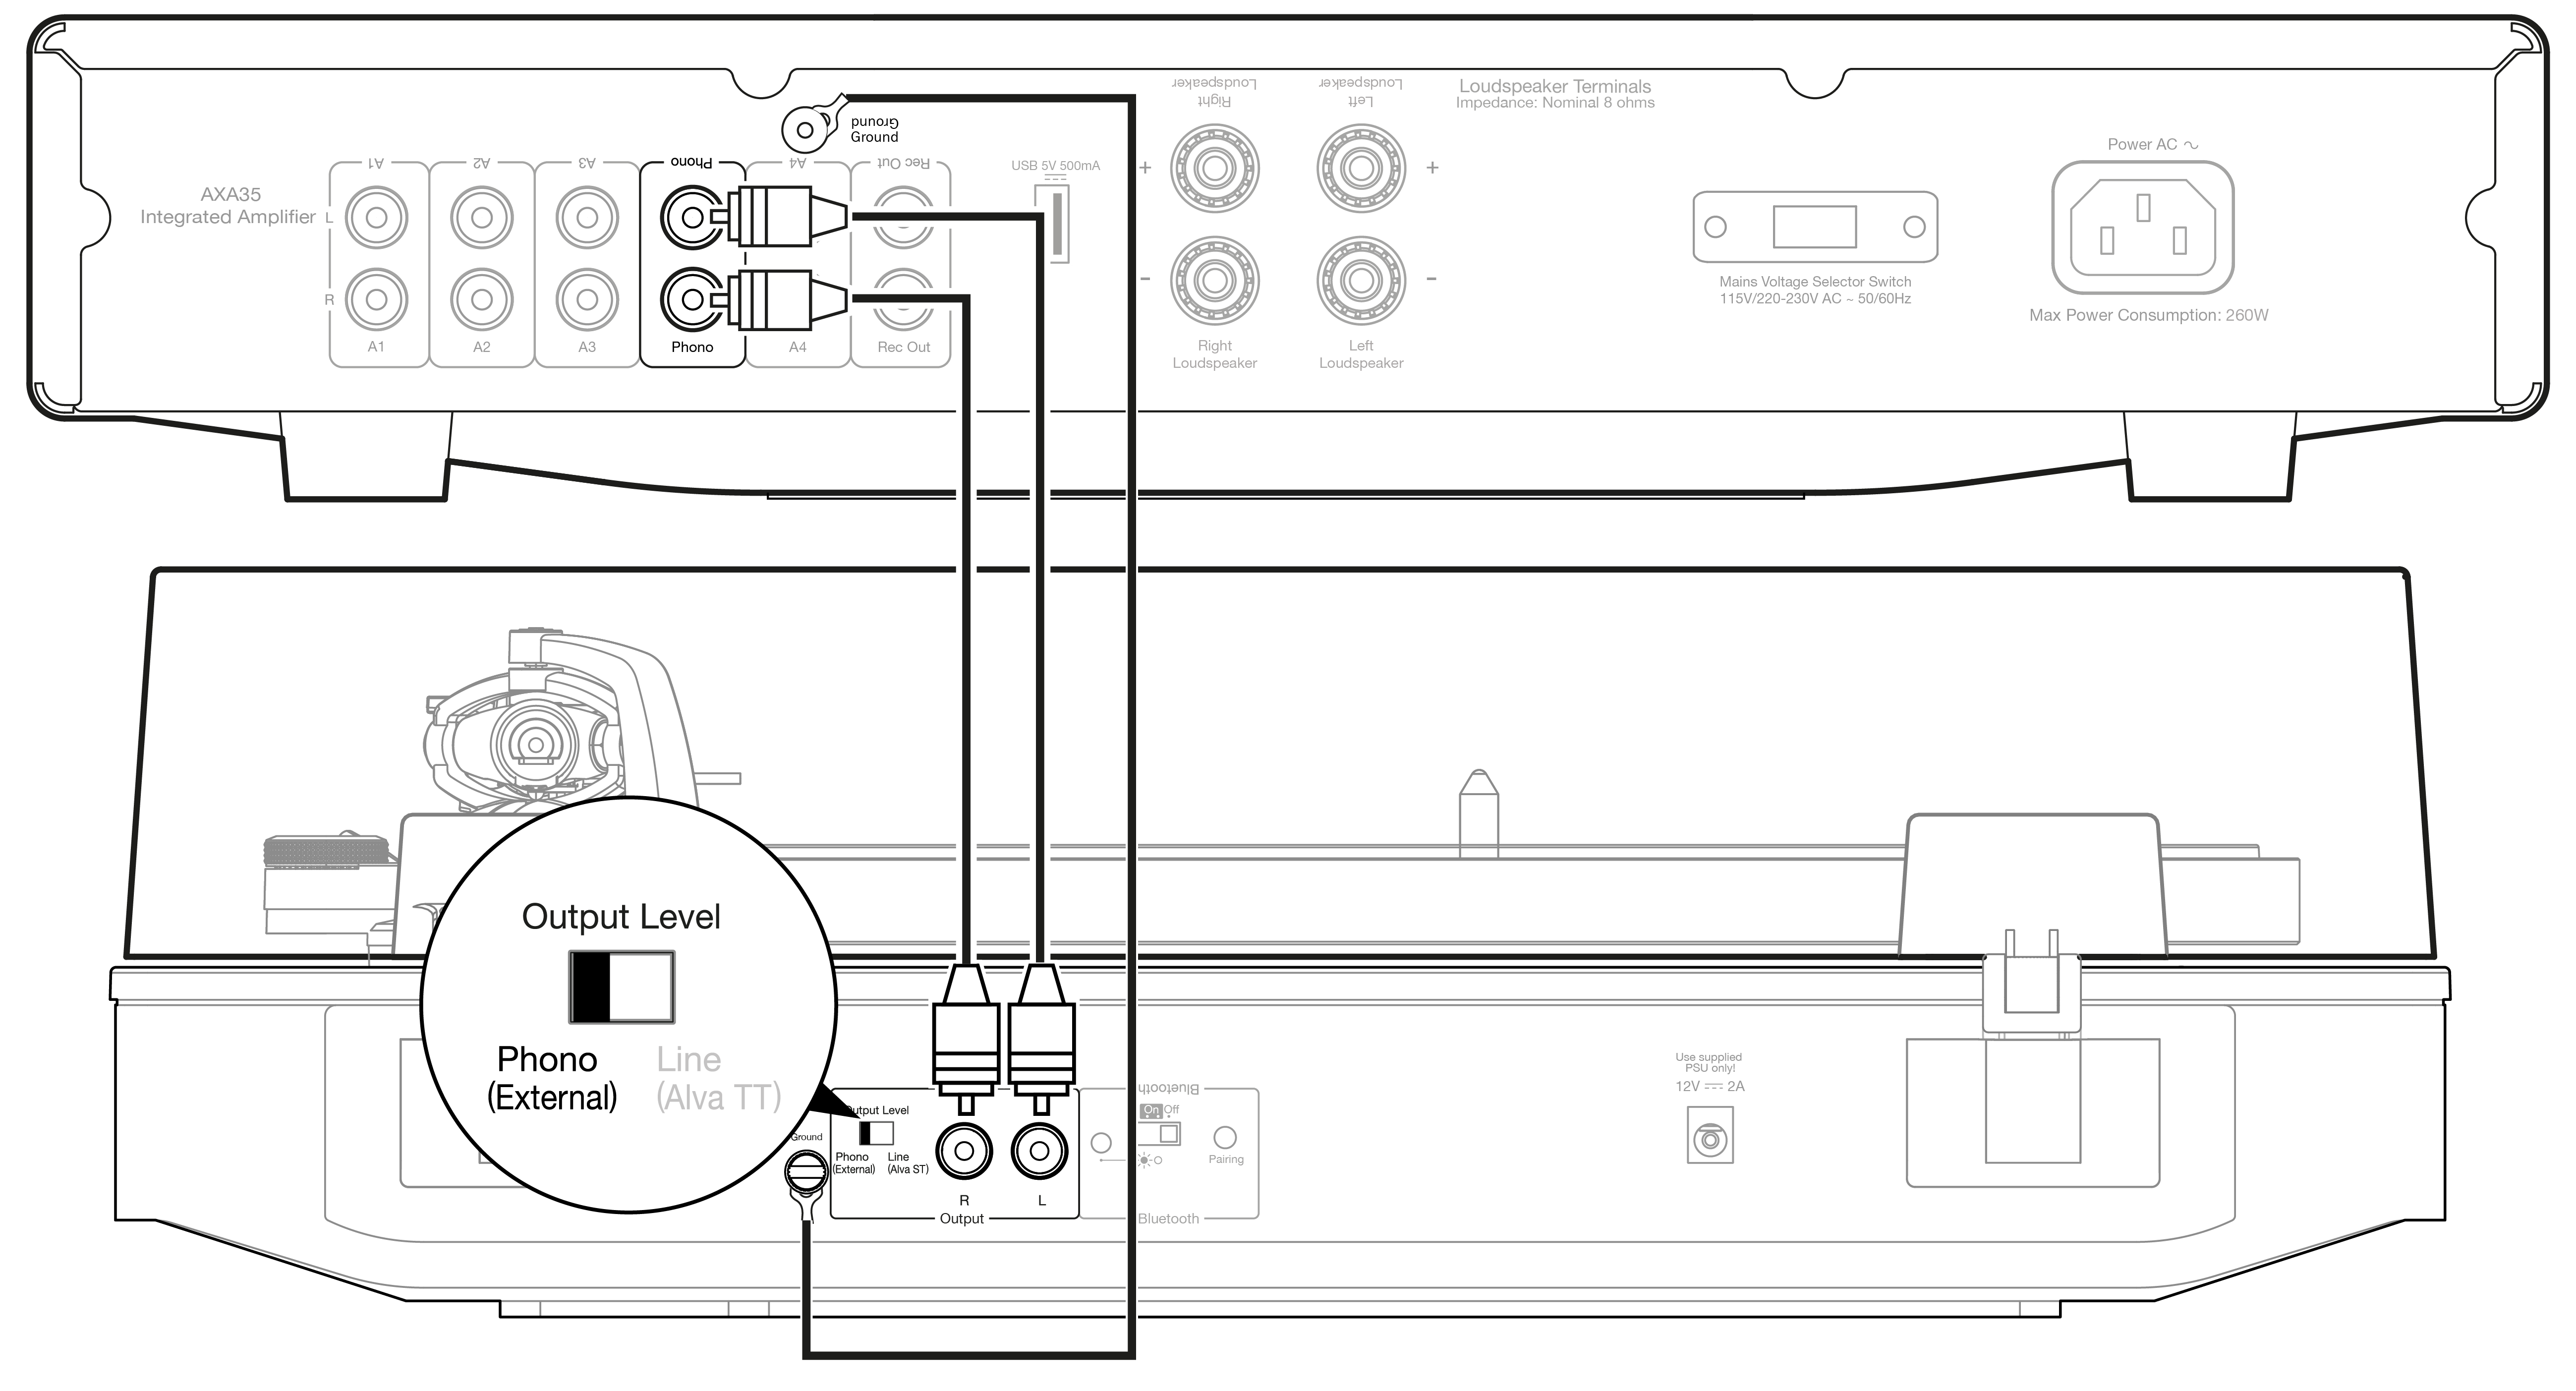
下図は、AXA35 とターンテーブルを Phono 入力経由で接続した基本的な接続例です。
The diagram below shows the basic connection of the AXA35 to a turntable via the Phono input.
本機にはフォノプリアンプ(フォノステージ)を内蔵しています。お使いのターンテーブルにフォノステージが内蔵されていない場合は、本機背面の「Phono」と表示された入力にレコードプレーヤーを接続してください。
This unit has a built-in Phono preamplifier (Phono Stage), so if your turntable does not possess its own Phono Stage, you may connect the record player to the input on the rear of the unit marked 'Phono'.
ターンテーブルにフォノステージが内蔵されている場合、または外付けのフォノステージを使用している場合は、他のアナログ入力に接続してください。「Phono」入力に接続すると、歪みが発生することがあります。
If your turntable does have a built-in Phono stage or you are using an external version, you should connect to any of the other analogue inputs, as the 'Phono' input may produce an unwanted distortion.
注:フォノ以外のソースを Phono 入力に接続しないでください。
Note: Do not connect a non-phono source to the phono input.
操作方法
本機への接続が完了したら、フロントパネルの電源ボタンを押して AXA35 を起動してください。
After making any connections to your unit, activate the AXA35 by pressing the Power button on the front of the unit.
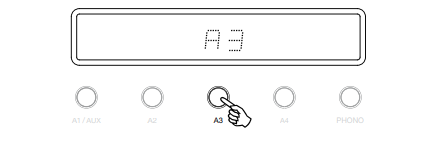
ソースの選択。
フロントパネルにある、選択したいソースに対応する Source ボタンを押してください。リモコンの該当ボタンを使用することもできます。
Press the Source button on the front of the unit corresponding to your desired source. Alternatively, you may use the appropriate button on the remote control.
音量の調整。
音量を変更するには、リモコンの Volume Up/Down ボタン、または本機フロントパネルの Volume ノブを使用してください。設定した音量レベルはフロントディスプレイに短く表示されます。
Use either the Volume Up/Down buttons on the remote control, or the Volume control on the front of your unit system to change the volume level. The newly selected level will be indicated briefly on the front display.
音量はマイナス dB で表示され、0dB が最大レベルです。
The volume is displayed in minus dB where 0dB is the highest level.
マイナスの数値が大きくなるほど、音量が小さくなります。
A progressively larger negative number indicates the volume is being reduced.

オーディオ設定の調整。
低音、高音、バランスの調整は次の手順で行います。
Adjustments to the bass, treble and balance can be made as follows:
1. オーディオメニューに入ります。本機フロントパネルまたはリモコンの Menu ボタンを押してください。
1. To enter the audio menu. Press either the Menu button on the front of the unit or on the remote control.
2. Menu ボタンを押すたびに、設定項目が切り替わります。設定項目は順に、低音、高音、バランスです。
2. Step through the available settings by pressing the Menu button. The settings available are in order Bass, Treble and Balance.
3. 低音、高音、バランスを調整する際は、Volume ノブを回すか、リモコンの音量ボタンを使用してください。
3. When you wish to make an adjustment for bass, treble or balance, simply rotate the Volume control or use the Volume control buttons on the remote control.
4. 終了するには、本機が通常モードに戻るまで 5 秒間お待ちください。
4. To exit, wait for five seconds until the unit returns to normal mode.
技術仕様
出力 35 ワット(8Ω 負荷時)
Power Output 35 watts (into 8Ω)
全高調波歪率(THD)(非加重) <0.01% @ 1kHz、定格出力の80%
THD (unweighted) <0.01% @ 1kHz, 80% of rated power
周波数特性(-3dB)5Hz〜50kHz
Frequency response (-3dB)5Hz - 50kHz
SN 比(1W 基準)82dB 超(無加重)/(最大出力基準)93dB 超(A 加重)
S/N ratio (ref 1W) >82db (unweighted)(ref full power) >93dB (A-weighted)
入力インピーダンス 47k オーム
Input impedances 47k ohms
パワーアンプ ダンピングファクター 50 超
Power Amp damping factor >50
最大消費電力 260W
Max. power consumption 260W
低音/高音コントロール シェルビング型、最大ブースト/カット ±10dB(100Hz および 10kHz)
Bass/Treble controls Shelving, ultimate boost/cut +/- 10dB @ 100Hz and 10kHz
スタンバイ消費電力 0.5W 未満
Standby power consumption <0.5W
入力 RCA × 4、Phono × 1、3.5mm Aux 入力 × 1(フロントパネル)
Inputs 4x RCA, 1x Phono, 1 x 3.5mm Aux input (front panel)
出力 スピーカー、Rec Out、USB 5V 電源
Outputs Speakers, Rec Out, USB 5V power
外形寸法(H × W × D)83 × 430 × 335mm(3.3 × 16.9 × 13.2 インチ)
Dimensions (HxWxD) 83 x 430 x 335mm (3.3 x 16.9 x 13.2”)
質量 5.6kg(12.3 ポンド)
Weight 5.6kg (12.3lbs)
トラブルシューティング
電源が入らない場合。• AC 電源コードがしっかり接続されているか確認してください。• 電源プラグがコンセントに完全に差し込まれ、スイッチが入っているか確認してください。• 電源プラグまたはアダプターのヒューズを確認してください。• 本機フロントパネルの電源ボタンがオンになっているか確認してください。
There is no power. • Ensure the AC power cord is connected securely. • Ensure the plug is fully inserted into the wall socket and is switched on. • Check fuse in the mains plug or adaptor. • Check the power button is on at the front of the unit.
音が出ない場合。• アンプのフロントパネルで正しい入力が選択されているか確認してください。• スピーカーが正しく接続されているか確認してください。• 本機がミュート状態になっていないか確認してください。
There is no sound. • Check the correct input is selected on the front panel of the amplifier. • Check that the speakers are connected correctly. • Check that the unit is not in mute mode.
音が歪む場合。• スピーカーの接続を確認してください。• フォノ以外のソースを Phono 入力に接続していないことを確認してください。
The sound is distorted. • Check speaker connections. • Ensure that any non-phono source is NOT connected to the phono input.
スピーカーからハム音が聞こえる場合。• すべてのケーブル接続が確実か確認してください。特にターンテーブルのグランド/シールド接続を確認してください。
There is a hum coming from the speaker. • Ensure that all cable connections are secure, particularly ground/shield connections for turntables.
不要なバックグラウンドノイズや干渉がある場合。• 干渉源となり得る他の電気機器から本機を離して設置してください。• すべてのケーブル接続が確実か確認してください。特にターンテーブルのグランド/シールド接続を確認してください。• USB ポートで機器を充電しながら、同じ機器をオーディオソースとして使用していないか確認してください。
There is unwanted background noise and interference. • Move the unit away from other electrical equipment that is likely to cause interference. • Ensure that all cable connections are secure, particularly ground/shield connections for turntables. • Ensure that you are not charging a device via the USB port and using it as an audio source at the same time.
リモコンが動作しない場合。• 電池の向きが正しく、寿命が切れていないか確認してください。• リモコンの受光部を遮るものがないか確認してください。
The remote handset will not function. • Check that the batteries are the correct way around and have not expired. • Ensure that nothing is blocking the remote sensor.
よくある質問(FAQ)
AXA35 の USB 接続から音が出ないのはなぜですか?
AXA35 背面の USB 入力はオーディオ入力としては設計されていません。機器の充電や、ストリーミングデバイスなどへの電源供給専用です。
The USB input on the rear of the AXA35 is not designed as an audio input. This is purely for charging devices and maintaining power to components such as a Streaming device.
Bluetooth 機能を有効にするため、AXA35 の USB ポートに Bluetooth アダプターを挿入できますか?
AXA35 背面の USB ポートは、スマートフォンなどの機器を充電する目的でのみ設計されています。そのため、このポートに Bluetooth アダプターを挿入して AXA35 で Bluetooth 機能を利用することはできません。
The USB port on the rear of the AXA35 is only designed for charging a device, such as a smart phone. It is, therefore, not possible to insert a Bluetooth adaptor in to this port to enable Bluetooth functionality with the AXA35.
AXA35 で 4 オームまたは 6 オームのスピーカーを使用できますか?
AXA35 は 8 オームスピーカーでの使用のみを想定しており、4 オームまたは 6 オームのスピーカーでの使用は推奨いたしません。
The AXA35 is only rated to be used with 8 Ohm speakers and we would not recommend using it with 4 or 6 Ohm speakers.
AXA35 を 4 オームまたは 6 オームのスピーカーと組み合わせて使用すると、アンプが過熱し、長期的には本機が故障するおそれがあります。
Using the AXA35 with 4 or 6 Ohm speakers could result in the amplifier overheating, which in the long run could damage the unit.