取扱説明書
EXN100
はじめに
本ガイドは、本製品の設置と使用を可能な限り簡単に行えるよう作成されています。本書の情報は発行時点で正確性を十分に確認しています。ただし、Cambridge Audio は継続的な改良を方針としており、デザインおよび仕様は予告なく変更される場合があります。
This guide is designed to make installing and using this product as easy as possible. Information in this document has been carefully checked for accuracy at the time of publishing; however, Cambridge Audio’s policy is one of continuous improvement, therefore design and specifications are subject to change without prior notice.
本書には著作権で保護された専有情報が含まれます。すべての権利は留保されています。本書のいかなる部分も、製造元の書面による事前の許可なしに、機械的・電子的その他の方法や形式で複製することは禁じられています。すべての商標および登録商標は、それぞれの所有者に帰属します。
This document contains proprietary information protected by copyright. All rights are reserved. No part of this manual may be reproduced by any mechanical, electronic or other means, in any form, without prior written permission of the manufacturer. All trademarks and registered trademarks are the property of their respective owners.
Bluetooth® のワードマークおよびロゴは、Bluetooth SIG, Inc. が所有する登録商標です。Audio Partnership Plc はライセンスに基づいてこれらのマークを使用しています。その他の商標および商号は、それぞれの所有者に帰属します。
The Bluetooth® word mark and logos are registered trademarks owned by the Bluetooth SIG, Inc. and any use of such marks by Audio Partnership Plc is under license. Other trademarks and trade names are those of their respective owners.
Qualcomm は Qualcomm Incorporated の商標であり、米国およびその他の国で登録されています。aptX は Qualcomm Technologies International, Ltd. の商標であり、米国およびその他の国で登録されています。
Qualcomm is a trademark of Qualcomm Incorporated, registered in the United States and other countries. aptX is a trademark of Qualcomm Technologies International, Ltd., registered in the United States and other countries.
Qualcomm aptX は Qualcomm Technologies, Inc. およびその子会社の製品です。
Qualcomm aptX is a product of Qualcomm Technologies, Inc. and/or its subsidiaries.
StreamMagic は Audio Partnership Plc の商標であり、欧州共同体およびその他の国で登録されています。
StreamMagic is a trademark of Audio Partnership Plc and is registered in the European Community and other countries.
本製品には、GNU Public License バージョン 2 および GNU Lesser Public License バージョン 2.1 の下でライセンスされたソフトウェアが含まれます。当該ソフトウェアのソースコードは次の URL から入手できます: https://gpl.stream-magic.com/
This product contains software licensed under version 2 of the GNU Public License and version 2.1 of the GNU Lesser Public License. The source code for this software is available from: https://gpl.stream-magic.com/
本製品には、Microsoft Corporation が所有し、Microsoft Licensing GP からのライセンスに基づく技術が含まれます。本製品以外での当該技術の使用または配布は、Microsoft Corporation および/または Microsoft Licensing, GP からのライセンスなしには禁止されています。
This product includes technology owned by Microsoft Corporation and under a licence from Microsoft Licensing GP. Use or distribution of such technology outside of this product is prohibited without a license from Microsoft Corporation and/or Microsoft Licensing, GP as applicable.
Spotify ソフトウェアは、次のサードパーティライセンスの対象です: https://www.spotify.com/connect/third-party-licenses
The Spotify Software is subject to third party licenses found here: https://www.spotify.com/connect/third-party-licenses
EXN100 で AirPlay を使用するには、最新バージョンの iOS、iPadOS、または macOS を推奨します。
To use AirPlay with EXN100, the latest version of iOS, iPadOS, or macOS is recommended.
Apple、AirPlay、Apple Home、Apple TV、Apple Watch、HomeKit、HomePod、HomePod mini、iPad、iPad Air、iPhone、tvOS は、米国およびその他の国・地域で登録された Apple Inc. の商標です。
Apple, AirPlay, Apple Home, Apple TV, Apple Watch, HomeKit, HomePod, HomePod mini, iPad, iPad Air, iPhone, and tvOS are trademarks of Apple Inc., registered in the U.S. and other countries and regions.
Works with Apple AirPlay バッジの使用は、そのアクセサリーがバッジに示された技術と連携するよう専用に設計されていることを意味します。また、Apple のパフォーマンス基準を満たすことが開発者により認証されています。
Use of the Works with Apple AirPlay badge means that an accessory has been designed to work specifically with the technology identified in the badge and has been certified by the developer to meet Apple performance standards.
Android、Google Play、Chromecast built-in は、Google LLC の商標です。
Android, Google Play and the Chromecast built-in are trademarks of Google LLC.
TIDAL および TIDAL ロゴは、欧州連合およびその他の国における Aspiro AB の登録商標です。
TIDAL and TIDAL logo are registered trademarks of Aspiro AB in the European Union and other countries.
MQA および Sound Wave Device は、MQA Limited © 2016 の登録商標です。
MQA and the Sound Wave Device are registered trademarks of MQA Limited © 2016.
© Copyright Cambridge Audio Ltd
© Copyright Cambridge Audio Ltd
このマニュアル内の画像の一部は、元の PDF から自動生成されたものです。自動処理の都合上、製品の細部や配線図などが実際と異なる場合があります。正確な形状・寸法・配線は、実機および製品ページの写真、同梱の正規マニュアル(英語版)をあわせてご確認ください。
EXN100 の同梱品
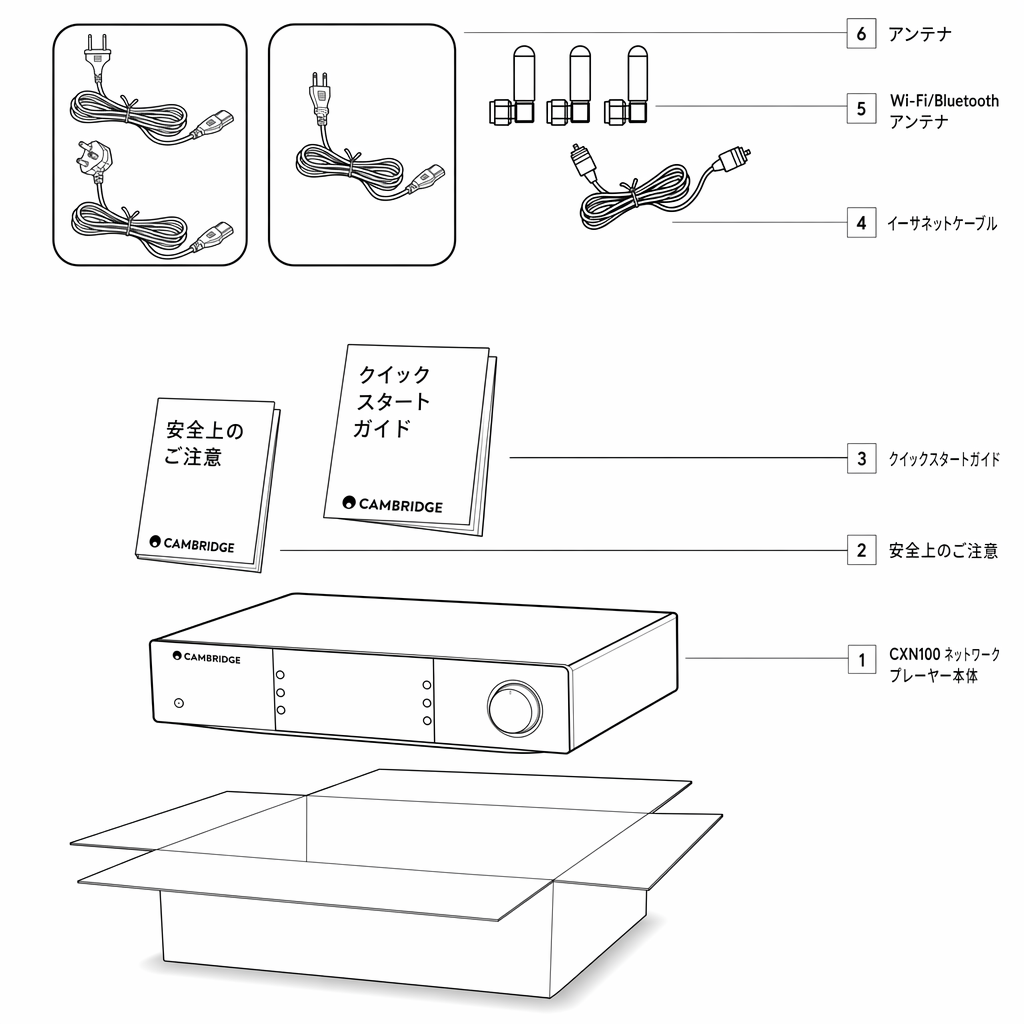
EXN100 の箱の中には、次のものが同梱されています。
Inside the box of your EXN100 you will receive:
- EXN100 ネットワークプレーヤー
- 安全ガイド
- クイックスタートガイド
- コントロールバスケーブル
- Wi-Fi/Bluetooth アンテナ×3(本体に取り付け済み)
- 地域別電源ケーブル
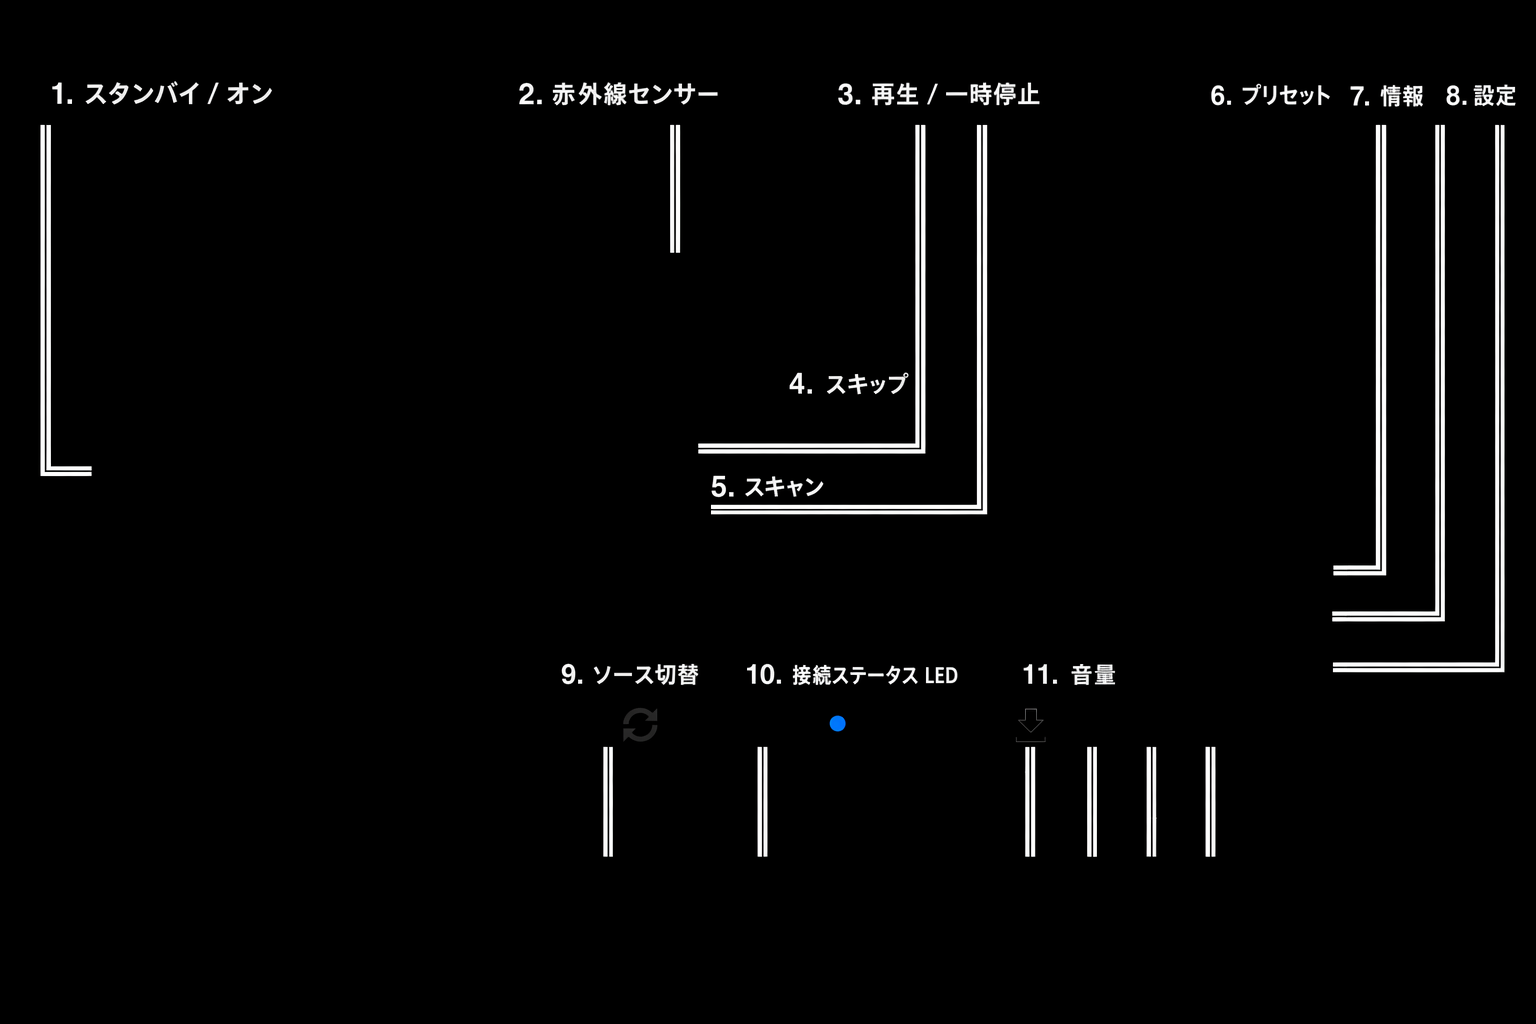
フロントパネルの操作部

1. スタンバイ/オン
1. Standby/On
本体をスタンバイモード(電源 LED が暗く点灯)とオン(電源 LED が明るく点灯)の間で切り替えます。
Switches the unit between Standby Mode (indicated by dim power LED) and On (indicated by bright power LED).
2. スキップ
2. Skip
再生中に次のトラックへスキップします。
Skip to next track during playback.
3. 再生/一時停止
3. Play/Pause
現在のトラックを再生または一時停止します。
Play or pause current track.
4. ディスプレイ
4. Display
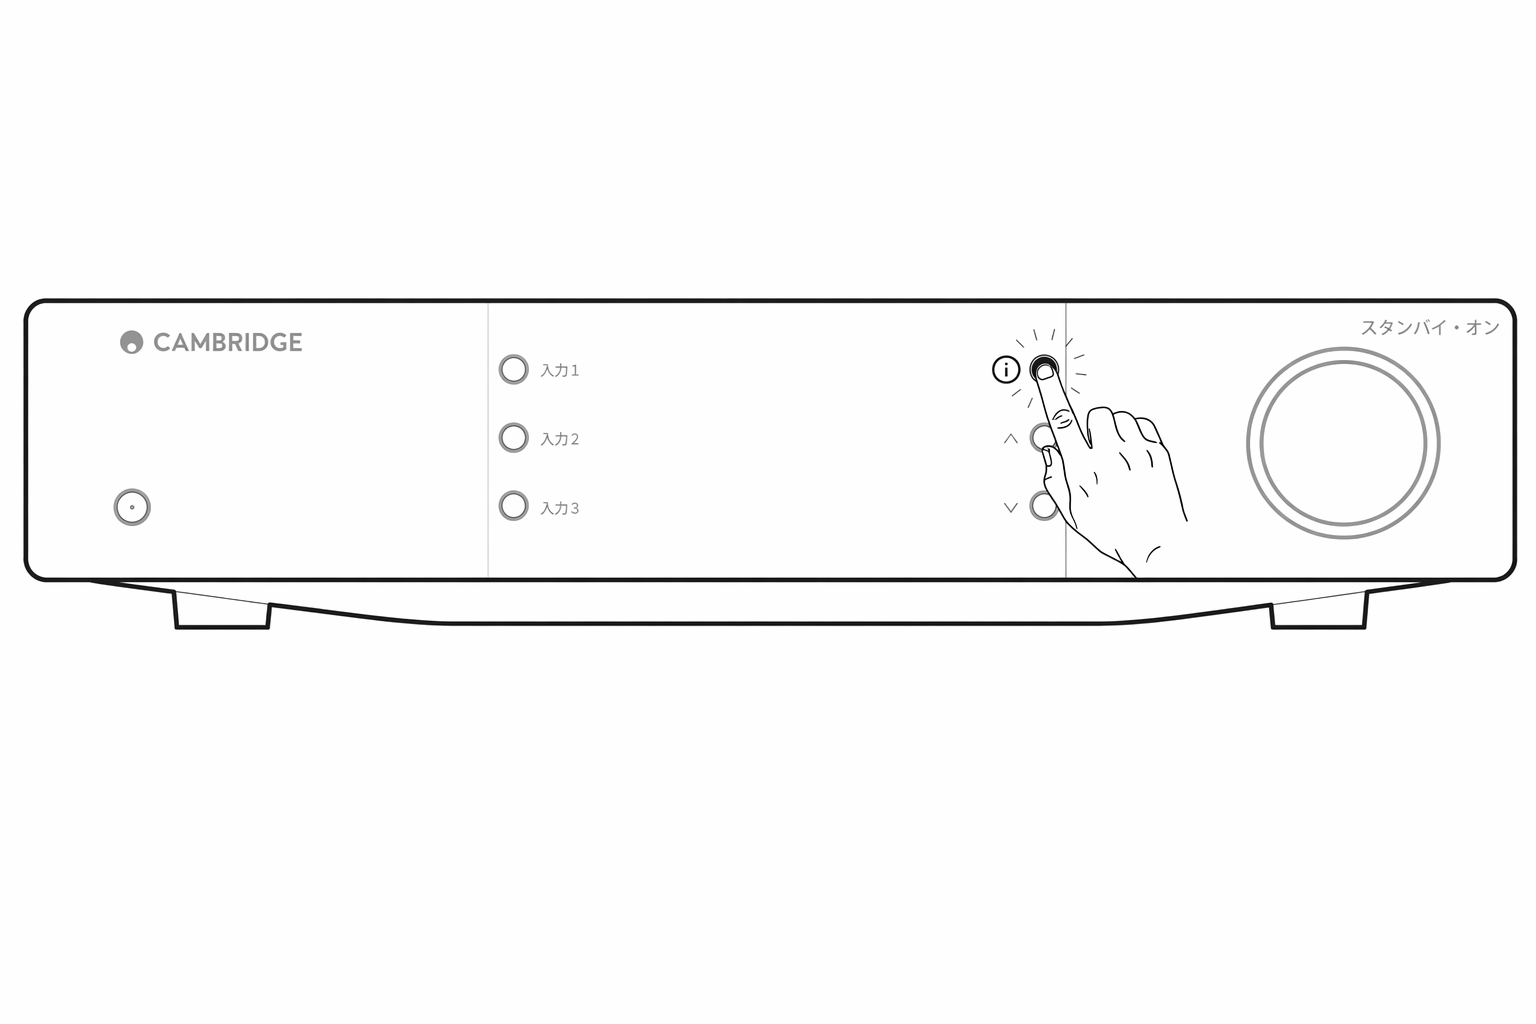
5. Info
5. Info
再生中にこのボタンを押すと、さまざまな「Now Playing」画面を順に切り替えます。長押しすると、製品情報に加えて、ファームウェアアップデート、ネットワークセットアップモード、工場出荷時リセットのオプションを表示します。「Now Playing」画面はソースごとに個別に保存されます。
During playback, pressing this button will cycle through the different ‘Now Playing’ screens. Press and hold to display the product info, as well as options for updating the firmware, network setup mode and factory reset. Different “Now Playing” screens are saved for each source.
6. 赤外線センサー
6. Infrared sensor
対応する EX シリーズ 2 リモコンからの IR コマンドを受信する IR センサーです。
IR sensor that receives IR commands from the compatible EX series 2 remote control.
注記: EXN100 には専用リモコンは付属していません。
Note: The EXN100 does not have its own remote control and does not come with one included.
7. ソースセレクター
7. Source Selector
StreamMagic アプリで有効化したソースを順に切り替えます。
Scroll through sources enabled in the StreamMagic app.
8. ボリューム調整
8. Volume Control
プリアンプモードが有効な場合、アナログ出力の音量を調整します。
When Pre-amp mode is enabled, this will control volume via the analogue outputs.
リアパネルの接続
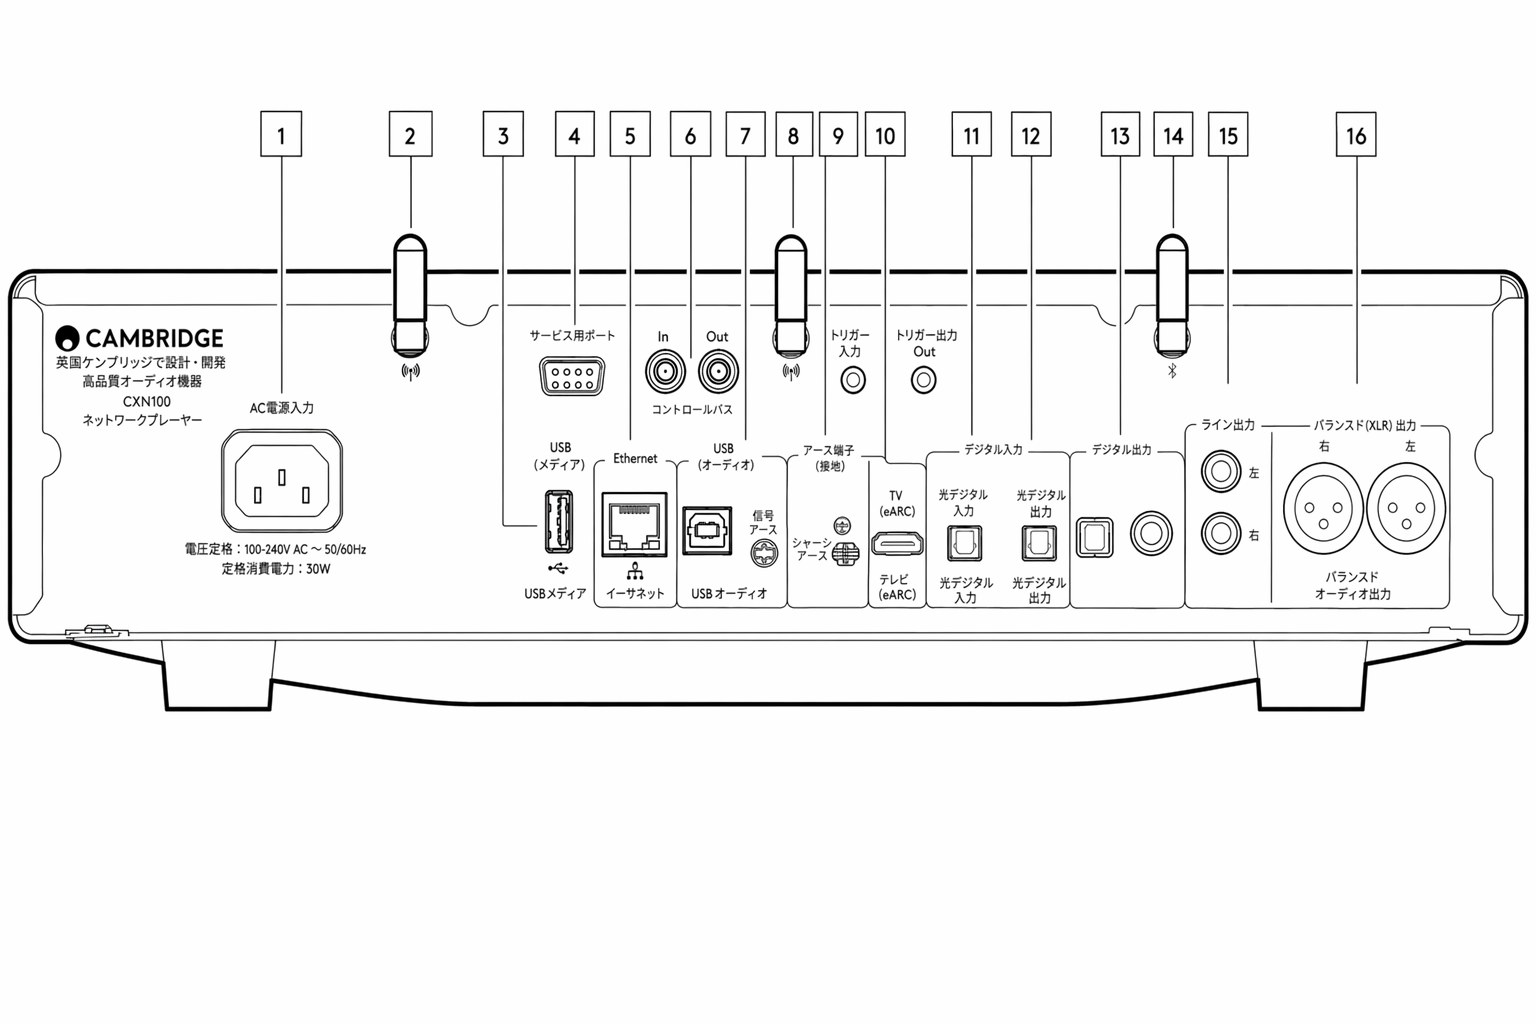
1. AC 電源ソケット
1. AC Power socket
アンプへの接続をすべて完了したら、AC 電源ケーブルを適切な電源コンセントに差し込み、電源をオンにします。
Once you have completed all connections to the amplifier, plug the AC power cable into an appropriate mains socket then switch on.
2. Wi-Fi アンテナ
2. Wi-Fi Antenna
使用前にアンテナが確実に接続されていることを確認してください。
Ensure antenna is connected securely before use.
3. USB メディア
3. USB Media
ローカルメディアストレージを接続するための端子です。USB ポートはモバイルデバイスの接続を想定していません。充電を含め、いかなる機能にも対応していません。
For connecting local media storage. Note that the USB ports are not intended for connection to mobile devices; no functionality, charging or otherwise is supported.
4. サービスポート
4. Service Port
サービス用途専用です。
For servicing use only.
注記: このポートに他のデバイスを接続すると、故障の原因となることがあります。
Note: Connecting any other device here may result in damage.
5. Ethernet
5. Ethernet
EXN100 をネットワークルーターに直接接続する際に使用します。352.8kHz、384kHz、DSD 256 のハイレゾ音源をシームレスに再生するには、有線接続を推奨します。
Use to connect the EXN100 directly to a network router. Use a wired connection for seamless playback of high-resolution 352.8kHz, 384kHz, and DSD 256.
6. コントロールバス
6. Control Bus
接続された他の EX シリーズ製品との間で、電源および音量コマンドを送受信する RCA 端子です。コントロールバスの詳細は「コントロールバス」セクションを参照してください。
RCA sockets used to send and receive power and volume commands from other connected EX Series products. For more information on the Control Bus, see Control Bus section.
7. USB オーディオ入力
7. USB Audio In
PC、Mac、一部の Linux コンピューターを接続するための USB B タイプ端子です。
A USB B type socket to enable connection to PC, Mac and some Linux computers.
注記: Class 2 USB オーディオを使用する場合、Windows PC では接続前に Cambridge Audio 製 USB ドライバーのインストールが必要です。最新の USB ドライバーはこちらから入手できます。
Note: For Class 2 USB audio, Windows-based PCs require a Cambridge Audio USB driver to be installed before connection. You can find the latest USB driver here.
USB グラウンドスイッチ 注記: グラウンドスイッチは初期設定で「リフト」に設定されています。ハムノイズが発生する場合は、別の位置に切り替えてください。
USB Ground SwitchNote: The ground switch position should be set to lifted as default. Use another position if a humming noise occurs.
リフト ― 通常の初期位置。本体のオーディオグラウンドがシャーシアースから切り離されます。
Lifted – Normal/default position. The main unit audio ground is lifted from chassis earth.
シャーシアース ― USB オーディオのグラウンドが本体のオーディオグラウンドから切り離されます。本体のグラウンドもシャーシアースから切り離されます。一部の USB オーディオ環境で発生するハムやノイズを低減するのに有効です。
Chassis earthed – USB Audio ground is lifted from the main unit audio ground, which is also lifted from chassis earth. This may be useful to reduce hum and noise that can occur with some USB Audio setups.
8. Wi-Fi アンテナ
8. Wi-Fi Antenna
使用前にアンテナが確実に接続されていることを確認してください。
Ensure antenna is connected securely before use.
9. シグナルグラウンドスイッチ
9. Signal Ground Switch
リフト ― 通常の初期位置。本体のオーディオグラウンドがシャーシアースから切り離されます。
Lifted – Normal/default position. The main unit audio ground is lifted from chassis earth.
シャーシアース ― 本体のオーディオグラウンドがシャーシグラウンドに直接接続されます。一部の環境では、特定のテレビ、ターンテーブル、その他の機器を EXN100 に接続した際のハムやノイズを低減できます。
Chassis earthed – Main unit audio ground is connected directly to chassis ground. For some setups, this can reduce hum or noise when certain TVs, Turntables, and other equipment are connected to the EXN100 unit.
10. トリガー
10. Triggers
トリガー出力 ― EXN とトリガー入力を備えた製品の間にリンクワイヤーを接続します。EXN のオン/スタンバイ切り替え時に、両製品の電源状態を同期します。
Trigger Out - Use a link wire between the EXN and a product that has a trigger input. This will synchronise the power state of both products when powering the EXN on/standby.
トリガー/IR 入力
Trigger/IR In
トリガー入力 ― トリガー出力を備えた製品と EXN の間にリンクワイヤーを接続します。IR 入力 ― IR リピーターやカスタムインストールシステムから変調された IR コマンドを受信します。
Trigger In - Use a link wire between a product that has a trigger output and the EXN IR In – Receives modulated IR commands from an IR repeater or custom install systems.
11. Enhanced Audio Return Channel(eARC)
11. Enhanced Audio Return Channel (eARC)
eARC および ARC に対応するテレビから、HDMI 接続で音声を入力する端子です。
A connection from a TV that supports eARC and ARC via HDMI connection.
12. デジタル入力(同軸および光) TOSLINK および S/PDIF 同軸デジタル入力端子。
12. Digital Inputs (Coax and Optical)TOSLINK and S/P DIF coaxial digital inputs.
同軸 ― 高品質な 75 Ω デジタル RCA フォノインターコネクトケーブルを使用します(アナログオーディオ用フォノインターコネクトとは異なります)。この入力は 16〜24 ビット、最大 192kHz のコンテンツに対応します。
Coaxial – Use a high quality 75 ohm digital RCA Phono interconnect cable (This is different from an analogue audio phono interconnect). This input is suitable for 16-24 bit content up to 192kHz.
TOSLINK 光(オプティカル)― オーディオ用に設計された高品質な TOSLINK 光ファイバーインターコネクトケーブルを使用します。この入力は 16〜24 ビット、最大 96kHz のコンテンツに対応します(TOSLINK は 192kHz のサンプリングレートには推奨されません)。
TOSLINK Optical – Use a high quality TOSLINK fibre optic interconnect cable designed specifically for audio use. This input is suitable for 16-24 bit content up to 96kHz (TOSLINK is not recommended at 192kHz sampling rates).
注記: デジタル入力にテレビを接続している場合、StreamMagic アプリのソース設定で TV モードを有効化できます。このモードでは MQA デコードをバイパスし、オーディオ経路のリップシンク遅延を最小限に抑えます。一部のテレビで発生する音切れやグリッチの低減にも効果があります。
Note: If a digital input is connected to a TV, you can enable TV mode in the sources settings of the StreamMagic app. This mode minimises lip-sync delays on the audio path by bypassing MQA decoding and also reduces the chance of dropouts and glitches from some TVs.
13. デジタル出力
13. Digital Outputs
TOSLINK および S/PDIF 同軸デジタル出力端子。
TOSLINK and S/P DIF coaxial digital outputs.
14. Bluetooth アンテナ
14. Bluetooth Antenna
このアンテナが接続されていない場合、Bluetooth 機能は使用できません。
Bluetooth functionality won't be possible if this antenna is not connected.
15. ライン出力
15. Line Output
ライン出力(固定または可変)は、別のアンプや録音機器に信号を送るために使用します。
Line Output (fixed or variable) used to provide a signal to another amplifier or a recording device.
16. バランスオーディオ出力
16. Balanced Audio Output
バランス XLR 接続で使用します。バランス接続はより高品質な選択肢であり、対応する機器と組み合わせて使用すると、ケーブル上のノイズや干渉を抑制できます。
For use with balanced XLR connections. The balanced connection is the higher quality option and can reject noise and interference in the cable when used with other equipment that supports this function.
注記: XLR コネクターは次のように配線してください。ピン 1: グラウンド、ピン 2: ホット(正相)、ピン 3: コールド(逆相)。
Note: XLR connectors should be wired as follows: Pin 1: Ground, Pin 2: Hot (in-phase) and Pin 3: Cold (phase-inverted).
ディスプレイ
1. アルバム/ソースアートワーク アルバムアートワークを表示します。アートワークが利用できない場合は、ソース入力のアイコンを表示します。
1. Album/Source artworkDisplays the album artwork. Alternatively, if no artwork is available this will display the source input icon.
2. トラックタイトル、アーティスト、アルバム インターネットラジオの場合、ラジオ局名と現在の再生情報を表示します。
2. Track title, artist and albumFor Internet Radio, this will display the radio station name and the current playback.
3. フォーマット情報 ストリーミングのサンプリングレートを表示します。インターネットラジオの場合は、ラジオ局のストリーミングビットレートを表示します。
3. Format infoDisplays the streaming sample rate. For Internet Radio, this will display the bitrate the station is streaming.
4. ソース入力 現在選択中のソース入力を表示します。
4. Source inputDisplays the currently selected source input.
5. プログレスバー 利用可能な場合、再生中のトラック進行状況を表示します。
5. Progress barWhen available, this will display the current track progression during playback.
6. トラックタイム 利用可能な場合、再生中のトラック経過時間を表示します。
6. Track timeWhen available, this will display the elapsed track time during playback.
7. 時計
7. Clock
8. ネットワーク接続 現在のネットワーク接続状態を表示します。
8. Network connectionDisplays the current network connection.
| 無線ネットワーク接続 | 無線接続あり、インターネットアクセスなし | 有線ネットワーク接続 | 有線接続あり、インターネットアクセスなし | ネットワーク未接続 |
|---|
9. スピーカー出力 対応するネットワークストリーマーで、現在選択中のスピーカー出力を表示します。
9. Speaker outputDisplays the currently selected speaker output on relevant network streamers.
10. ミュート ネットワークストリーマーがミュート状態のときに表示します。
10. Mute volumeDisplays when the network streamer is muted.
11. ファームウェアアップデート 新しいファームウェアが利用可能になったことを示します。フロントパネルの「Info」ボタンを押すか、StreamMagic アプリを使用して、ネットワークストリーマーのファームウェアを更新してください。
11. Firmware updateThis indicates when new firmware is available. Press the 'Info' button on the front panel or use the StreamMagic app to update the network streamer's firmware.
12. MQA インジケーター 詳細は MQA セクションを参照してください。
12. MQA indicatorSee the MQA section for more details.
13. シャッフル、リピート、リピート +1
13. Shuffle, Repeat and Repeat +1
リモコン
注記: EXN100 にはリモコンは付属していません。EX シリーズのリモコンを使用した赤外線操作に対応します。また、StreamMagic アプリを使用すると、より詳細に EXN100 を操作できます。
Note: The EXN100 does not come with a remote control, it supports infrared control using the remote control of the EX series. In addition, EXN100 can also be controlled in more detail through the StreamMagic App
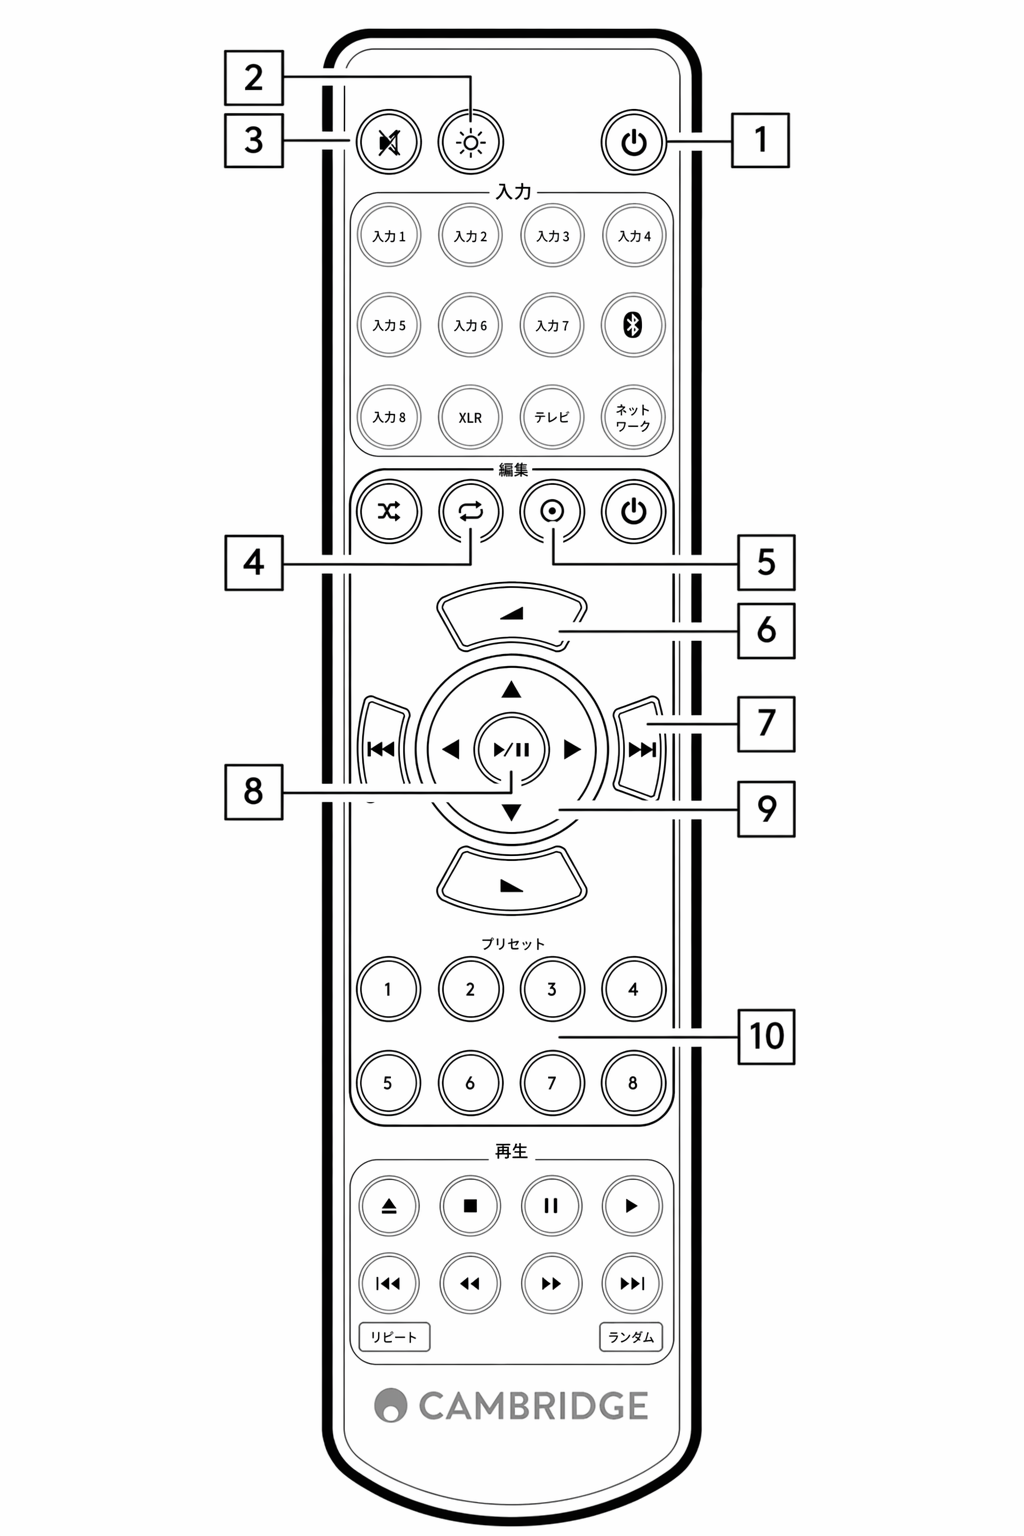
- スタンバイ/オン EXN100 をオンとスタンバイモードの間で切り替えます。
- ブライトネス EXN100 ディスプレイの明るさを変更します。明るさは 2 段階あり、バックライトをオフにするオプションもあります。注記: 明るさを「オフ」に設定した場合でも、いずれかの機能を選択すると、変更内容を示すためにライトが一時的に点灯します。
- ミュート 押すとオーディオをミュートまたはミュート解除します。プリアンプモードが有効な場合にのみ使用できます。
- ランダム キュー内のトラックをランダムに再生します。
- Info タップすると表示情報を切り替えます。長押しすると「Info」画面を表示します。
- ボリューム 音量レベルを調整します。アナログ出力で接続し、プリアンプモードが有効な場合にのみ使用できます。
- スキップ 前後のトラック間を移動します。
- 再生/一時停止 現在のトラックを再生または一時停止します。
- ソースセレクター StreamMagic アプリで有効化したソースを順に切り替えます。
- プリセット 保存済みの 1〜8 のプリセットを呼び出します。
リモコンが機能しない場合は、電池が切れていないこと、およびフロントパネルの IR センサーが遮られていないことを確認してください。
If the remote control will not function, please check that the batteries have not expired, and that there is nothing blocking the front panel IR sensor.
接続方法
基本的なアナログ接続
重要: 接続作業を行う前に電源をオフにしてください。EXN100 には 2 種類のアナログ接続オプションがあります。
Important Note: Switch the power off before making any connections. There are two analogue connection options for the EXN100.
ライン出力接続(RCA)
Line Output Connection (RCA)
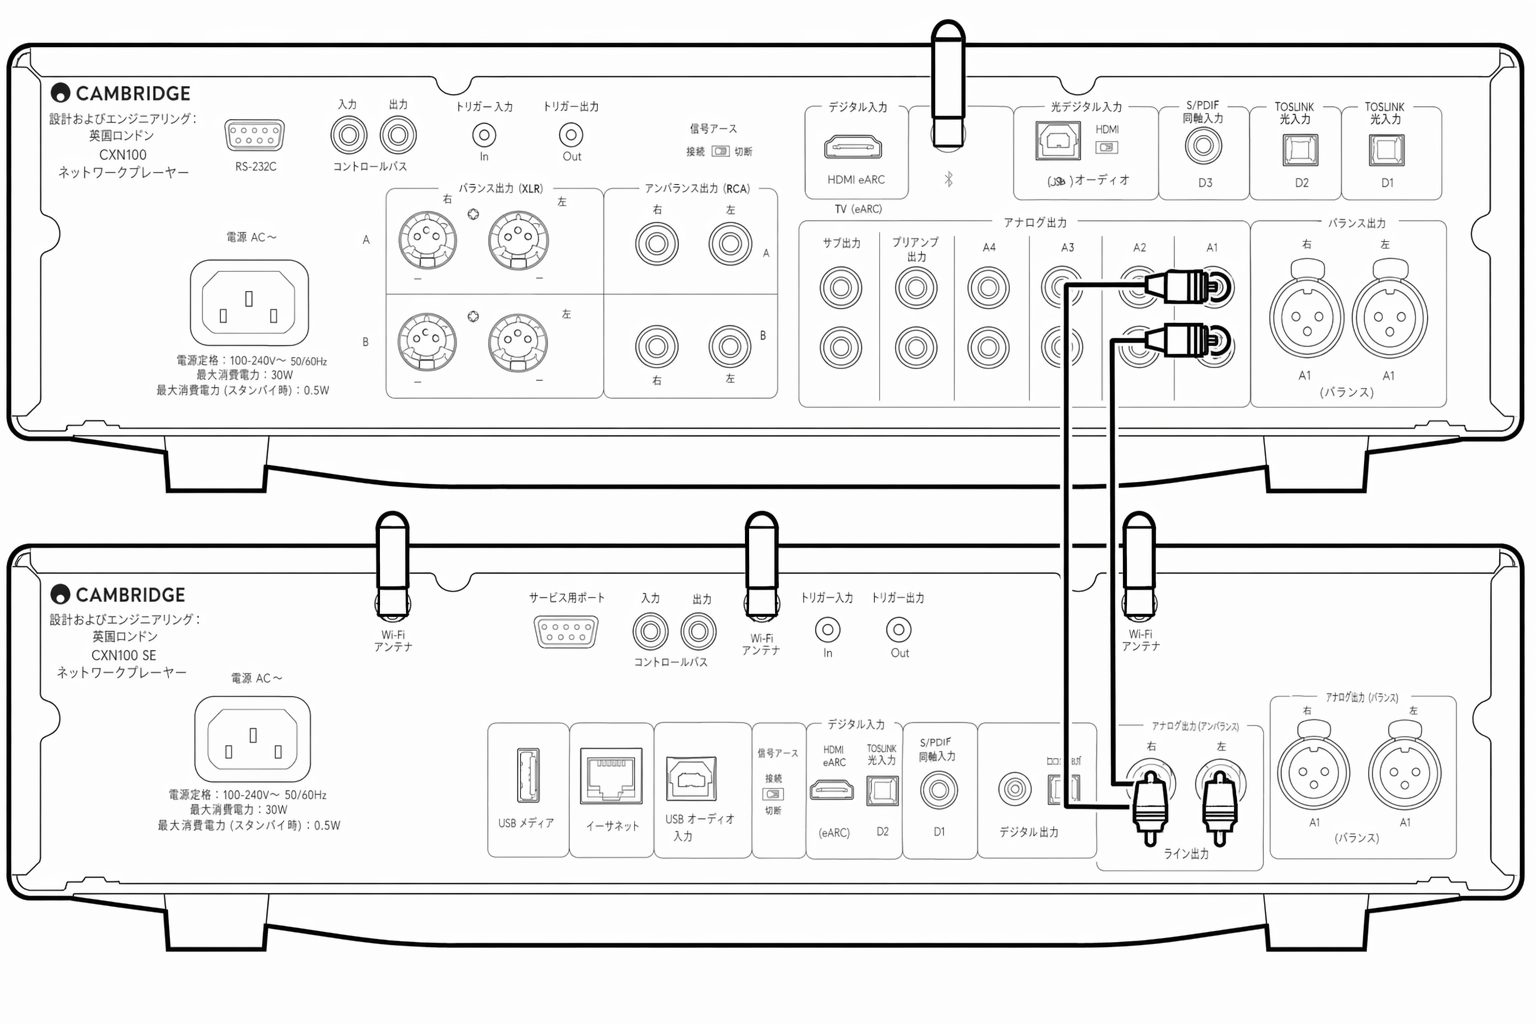
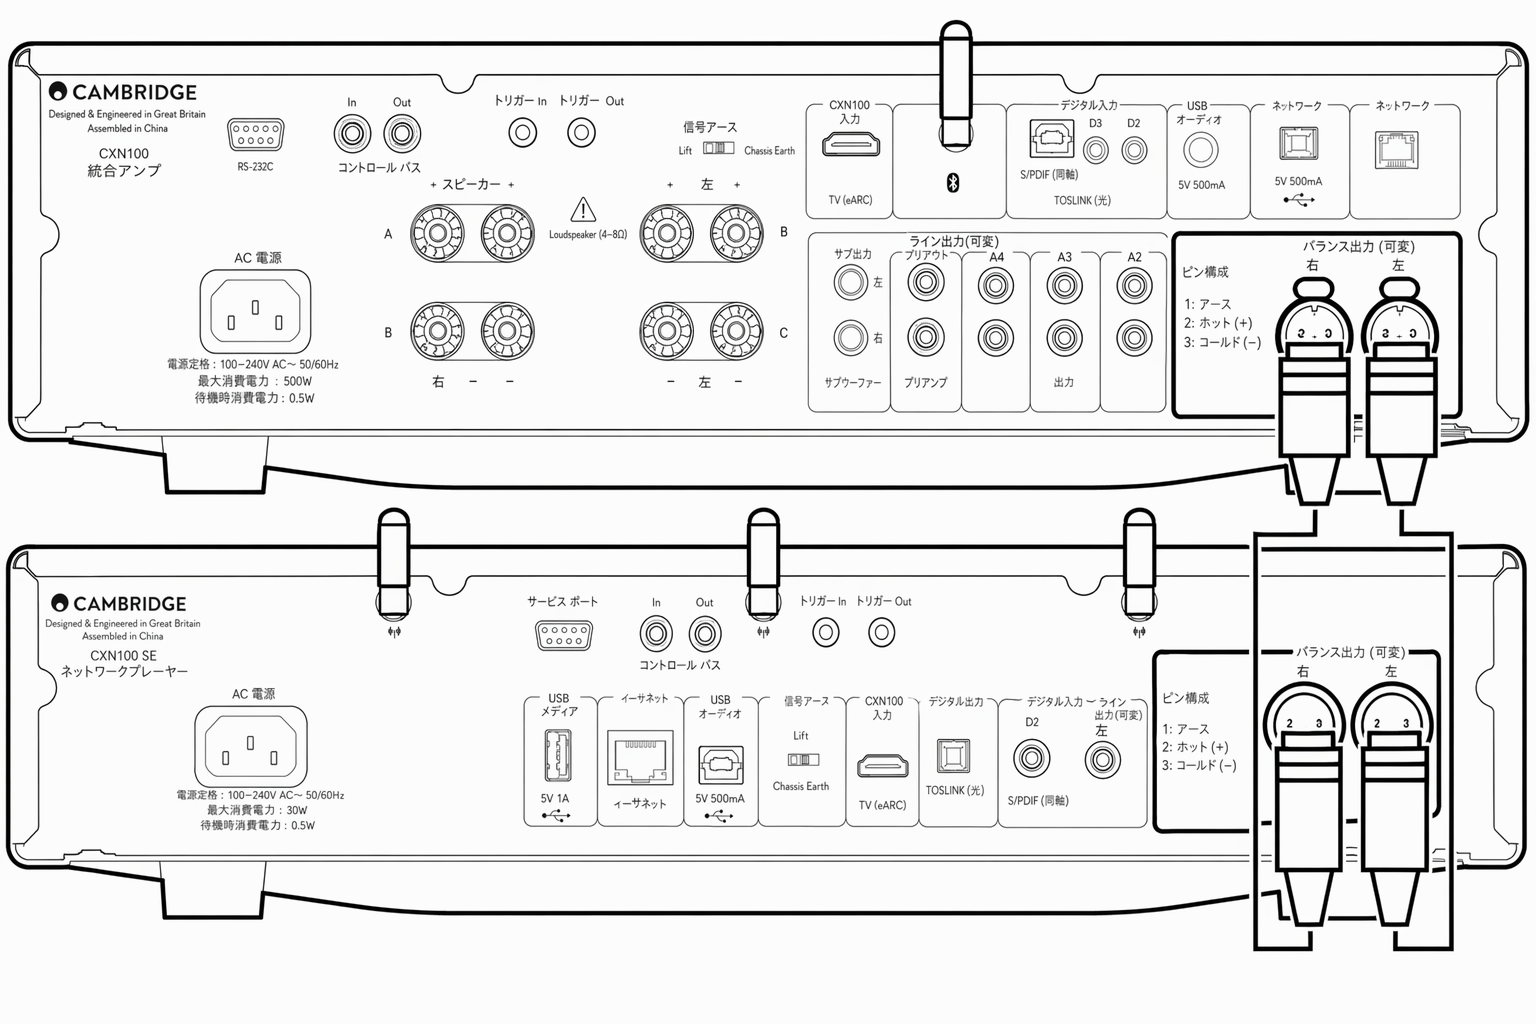
バランスオーディオ接続(XLR) バランス接続はより高品質な選択肢であり、対応する機器と組み合わせて使用すると、ケーブル上のノイズや干渉を抑制できます。注記: XLR コネクターは次のように配線してください。ピン 1: グラウンド、ピン 2: ホット(正相)、ピン 3: コールド(逆相)。
Balanced Audio Connection (XLR)The balanced connection is the higher quality option and can reject noise and interference in the cable when used with other equipment that supports this function.Note: XLR connectors should be wired as follows: Pin 1: Ground, Pin 2: Hot (in-phase) and Pin 3: Cold (phase-inverted).
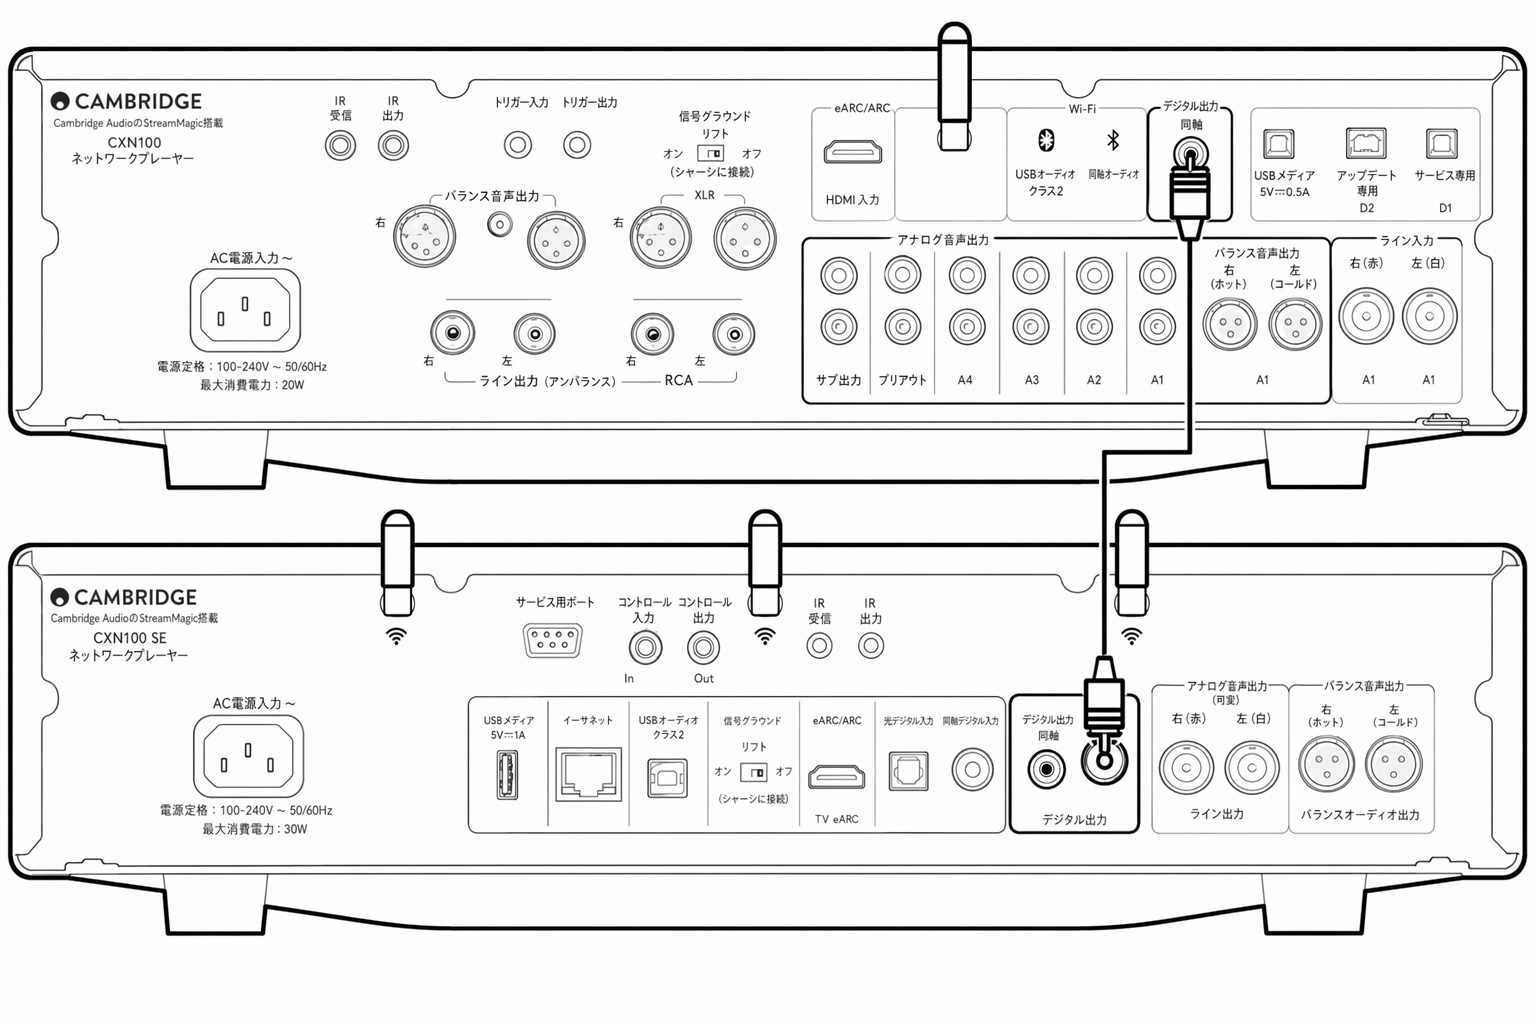
デジタル接続
EXN100 には 2 種類のデジタル接続オプションがあります。注記: EXN100 のデジタル出力を使用する場合、デジタル信号は EXN100 の D/A コンバーター(DAC)をバイパスし、デジタル出力に接続された機器(例: EXA)で処理されます。
There are two digital connection options for the EXN100.Note: If using either of the digital outputs of the EXN100, the digital signal will bypass the DAC in EXN100 and will instead be processed by the unit connected to the digital output, E.g., EXA
デジタル同軸出力 デジタル同軸接続は CD プレーヤーやアンプで一般的に使用されます。帯域幅が広いため、使用を推奨します。
Digital Coaxial OutputDigital Coaxial connections are commonly used with CD players and amplifiers and are recommended for use as they have a higher bandwidth.
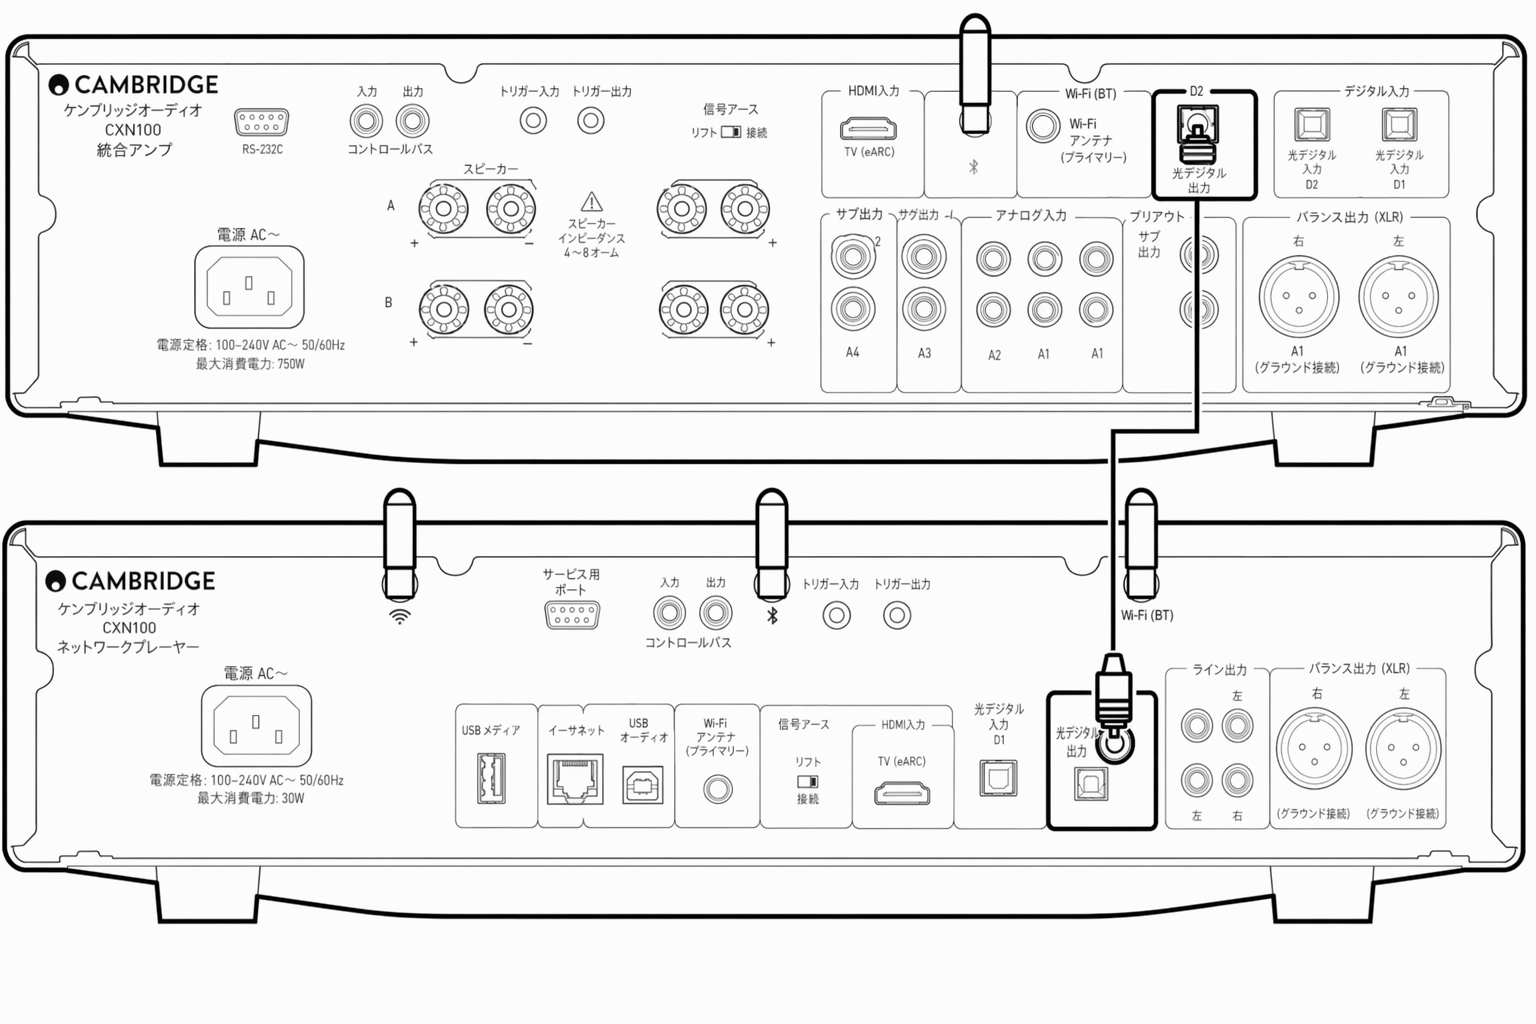
TOSLINK 光(オプティカル)出力 同軸ケーブルより帯域幅は狭いものの、TOSLINK 光接続はテレビ、DVD プレーヤー、A/V 機器でよく見られます。
TOSLINK Optical OutputWhilst having lower bandwidth than coaxial cables, TOSLINK Optical connections are commonly found on televisions, DVD players and A/V units.
コントロールバス
コントロールバスにより、他の EX シリーズ機器を操作できます。付属のコントロールバスケーブルで EXN100 を接続する際は、以下の図を参照してください。
The Control Bus lets you control your other EX series units. See the following diagrams when connecting the EXN100 using the provided Control Bus cable.
コントロールバスのもう一つの追加機能は、StreamMagicアプリの使用です。EXN100を介してStreamMagicアプリを使用し、他のEXシリーズ機器を制御できます。
Another added feature with Control Bus is the use of the StreamMagic app. You can use the StreamMagic app to control other EX series units via the EXN100.
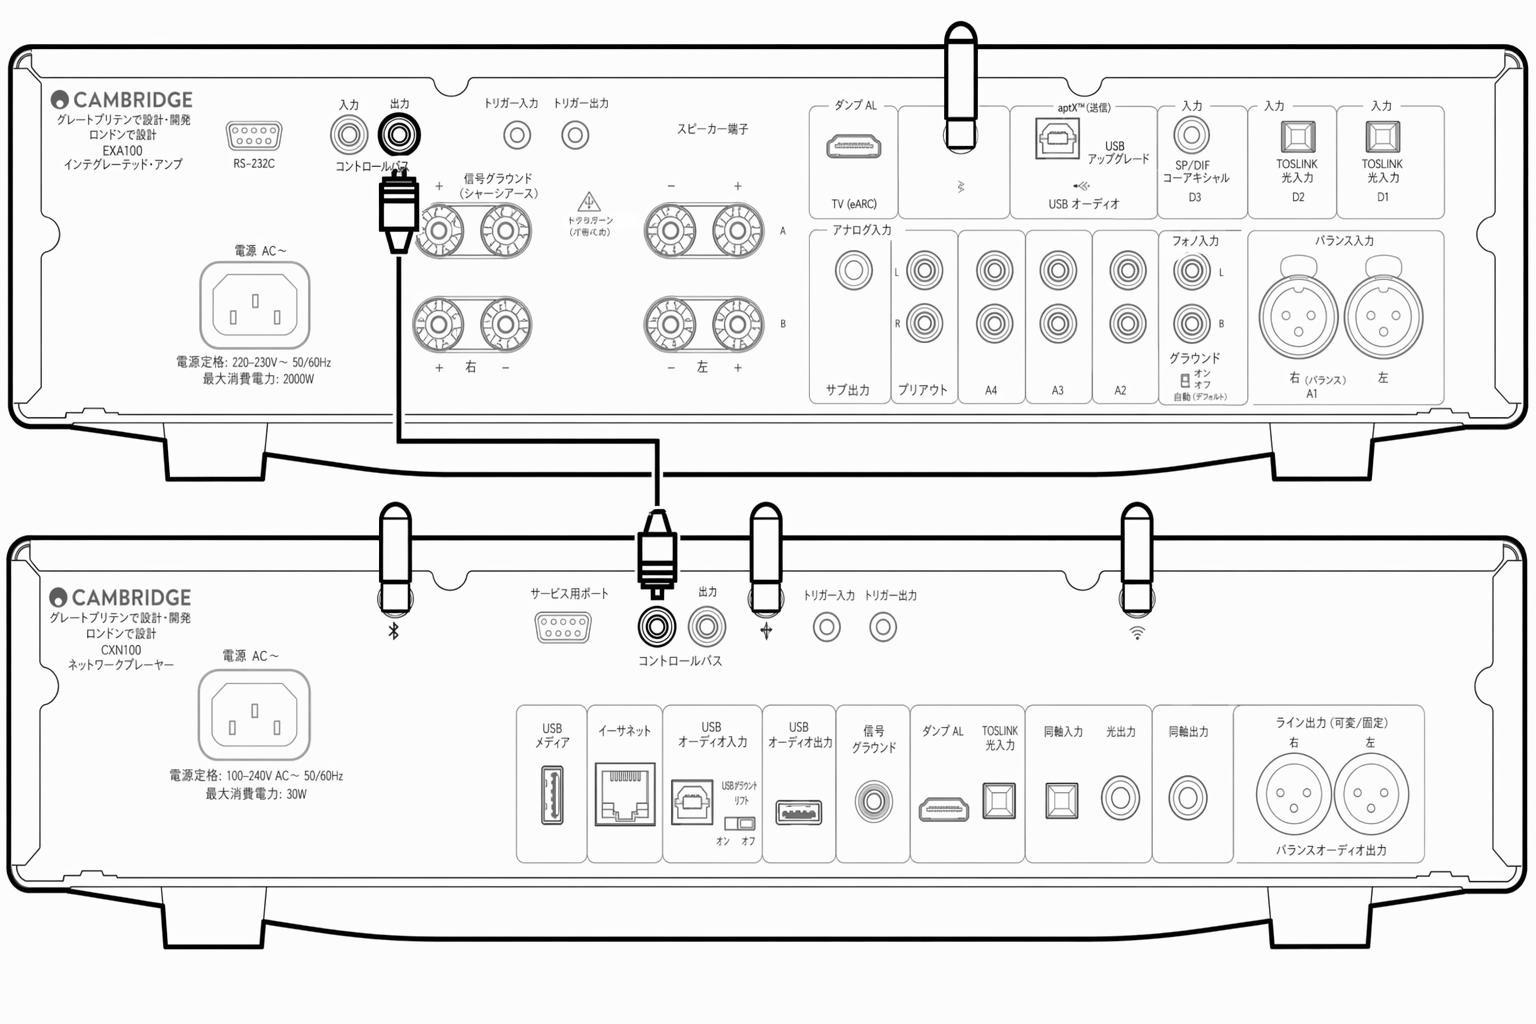
EXN100 と EXA(StreamMagic アプリ経由)
アプリで EXN100 をオン/オフすると、EXA も連動してオン/オフします。アプリからは EXA の音量も調整できます。EXN100 のコントロールバス出力を EXA のコントロールバス入力に接続してください。
When using the app to turn the EXN100 on/off, this will also turn the EXA on/off. The app can also be used to control the volume of the EXA. Connect the EXN100 Control Bus Out to EXA Control Bus In.
アプリから EXA の音量を調整する場合は、「プリアンプ」モードを無効にし、アプリのデバイス設定で「コントロールバス」を「アンプ」に設定してください。
If you wish to control the volume of your EXA via the app, ensure that the 'Pre-amp' mode is disabled and 'Control Bus' has been set to 'Amplifier' in the app device settings.
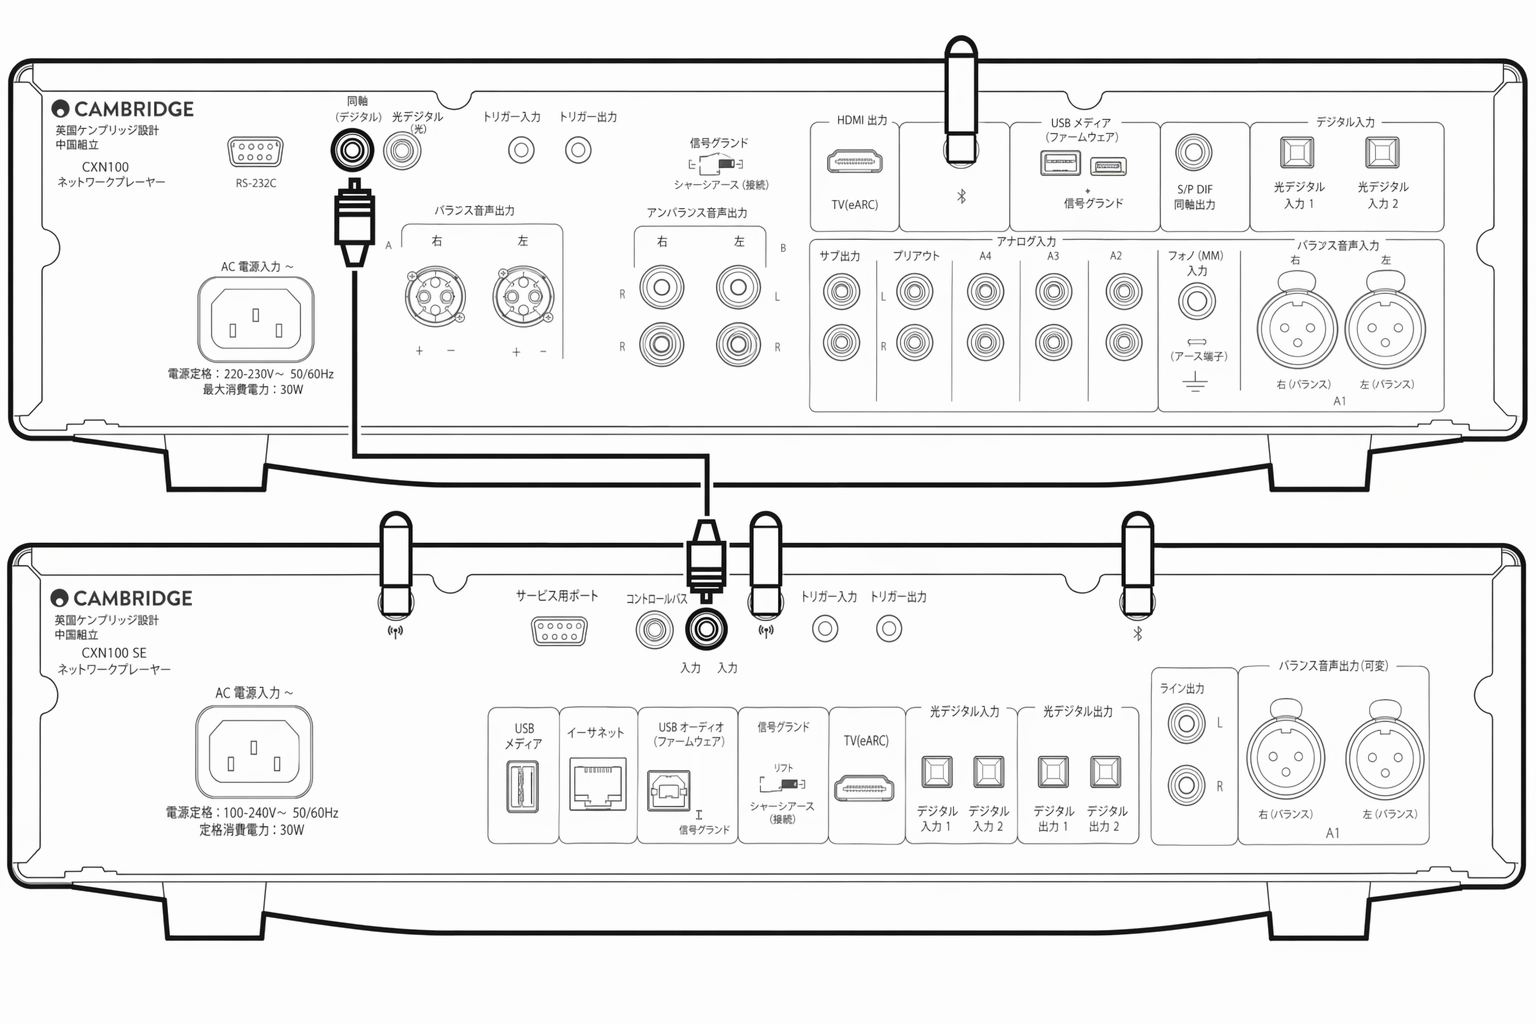
EXA と EXN100
注記: StreamMagic アプリを使用せずに EXA を操作する場合の接続方法です。
Note: Without using the StreamMagic app to control the EXA.
EXA をオン/オフすると、EXN も連動してオン/オフします。EXA のコントロールバス出力を EXN の入力に接続してください。
When turning the EXA on/off, this will also turn the EXN on/off. Connect the EXA control bus out to EXN in.
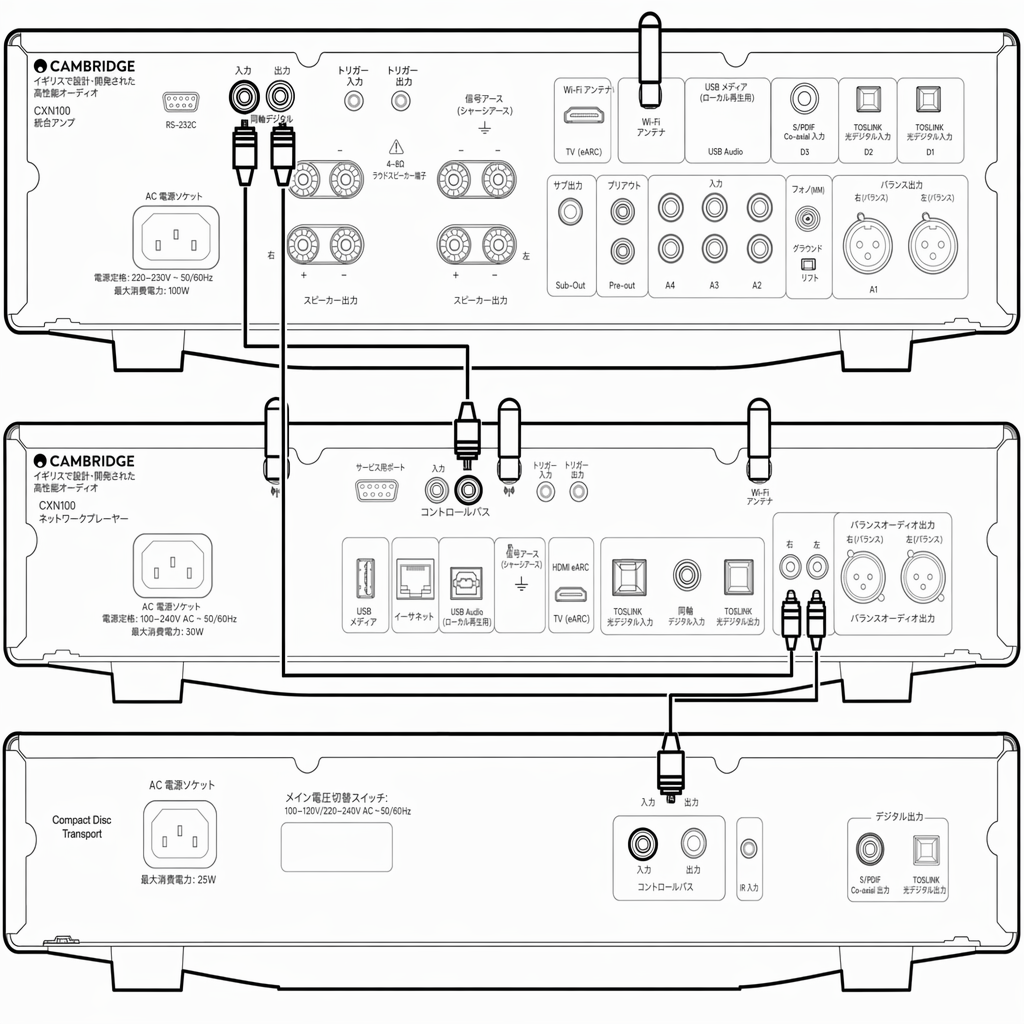
EXA と EXN100 と CXC
EXN をオン/オフすると、EXA と CXC も連動してオン/オフします。
When turning the EXN on/off, this will turn the EXA and CXC on/off.
3 台の EX 製品を使用する場合、EXN のコントロールバス出力を EXA のコントロールバス入力に接続します。続いて、EXA のコントロールバス出力を CXC のコントロールバス入力に接続します。
With all three EX devices, connect the EXN Control Bus out to EXA Control Bus in. Then connect the EXA Control Bus out to CXC Control Bus in.
注記: CXC のコントロールバス出力から EXN のコントロールバス入力へループバック接続しないでください。
Note: Do not loop back from the CXC Control Bus out to the EXN Control Bus in.
StreamMagic アプリを EXN に接続したら、アプリの EXN デバイス設定でコントロールバスを有効化し、「アンプ」に設定する必要があります。
Control Bus will also need to be enabled and set to 'Amplifier' within the EXN device settings in the StreamMagic app once the app has been connected to the EXN.
注記: EXA、EXN、CXC はいずれも自動電源オフ(APD)機能を備えています。APD が有効で、いずれかの機器がオン状態のまま操作されずにいた場合、設定した APD 時間の経過後に自動的に電源オフとなります。コントロールバス接続により、連動して他の接続機器もすべて電源オフとなります。自動でスタンバイに移行させたくない場合は、各機器で APD 機能を無効化することを推奨します。
Note: The EXA, EXN and CXC all have an Auto Power Down (APD) function. If APD is enabled and one of the devices is switched on but inactive, the device will automatically power down after the selected APD time. This will then switch off all the other connected devices, due to the Control Bus connection.If you don't want the devices to go into standby automatically, we would recommend disabling the APD feature on each device.
ネットワークへの接続
重要: ネットワークプレーヤーは、Wi-Fi または Ethernet でインターネットに常時接続しておくことを強く推奨します。これにより、重要なセキュリティプロトコルやサードパーティとの互換性を保つためのアップデートを定期的に受け取れます。
Important Note: It is vitally important that your Network Player remains connected to an internet network as often as possible, either via Wi-Fi or Ethernet. This will ensure that the unit is regularly updated to meet essential security protocols, third party compatibility.
ファームウェアアップデートの適用を強く推奨します。安定性の向上、性能の改善、新機能の追加により、より快適にご使用いただけます。
Firmware upgrading is highly recommended. It enhances stability, improves performance, and adds new features for a better user experience.
注記: 本プレーヤーはキャプティブポータル方式のネットワークには対応していません。可能な限り、電力線アダプターや Wi-Fi 信号ブースター/エクステンダーの使用は避けてください。これらはネットワーク接続の信頼性を損なうことがあります。
Note: Your player is not compatible with captive portal networks. Where possible, avoid the use of powerline adapters and Wi-Fi signal boosters/extenders, as these can disrupt the reliability of the network connection.
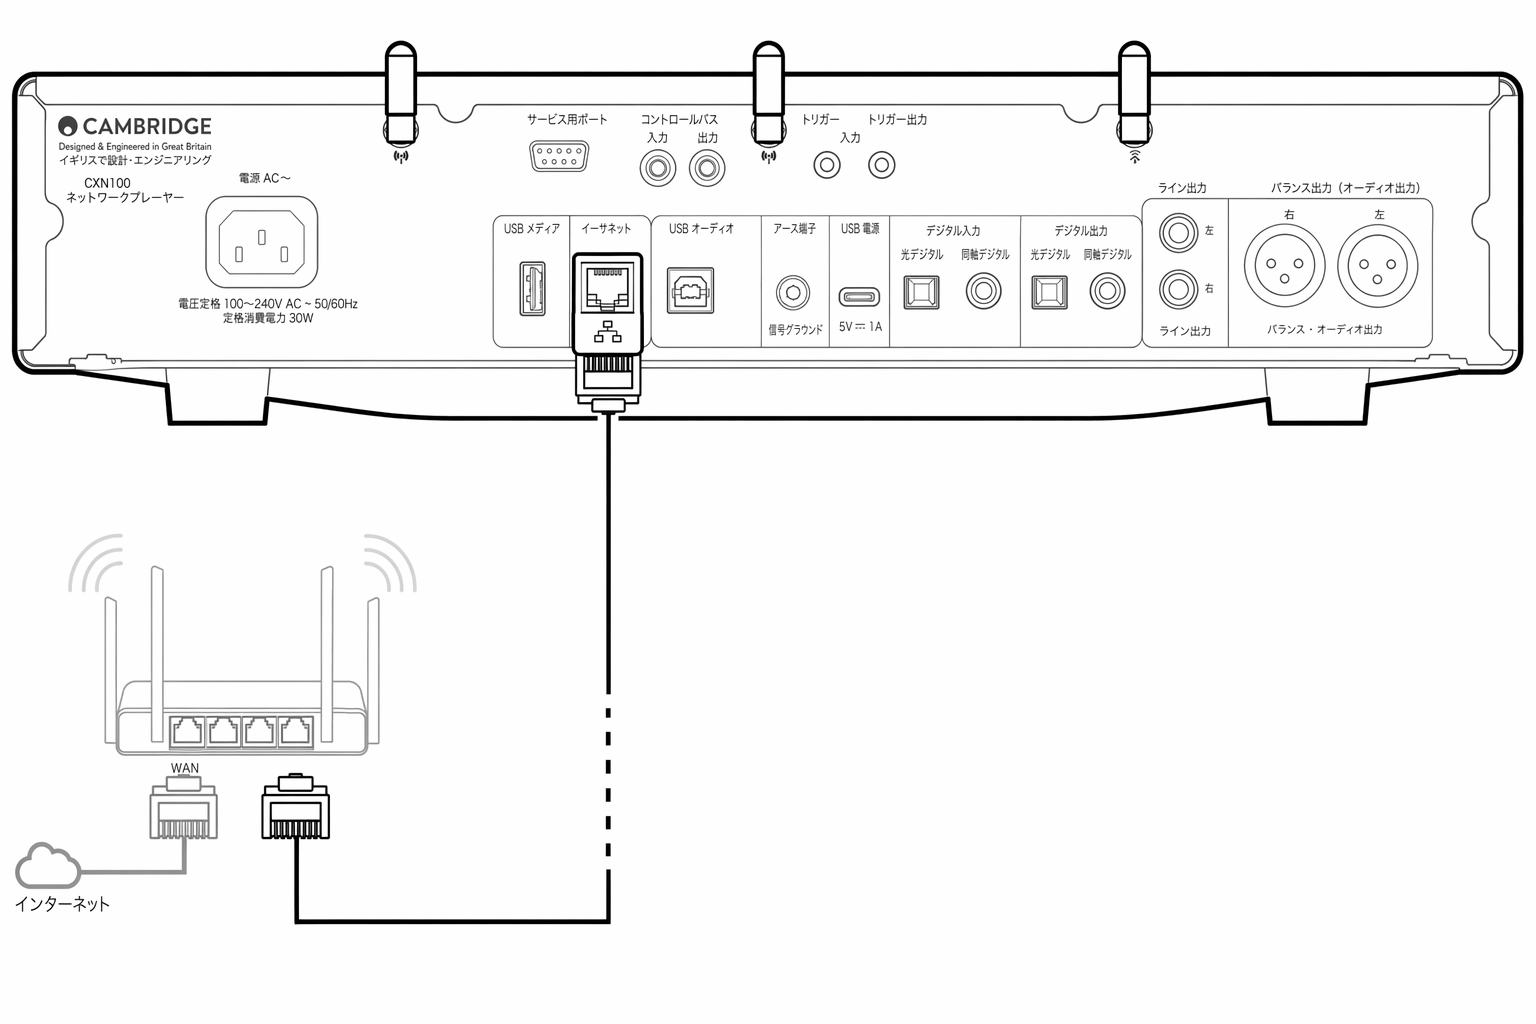
有線ネットワークへの接続
- 本機とルーターをネットワークケーブルで接続します。
- 本機は自動的にネットワークに接続されます。
無線ネットワークへの接続
iOS の場合:
iOS:
- 付属の Wi-Fi アンテナ 2 本を本体リア部に接続し、無線ルーターの電波範囲内に本体を設置します。次に本体の電源を入れます。注記: 初回セットアップ時や工場出荷時リセット後は、電源投入後に画面の指示に従って使用言語を選択してください。
- iOS デバイスの Wi-Fi 設定を開き、「新しい AIRPLAY スピーカーを設定」の項目からネットワークプレーヤーの名前を選択します。注記: 一部の iOS デバイスには「AirPlay スピーカー」の項目が表示されない場合があります。その場合も、ネットワークプレーヤーの名前を選択してください。
- 接続が完了したら、Apple App Store から StreamMagic アプリをダウンロード・インストールし、本機のセットアップを完了します。
Android の場合:
Android:
- 付属の Wi-Fi アンテナ 2 本を本体リア部に接続し、無線ルーターの電波範囲内に本体を設置します。次に本体の電源を入れます。注記: 初回セットアップ時や工場出荷時リセット後は、電源投入後に画面の指示に従って使用言語を選択してください。
- Google Play ストアから StreamMagic アプリをダウンロード・インストールします。
- StreamMagic アプリを開き、「Connect」を選択します。
- 「Choose a device」で「Set up a new device」を選択し、続いてネットワークプレーヤーの名前を選択します。
- 「Wireless Connection」を選択し、「Continue」を選択します。
- Android デバイスに、電波範囲内の Wi-Fi 対応機器がすべて表示されます。ネットワークプレーヤーの名前を選択してください。
- 接続後、Wi-Fi ネットワークのパスワード入力を求められます。パスワードを入力し、「Continue」を選択します。
- 本機が Wi-Fi ネットワークに接続されます。接続には最大 1 分ほどかかることがあります。
- 接続が完了したら、StreamMagic アプリ内で本機の初期セットアップを完了します。
StreamMagic アプリ - セットアップ
本プレーヤーはネットワーク接続に対応しています。本機の入力に接続した機器の音声を聴くだけでなく、家庭内ネットワークやインターネット上のさまざまなソースから音楽をストリーミングできます。
Your player is network connected, not only can you listen to devices connected to the inputs on the product but you can also stream music from many different sources both on your home network and from the internet.
本プレーヤーをセットアップするには、まず Apple App Store または Google Play ストアから StreamMagic アプリをダウンロードしてください。
To set up your player, please first download the StreamMagic app from the Apple app store or Google Play store.


セットアップ
- 本プレーヤーの電源を入れ、画面の指示に従って使用言語を選択します。
- StreamMagic アプリを開き、表示される手順に従ってネットワーク上でのプレーヤーのセットアップを完了します。この過程で、保留中のアップデートがあれば併せて適用されます。
注記: セットアップ中に本プレーヤーの名前を入力するよう求められます。他と重複しない独自の名前を設定してください。ストリーミングやスマートホームサービスを利用する際に、本プレーヤーを識別しやすくなります。
Note: During the set up process you will be asked to give your player a name, please make sure this is unique to your player. This will make it easier to find when using streaming and smart home services.
本プレーヤーを家庭内ネットワークに接続すると、インターネットラジオ、ストリーミングサービス、ネットワークドライブ、USB ドライブなど、各種ソースを自在に操作できます。
Once your player is connected to your home network you'll have full control of your sources, including internet radio, streaming services, network and USB drives and more.
StreamMagic アプリの詳細については、次の URL を参照してください: https://www.cambridgeaudio.com/gbr/en/products/streammagic
For more information on our StreamMagic app, please visit: https://www.cambridgeaudio.com/gbr/en/products/streammagic
Google Home/Google Cast
本プレーヤーは Google Cast に対応しており、Google Home に組み込んで使用できます。本プレーヤーをセットアップするには、スマートフォンまたはタブレットに Google Home アプリをダウンロードしてください。
Your player features Google Cast and can be incorporated in to your Google Home. To set up your player, download the Google Home app on your smart phone or tablet.
本プレーヤーに搭載された Google Cast により、お手持ちのスマートフォンがリモコンになります。普段お使いのアプリでキャストボタンをタップするだけで、スマートフォン、タブレット、ノートパソコンから本プレーヤーに音楽、ポッドキャスト、プレイリストをストリーミングできます。
With Google Cast built in to your player, your phone becomes your remote. Simply tap the Cast button from apps you already know and love to stream music, podcasts and playlists from your phone, tablet or laptop to your player.
Google Cast
スマートフォンがリモコンになります
Your phone is your remote
- 普段お使いのアプリでキャストボタンをタップするだけ。新規ログインやダウンロードは不要です。
- スマートフォンで検索、再生、一時停止、音量調整を、家のどこからでも行えます。
- ストリーミング中もスマートフォンの他の操作を続けられます。SNS の閲覧、メッセージ送信、通話の応答も可能です。
- Google Cast 対応スピーカーを使ってマルチルームキャストを楽しめば、家中で音楽を楽しめます。
- 「OK Google」と話しかけるだけで、本プレーヤーにキャストできます。
無制限のエンターテインメントを、あなたのペースで
Unlimited entertainment, all on your schedule
- 数百種類のアプリに対応しており、新しいアプリも随時追加されています。
- Pandora、Spotify、YouTube Music など、人気の音楽サービスから数百万曲を自由に選択できます。
注記: StreamMagic アプリで本プレーヤーを初めてセットアップする際、または工場出荷時リセット後は、Google Cast 機能を有効化するために、表示される Google の利用規約に同意してください。
Note: When first setting up your Player via the StreamMagic app or after a factory reset, please ensure that you accept Google's terms and conditions when prompted to enable Google Cast functionality.
Android、Google Play、Google Cast 対応ロゴは、Google Inc. の商標です。
Android, Google Play and the Google Cast-enabled logo are trademarks of Google Inc.
地域によっては、Google Cast 対応機能の一部が利用できない場合があります。
Full Google Cast-enabled features may not be available in some territories.
インターネットラジオ
StreamMagic アプリの「Radio」タブから、多彩なインターネットラジオ局を閲覧・再生できます。お気に入りのインターネットラジオ局やその他のメディアを、最大 99 件まで本プレーヤーのプリセットとして登録できます。登録したプリセットは StreamMagic アプリから呼び出せます。リモコンが付属するモデルでは、一部のプリセットをリモコンから呼び出すこともできます。
You can browse and play a wide variety of Internet Radio stations in the StreamMagic app Radio tab. You can also assign up to 99 of your favourite Internet Radio stations and other media as presets on your player, which can then be recalled using the StreamMagic app. A limited amount of presets can be recalled via the remote control if your player includes one.
StreamMagic アプリでプリセットを検索・登録する方法:
- StreamMagic アプリで「Radio」タブに移動します。
- ページ上部の「Search for Radio」検索タブを使用するか、「URL」を選択してカスタム URL のリンクを入力します。
- 登録したい局を見つけたら選択します。「Play now」または「Add to presets」のオプションが表示されます。
- 本プレーヤーの 1〜99 のうち、希望するプリセット番号に局を登録します。
- 選択したプリセットに局が保存されたことを確認できます。
注記: カスタム URL のストリームは、次のサポートファイル形式のいずれかである必要があります。ALAC、WAV、FLAC、AIFF、DSD(x256)、WMA、MP3、AAC、HE AAC、AAC+、OGG Vorbis。
Note: Please ensure that the custom URL stream is one of the following supported file types: ALAC, WAV, FLAC, AIFF, DSD (x256), WMA, MP3, AAC, HE AAC AAC+, OGG Vorbis.
プリセットを削除する方法(iOS):
- StreamMagic アプリで「Home」タブに移動します。
- ページ下部までスクロールし、プレーヤーの「Presets」を表示したら「EDIT」を選択します。
- プリセットから局を削除するには、赤い丸のアイコンをタップし、「Delete」を押します。
プリセットを削除する方法(Android):
- StreamMagic アプリで「Home」タブに移動します。
- ページ下部までスクロールし、プレーヤーの「Presets」を表示したら「EDIT」を選択します。
- 削除したい局をタップします。
注記: リモコンが付属するモデルでは、局の再生中にリモコンの数字ボタンを長押ししてプリセットを登録することもできます。
Note: You may also assign a preset using a remote control if your player includes one, by pressing and holding a number on the remote whilst a station is playing.
Bluetooth
Bluetooth ソースを使用すると、本プレーヤーは大半のスマートフォン、タブレット、ノートパソコンから Bluetooth 経由でワイヤレスオーディオを受信できます。
The Bluetooth source allows your player to receive wireless Bluetooth audio from most phones, tablets and laptops.
ペアリング
Pairing
選択したメディアソースから高音質で音楽をストリーミングするには、まず本プレーヤーとペアリングする必要があります。
To begin streaming high-quality music from your chosen media source it will first need to be paired with your player.
- StreamMagic アプリで「Home」タブに移動します。
- ソースの「Edit」オプションから、Bluetooth ソースを追加します。
- 「Home」タブに戻り、Bluetooth ソースを選択します。
- モバイルデバイスまたはノートパソコンの Bluetooth 設定を開きます。
- 利用可能なデバイスの一覧から、本プレーヤーを選択します。
- デバイスと本プレーヤーが接続されます。
一度ペアリングすれば、本プレーヤーで Bluetooth ソースを選択し、デバイス側で以前に接続したデバイスの一覧から本プレーヤーを選ぶだけで、いつでも接続できます。
Once paired you should be able to connect to your player at any time by selecting the Bluetooth source on your player and then choosing your player from the list of previously connected devices.
注記:
Note:
Bluetooth デバイスと本プレーヤーを接続できるのは、Bluetooth ソースが選択されている場合のみです。
Your Bluetooth device can only be connected to your player while the Bluetooth source is selected.
AirPlay
AirPlay は、iPhone、iPad、HomePod、Apple TV から、タップや Siri への呼びかけだけで、家中のホームオーディオシステムやスピーカーを操作できる Apple の技術です。リビングとキッチンで同じ曲を同時に再生したり、各部屋の音量を個別に調整したりでき、すべて同期して動作します。
AirPlay is an Apple technology designed to control home audio systems and speakers in any room — with a tap or by just asking Siri — right from iPhone, iPad, HomePod, or Apple TV. Play a song in the living room and kitchen at the same time or adjust the volume in any room, all in sync.
本プレーヤーを設置したら、iPhone または iPad を使い、簡単な手順で Apple Home アプリに追加できます。
After installing your player, add it to the Apple Home app with a few simple steps using your iPhone or iPad
iPhone または iPad から AirPlay を使用する方法
1. 本プレーヤーがネットワークに接続されていることを確認します。
1. Ensure your player is connected to your network.
2. AirPlay で再生したいアプリを開きます。
2. Open the app that you want to AirPlay from.


3. ボタンをタップします。
3. Tap or .
4. AirPlay デバイスとして本プレーヤーを選択します。
4. Select your player as your AirPlay device.
コントロールセンターから AirPlay を使用する方法
コントロールセンターからデバイスのオーディオを切り替える方法:
To switch the audio on your device from Control Center:
画面右上から下方向にスワイプして、コントロールセンターを開きます。右上のエリアを長押しし、本プレーヤーを選択します。
Swipe down from the top right side of the screen on your device to open Control Center. Touch and hold in the upper-right corner, then select your player.
本製品は AirPlay 2 に対応し、iOS 11.4 以降が必要です。
This product supports AirPlay 2 and requires iOS 11.4 or later.
Apple および AirPlay は、米国およびその他の国で登録された Apple Inc. の商標です。
Apple and AirPlay are trademarks of Apple Inc., registered in the U.S. and other countries.
Works with Apple バッジの使用は、そのアクセサリーがバッジに示された技術と連携するよう専用に設計されていることを意味します。また、Apple のパフォーマンス基準を満たすことが開発者により認証されています。
Use of the Works with Apple badge means that an accessory has been designed to work specifically with the technology identified in the badge and has been certified by the developer to meet Apple performance standards.
内蔵ストリーミングサービス
本プレーヤーには、次のストリーミングサービスが内蔵されています。
Your player has the following built-in streaming services:
- Spotify Connect
- TIDAL
- Qobuz
- Deezer
注記: ストリーミング元のデバイス(スマートフォン、タブレット、コンピューターなど)は、本プレーヤーと同じ Wi-Fi ネットワークに接続されている必要があります。これにより、両機器が相互に通信できます。
Note: It is essential that the device you are streaming from (smartphone, tablet, computer, etc.) is on the same Wi-Fi network as your player, to ensure that the units can communicate with each other.
Spotify Connect
スマートフォン、タブレット、コンピューターを Spotify のリモコンとして使用できます。
Use your phone, tablet or computer as a remote control for Spotify.
詳細は spotify.com/connect を参照してください。
Go to spotify.com/connect to learn more.
TIDAL(Connect)
1. TIDAL アプリを開き、本プレーヤーにストリーミングしたいプレイリスト、アルバム、曲などを選択します。
1. Open the TIDAL app and choose the playlist, album, song, etc. that you wish to stream to your player.
2. TIDAL 内の音声出力デバイスアイコンを選択し、一覧から本プレーヤーを選択します。
2. Select the Sound Output devices icon within TIDAL and select your player from the list.
3. TIDAL Connect により、選択したコンテンツが本プレーヤーにストリーミングされます。
3. TIDAL Connect should now be streaming your chosen content to your player.
詳細は tidal.com/connect を参照してください。
Go to tidal.com/connect to learn more
TIDAL(StreamMagic 経由)
1. StreamMagic アプリを開き、「Library」タブに移動して「TIDAL」を選択します。
1. Open the StreamMagic app and navigate to the Library tab, and then select TIDAL.
注記: 指示が表示された場合は、TIDAL アカウントにサインインしてください。StreamMagic アプリとアカウントを連携する初回のみ必要です。
Note: Please ensure that you sign into your TIDAL account when prompted to do so. This will only be required on the first instance of use to link the account to the StreamMagic app.
2. 本プレーヤーにストリーミングしたいプレイリスト、アルバム、曲などを選択します。
2. Choose the playlist, album, song, etc. that you wish to stream to your player.
3. TIDAL により、選択したコンテンツが本プレーヤーにストリーミングされます。
3. TIDAL should now be streaming your chosen content to your player.
Qobuz(Google Cast 経由)
1. Qobuz アプリを開き、本プレーヤーにストリーミングしたいプレイリスト、アルバム、曲などを選択します。
1. Open the Qobuz app and choose the playlist, album, song, etc. that you wish to stream to your player.
2. Qobuz 内の Google Cast アイコンを選択し、Qobuz Connect の一覧から本プレーヤーを選択します。
2. Select the Google Cast icon within Qobuz and select your player from the Qobuz Connect list.
3. Qobuz により、選択したコンテンツが本プレーヤーにキャストされます。
3. Qobuz should now be casting your chosen content to your player.
Qobuz(StreamMagic 経由)
1. StreamMagic アプリを開き、「Library」タブに移動して「Qobuz」を選択します。
1. Open the StreamMagic app and navigate to the Library tab, and then select Qobuz.
注記: 指示が表示された場合は、Qobuz アカウントにサインインしてください。StreamMagic アプリとアカウントを連携する初回のみ必要です。
Note: Please ensure that you sign into your Qobuz account when prompted to do so. This will only be required on the first instance of use to link the account to the StreamMagic app.
2. 本プレーヤーにストリーミングしたいプレイリスト、アルバム、曲などを選択します。
2. Choose the playlist, album, song, etc. that you wish to stream to your player.
3. Qobuz により、選択したコンテンツが本プレーヤーにストリーミングされます。
3. Qobuz should now be streaming your chosen content to your player.
Deezer(Google Cast 経由)
1. Deezer アプリを開き、本プレーヤーにストリーミングしたいプレイリスト、アルバム、曲などを選択します。
1. Open the Deezer app and choose the playlist, album, song, etc. that you wish to stream to your player.
2. Deezer 内のスピーカーアイコンを選択し、「Google Cast」を選択します。一覧から本プレーヤーを選択します。
2. Select the speaker icon within Deezer, then select 'Google Cast'. Select your player from the list.
3. Deezer により、選択したコンテンツが本プレーヤーにキャストされます。
3. Deezer should now be casting your chosen content to your player.
Deezer(StreamMagic 経由)*
1. StreamMagic アプリを開き、「Library」タブに移動して「Deezer」を選択します。
1. Open the StreamMagic app and navigate to the Library tab, and then select Deezer.
注記: 指示が表示された場合は、Deezer アカウントにサインインしてください。StreamMagic アプリとアカウントを連携する初回のみ必要です。
Note: Please ensure that you sign into your Deezer account when prompted to do so. This will only be required on the first instance of use to link the account to the StreamMagic app.
2. 本プレーヤーにストリーミングしたいプレイリスト、アルバム、曲などを選択します。
2. Choose the playlist, album, song, etc. that you wish to stream to your player.
3. Deezer により、選択したコンテンツが本プレーヤーにストリーミングされます。
3. Deezer should now be streaming your chosen content to your player.
*Deezer は、ファームウェアバージョン 129-b-004 以降、および StreamMagic アプリのバージョン 2.9.0 以降でのみ、StreamMagic アプリ内で利用できます。
*Deezer is only available within the StreamMagic app when running firmware version 129-b-004 or later and StreamMagic app version 2.9.0 or later.
USB オーディオ
重要: 初回セットアップ時は、USB オーディオの接続を外してください。USB オーディオは、ファームウェアアップデートの適用後に再接続できます。
Important note: Before setting up your device for the first time, please make sure that the USB Audio connection is unplugged. USB Audio can be re-connected once any firmware updates are applied.
PC のセットアップ
注記: PC をネットワークプレーヤーに接続する前に、必ず Cambridge Audio Windows 2.0 USB ドライバーを PC にインストールしてください。最新の USB オーディオドライバーに関する情報はこちら、最新ドライバーのダウンロードリンクはこちらから確認できます。
Note: Before connecting your PC to the Network Player, ensure you install the required Cambridge Audio Windows 2.0 USB driver on your PC. Please find information on the most recent USB Audio driver here, and a link to download the latest driver here.
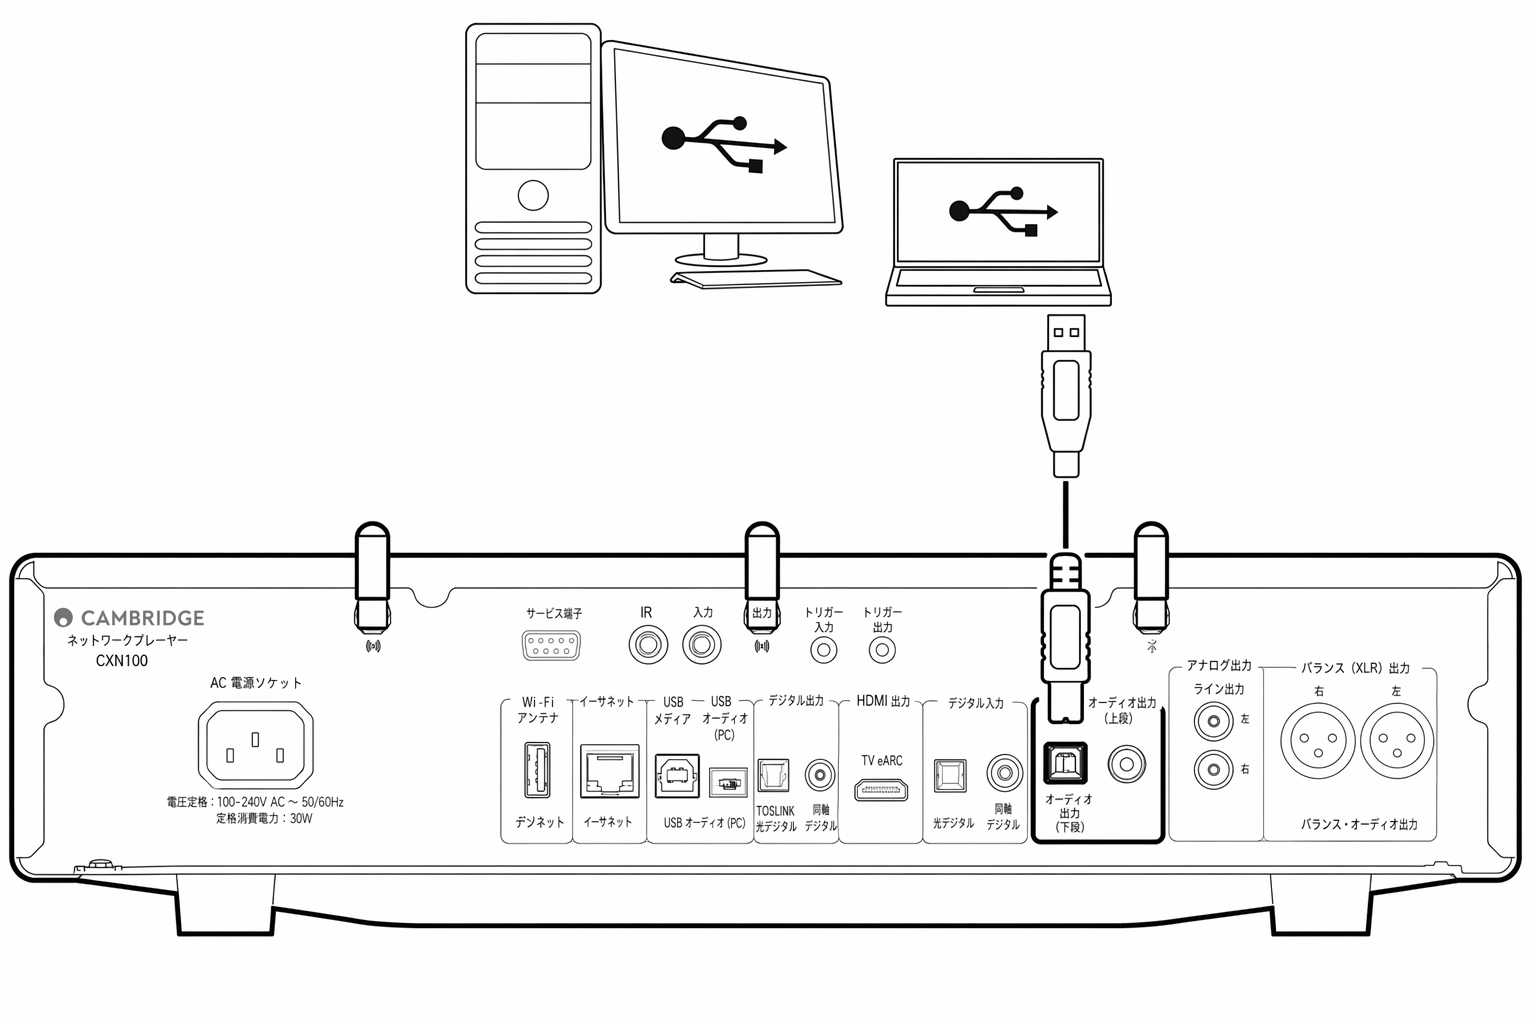
1. 本機を PC に接続します。
1. Connect your device to your PC.
- 正しいドライバーをインストールした後、USB オーディオケーブル(Type A から Type B)を使用して、本機の USB オーディオ入力と PC の USB ポートを接続します。
2. USB オーディオソースを選択します。
2. Select the USB Audio source.
- 本機前面のソースセレクターを使用するか、StreamMagic アプリの「Home」タブに移動して「Sources」セクションから「USB Audio」を選択します。
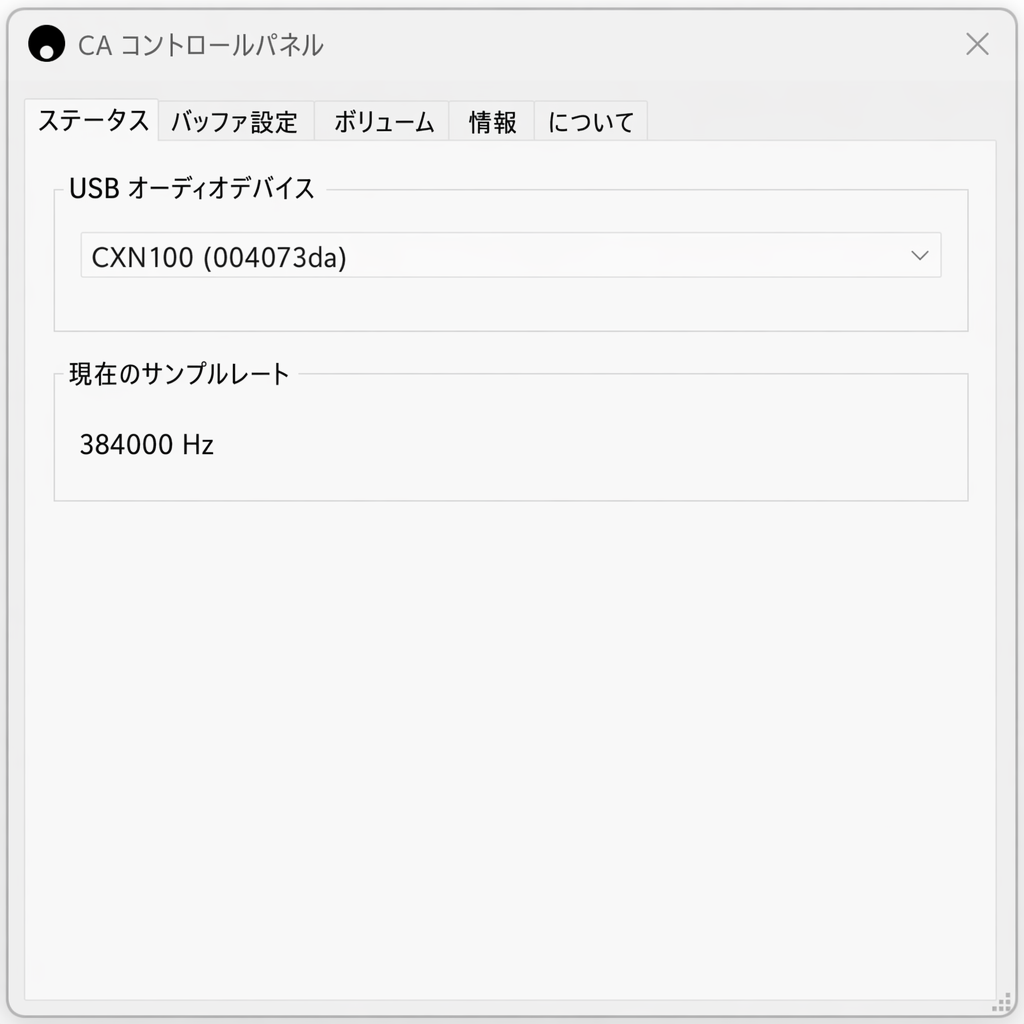
3. Windows のタスクバーにインストールされた CA コントロールパネルを開きます。接続中の Cambridge Audio 製 USB オーディオ機器と、現在のサンプリングレートが表示されます。
3. Navigate to the CA Control Panel which should now be installed in your Windows taskbar. This will show any connected Cambridge Audio USB Audio device and current sample rate.
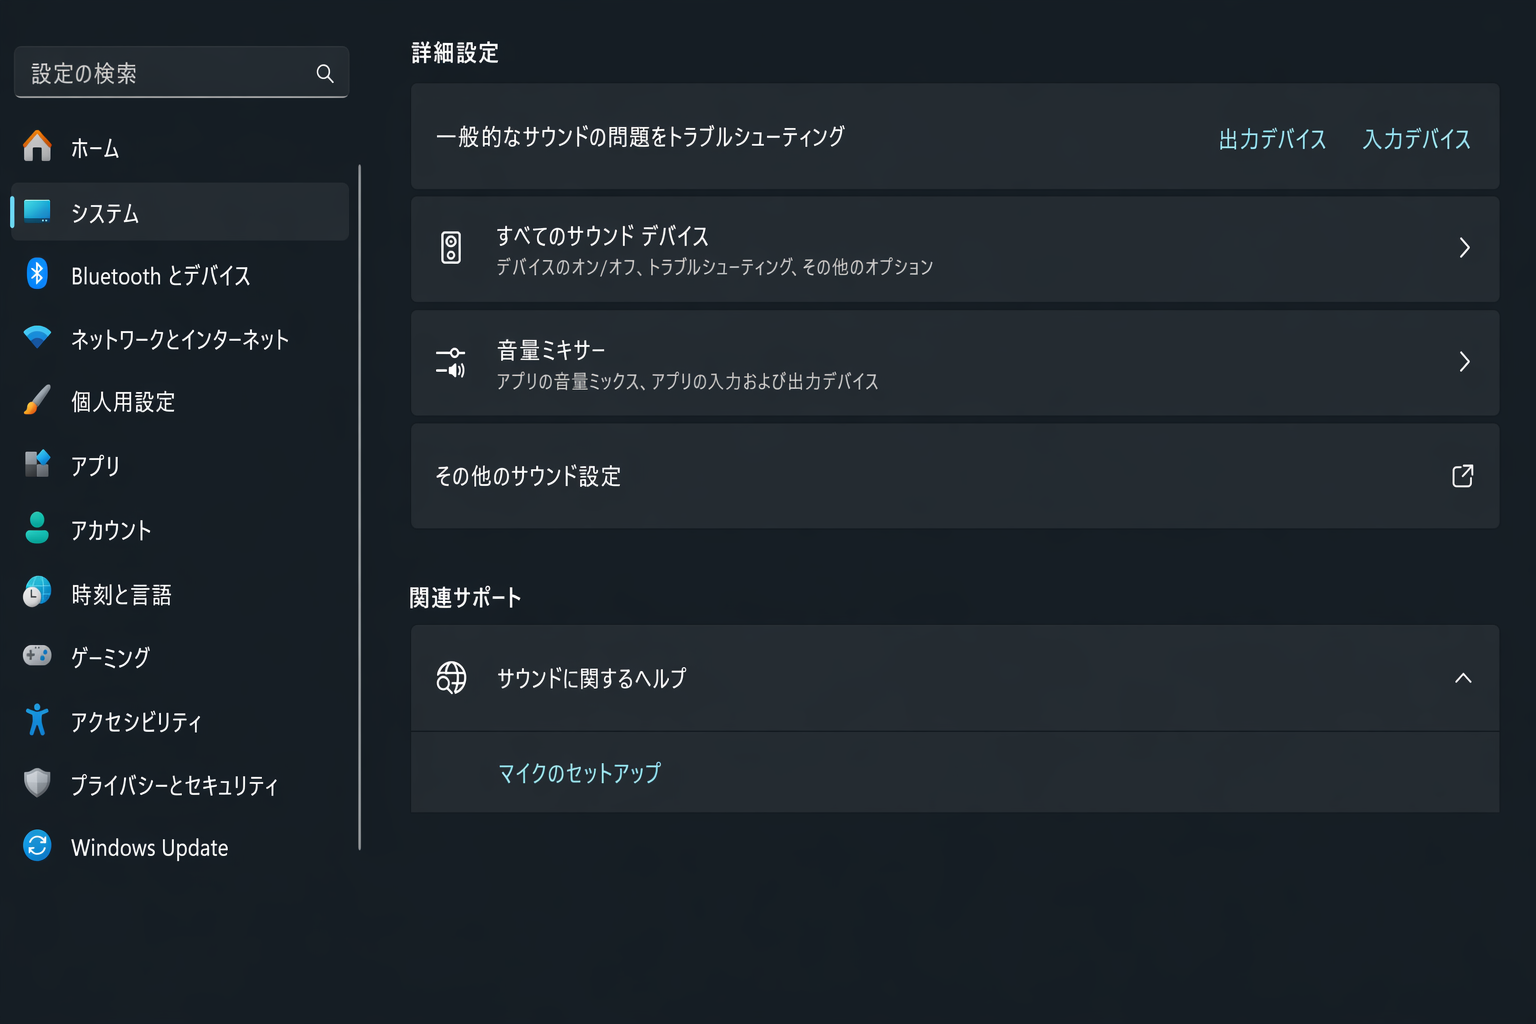
4. PC で「設定」>「システム」>「サウンド」に移動します。ドロップダウンメニューから、出力デバイスとしてネットワークプレーヤーを選択します。
4. On your PC, navigate to Settings > System > Sound. Select your Network Player as your output device from the drop-down menu.
5. 同じウィンドウの右側にある「関連設定」から「サウンドコントロールパネル」を選択します。または、下にスクロールして「その他のサウンド設定」を選択します。
5. Within this same window under Related Settings on the right-hand side, select Sound Control Panel. Alternatively, scroll down and select More Sound Settings.
6. 「再生」タブで、本機が既定の出力デバイスに設定されていることを確認し、「プロパティ」を選択します。
6. On the Playback tab, ensure that the device is the default output device, then select Properties.
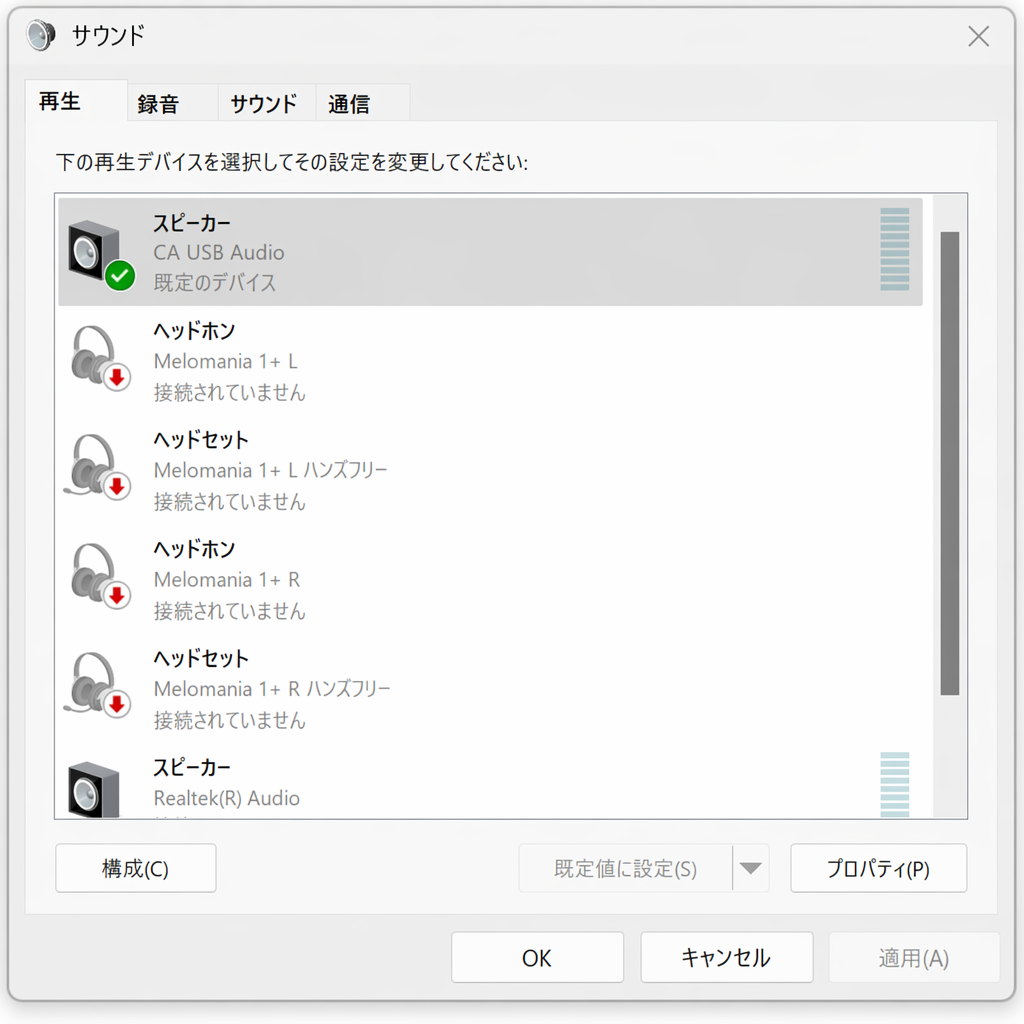
7. 「スピーカーのプロパティ」で「詳細」タブに移動します。希望するビット深度とサンプリングレートを選択します。(この手順は任意です。)
7. Within Speaker Properties, navigate to the Advanced tab. Select the desired bit depth and sample rate preference. (This step is optional.)

注記: Windows のバージョンによっては、384kHz を超えるサンプリングレートでの再生に対応していません。問題が発生する場合は、Windows の既定の再生フォーマットを 384kHz 以下に設定し、ネットワークプレーヤーを再起動してください。
Note: Not all Windows versions support playback at sample rates greater than 384kHz. If you experience issues please set the default Windows playback format to 384kHz or lower, then restart your Network Player.
8. PC の出力音声がネットワークプレーヤーから再生されます。
8. Your PC’s output will now playback via your Network Player.
Mac のセットアップ
注記: Mac では追加のドライバーは不要です。
Note: No extra drivers are required when using a Mac.
1. 本機を Mac に接続します。
1. Connect your device to your Mac.
- USB オーディオケーブル(Type A から Type B)を使用して、本機の USB オーディオ入力と Mac の USB ポートを接続します。
注記: USB Type A ポートを備えていない Mac をお使いの場合は、USB Type C(Thunderbolt 3)から USB Type B の接続も使用できます。
Note: If using a Mac without a USB Type A port, you may also use USB Type C (Thunderbolt 3) to USB Type B connection.
2. USB オーディオソースを選択します。
2. Select the USB Audio source.
- 本機前面のソースセレクターを使用するか、StreamMagic アプリの「Home」タブに移動して「Sources」セクションから「USB Audio」を選択します。
3. Mac の「システム環境設定」で「サウンド」設定を開きます。出力サウンドデバイスとしてネットワークプレーヤーを選択します。
3. Within the System Preferences of the Mac, locate the Sound settings. Select your Network Player as the output sound device.
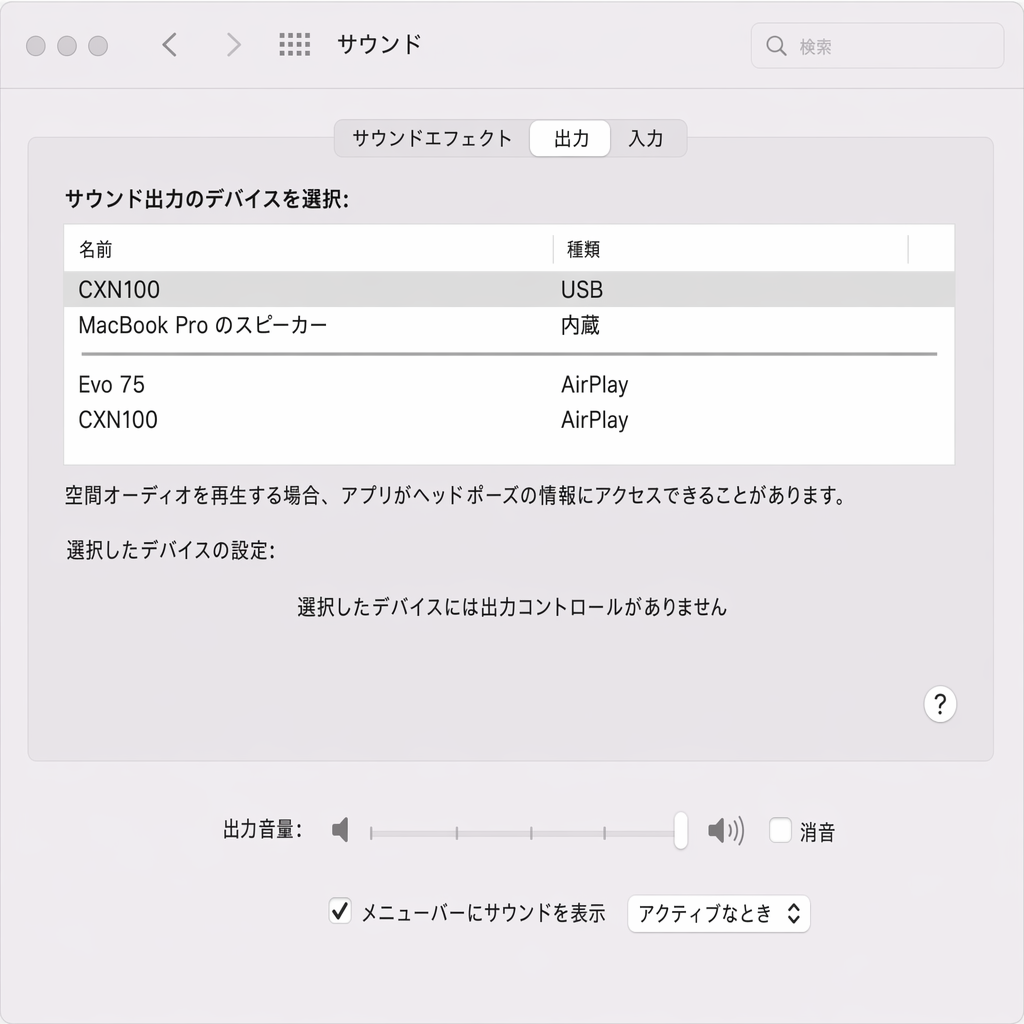
4. Mac で「アプリケーション」>「ユーティリティ」>「Audio MIDI 設定」に移動します。左側の列で出力サウンドデバイスとして本機を選択し、ドロップダウンオプションから希望するビット深度とサンプリングレートを選択します。
4. On the Mac navigate to Applications > Utilities > Audio MIDI Setup. Select the device as the output sound device on the left column, and then using the drop-down options select the desired bit depth and sample rate preference.
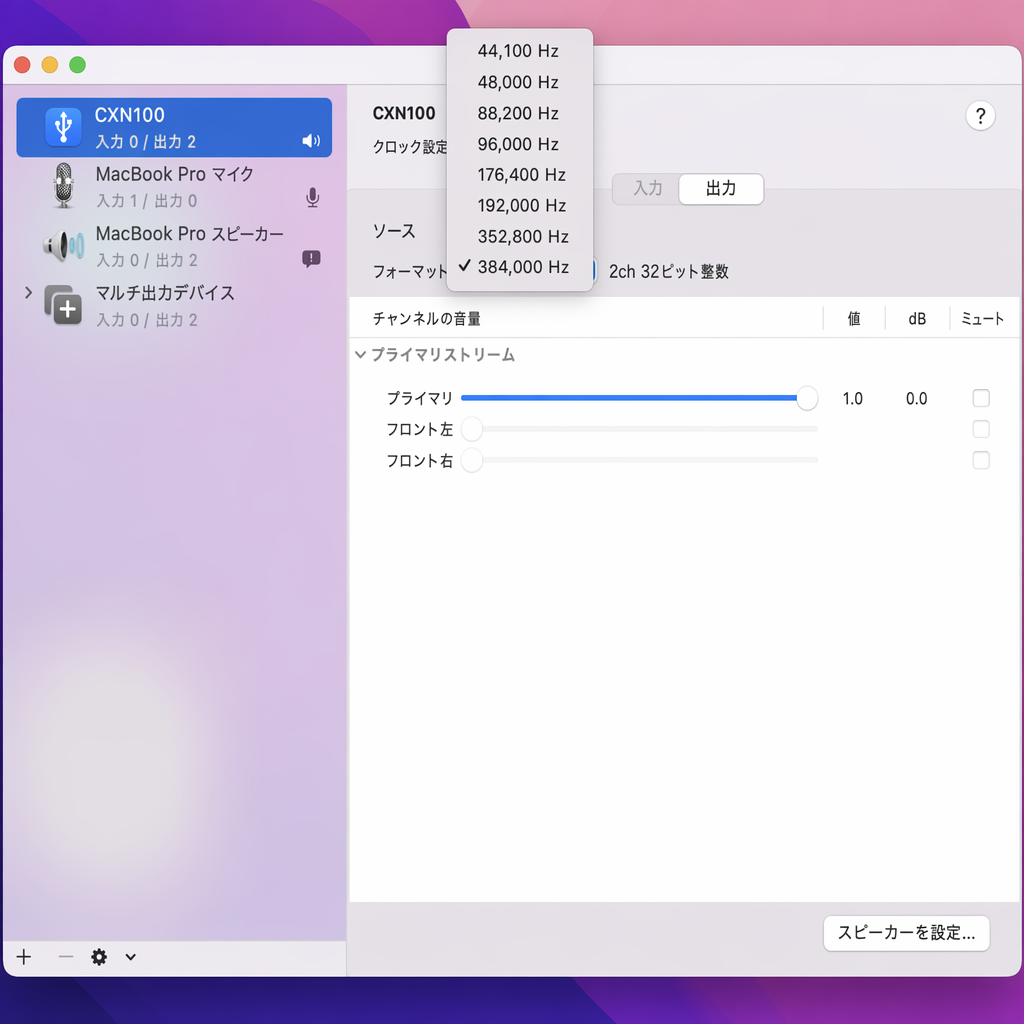
注記: この手順は任意です。
Note: This step is optional.
5. Mac の出力音声がネットワークプレーヤーから再生されます。
5. Your Mac’s output will now playback via your Network Player.
USB メディア
本機リア部の USB メディア入力に、USB SSD、USB HDD、フラッシュドライブを接続して再生できます。接続後は、次のフォーマットに対応します。ALAC、WAV、FLAC、AIFF、DSD、WMA、MP3、AAC、HE AAC、AAC+、OGG Vorbis。
You may connect a USB SSD, USB HDD or flash drive to your player via the USB Media input located on the rear of the unit for playback. Once connected, the following formats are supported: ALAC, WAV, FLAC, AIFF, DSD, WMA, MP3, AAC, HE AAC, AAC+, OGG Vorbis
注記: 本プレーヤーは USB 入力に接続された大容量ハードドライブを認識します。ただし、一部の大容量ドライブでは、専用の電源を使用する必要があります。
Note: your player will read large capacity hard drives connected to the USB input. However, some larger capacity drives will require you to use their own power supply.
本プレーヤーは、FAT32、exFAT、NTFS、Ext4 でフォーマットされた USB ハードドライブのみに対応します。
Your player only supports USB hard drives which are formatted to FAT32, exFAT, NTFS and Ext4.
本プレーヤーの主な用途はネットワーク音楽プレーヤーです。USB ポートは USB メモリーを手軽に接続できるようにするためのものです。そのため、すべての USB HDD との互換性は保証しかねます。
The primary function of your player is as a network music player. The USB ports are intended for convenient connection of USB thumb drives. As such, we cannot guarantee compatibility with all USB HDD’s.
USB メディア再生(StreamMagic アプリ経由)
1. リアパネルの USB 入力に、USB SSD、HDD、またはフラッシュドライブを接続します。
1.Connect a USB SSD, HDD or flash drive to rear panel USB Input.
2. StreamMagic アプリの「Library」タブに移動します。
2.Navigate to the Library tab of the StreamMagic app.
3. 「USB Drives」から USB メディア機器を選び、開きます。
3.Under USB Drives, locate your USB Media device and open.
4. トラックを選択すると、「PLAY FROM HERE」、「PLAY TRACK NOW」、「PLAY TRACK NEXT」、「QUEUE TRACK」のいずれかを選べます。
4.Upon selecting a track you will have the option to ‘PLAY FROM HERE’, ‘PLAY TRACK NOW’, ‘PLAY TRACK NEXT’ or ‘QUEUE TRACK’.
再生オプション:
Playback Options:
PLAY FROM HERE ― この位置からアルバムまたはフォルダーの再生を開始します。
PLAY FROM HERE – Playback of album/folder will begin from this point onwards.
PLAY TRACK NOW ― 選択したトラックをすぐに再生します。
PLAY TRACK NOW – Selected track will playback immediately.
PLAY TRACK NEXT ― 選択したトラックをキューに追加し、次に再生します。
PLAY TRACK NEXT – Selected track will be added to queue and playback next.
QUEUE TRACK ― 選択したトラックを再生キューに追加します。
QUEUE TRACK – Selected track will be added to playback queue.
ローカルのデジタル音楽ライブラリをストリーミングする
本プレーヤーは、さまざまな物理ソースのコンテンツを再生できます。本節では、ローカルに保存したデジタル音楽ライブラリへのアクセスと再生に必要な手順を解説します。「ローカル保存」とは、PC、Mac、またはネットワーク接続ストレージ(NAS)に保存したデジタル音楽ファイルを指します。
Your player can play content from many different physical sources and this section will explain what you need to do to access and play your locally stored digital music collection. ‘Locally Stored’ means the digital music files you have on your PC, Mac or Network Attached Storage devices (NAS).
ローカルコンテンツをストリーミングするには、ネットワーク内で以下のハードウェアとソフトウェアを動作させる必要があります。
To stream local content, you will need the following hardware and software running in your network:
1. Cambridge Audio のネットワークプレーヤー。
1. Your Cambridge Audio Network Player.
2. StreamMagic アプリを実行できるスマートフォンやタブレットなどのモバイルデバイス。またはフロントパネルの操作部からライブラリにアクセスすることもできます。
2. A mobile device such as a smartphone or tablet on which you can run the StreamMagic app, or by accessing your collection via the front panel controls.
3. 対応するデジタル音楽ファイルを保存したハードドライブ、コンピューター、または NAS。
3. A hard drive, computer or NAS containing your compatible digital music files.
4. 稼働中の UPnP 音楽サーバーまたはメディアサーバー。
4. An active UPnP music or media server.
5. UPnP サービスを許可するよう設定されたルーター。
5. A router which is configured to allow the UPnP service.
注記: 上記の項目は正しく接続・設定されている必要があります。使用するサーバー、NAS、コンピューターなどにより、設定手順は環境ごとに異なります。これらをサポートするために、ベストプラクティスガイドを用意しています。こちらから参照してください。
Note: The above items must be correctly connected and configured, and it is important to note that depending on the server, NAS, computer, etc. you’re using, this will differ from setup to setup. To help you with this we have created best practice guide which should get you up and running with minimal fuss and effort. This can be found here.
MQA(Master Quality Authenticated)
本プレーヤーには MQA 技術が搭載されています。MQA 音声ファイルやストリームを再生し、オリジナルマスター録音の音質を再現できます。
Your player includes MQA technology, which enables you to play back MQA audio files and streams, delivering the sound of the original master recording.
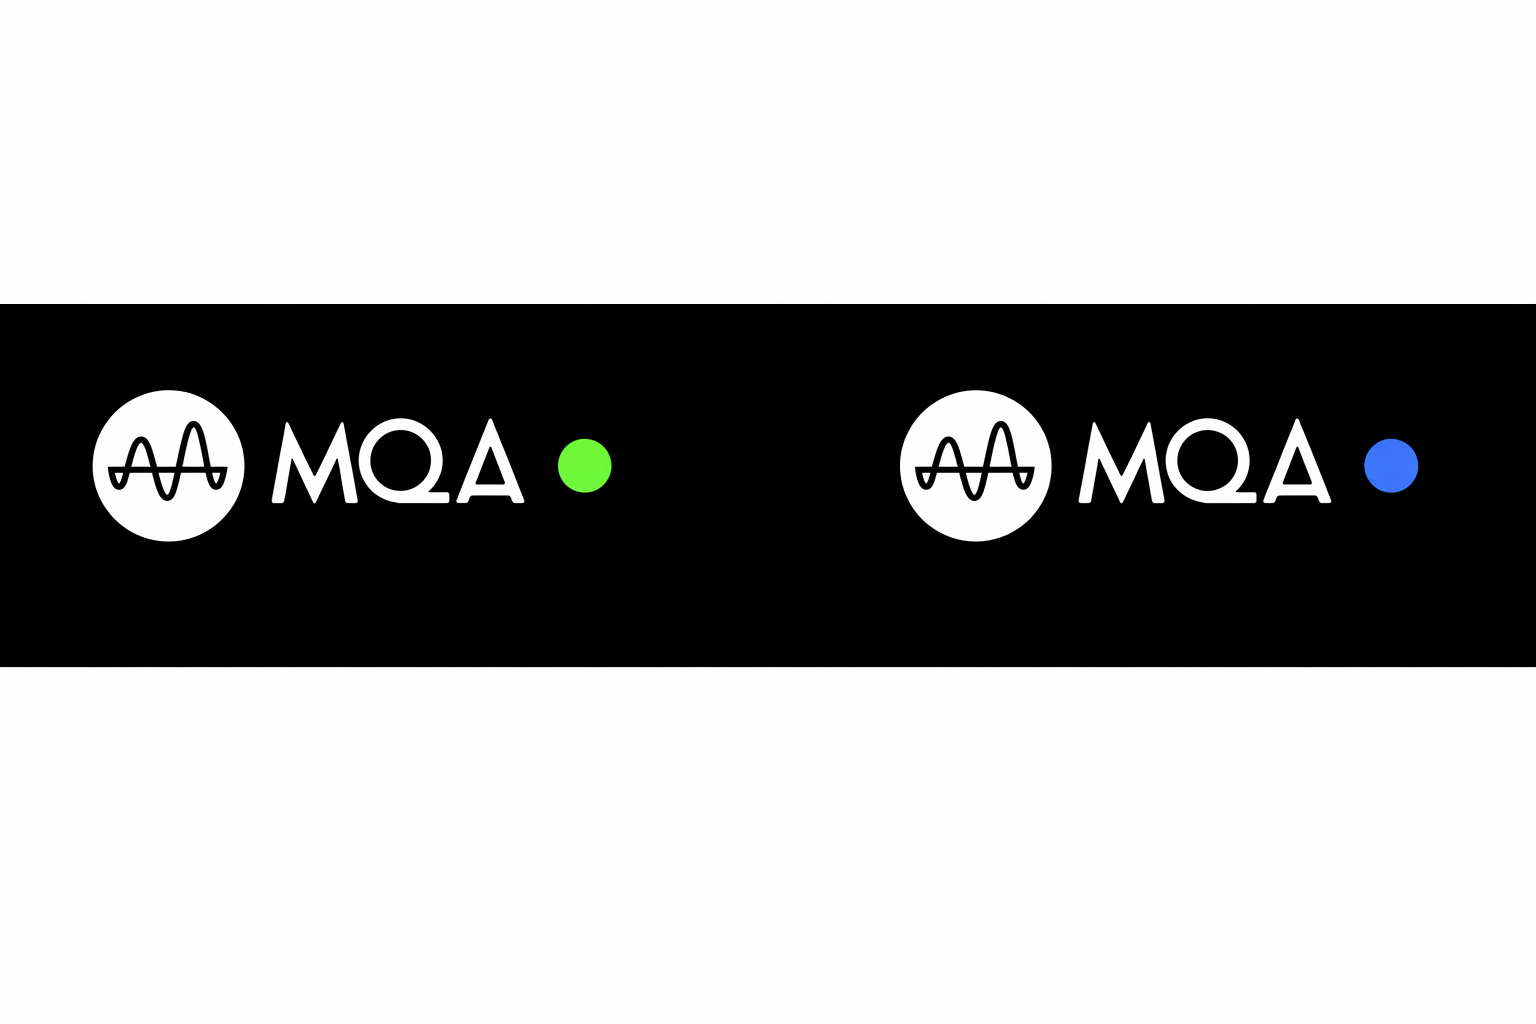
フロントパネルには、本機が MQA ストリームまたはファイルをデコードして再生していることを示す、緑または青の MQA 表示がされます。これによりソース素材と同一の音質が保証されます。青の MQA 表示は、アーティストやプロデューサーがスタジオで承認したか、著作権者が検証した MQA Studio ファイルを再生していることを示します。
The front panel will display MQA green or blue to indicate that the unit is decoding and playing an MQA stream or file, and denotes provenance to ensure that the sound is identical to that of the source material. It displays MQA blue to indicate it is playing an MQA Studio file, which has either been approved in the studio by the artist/producer or has been verified by the copyright owner.
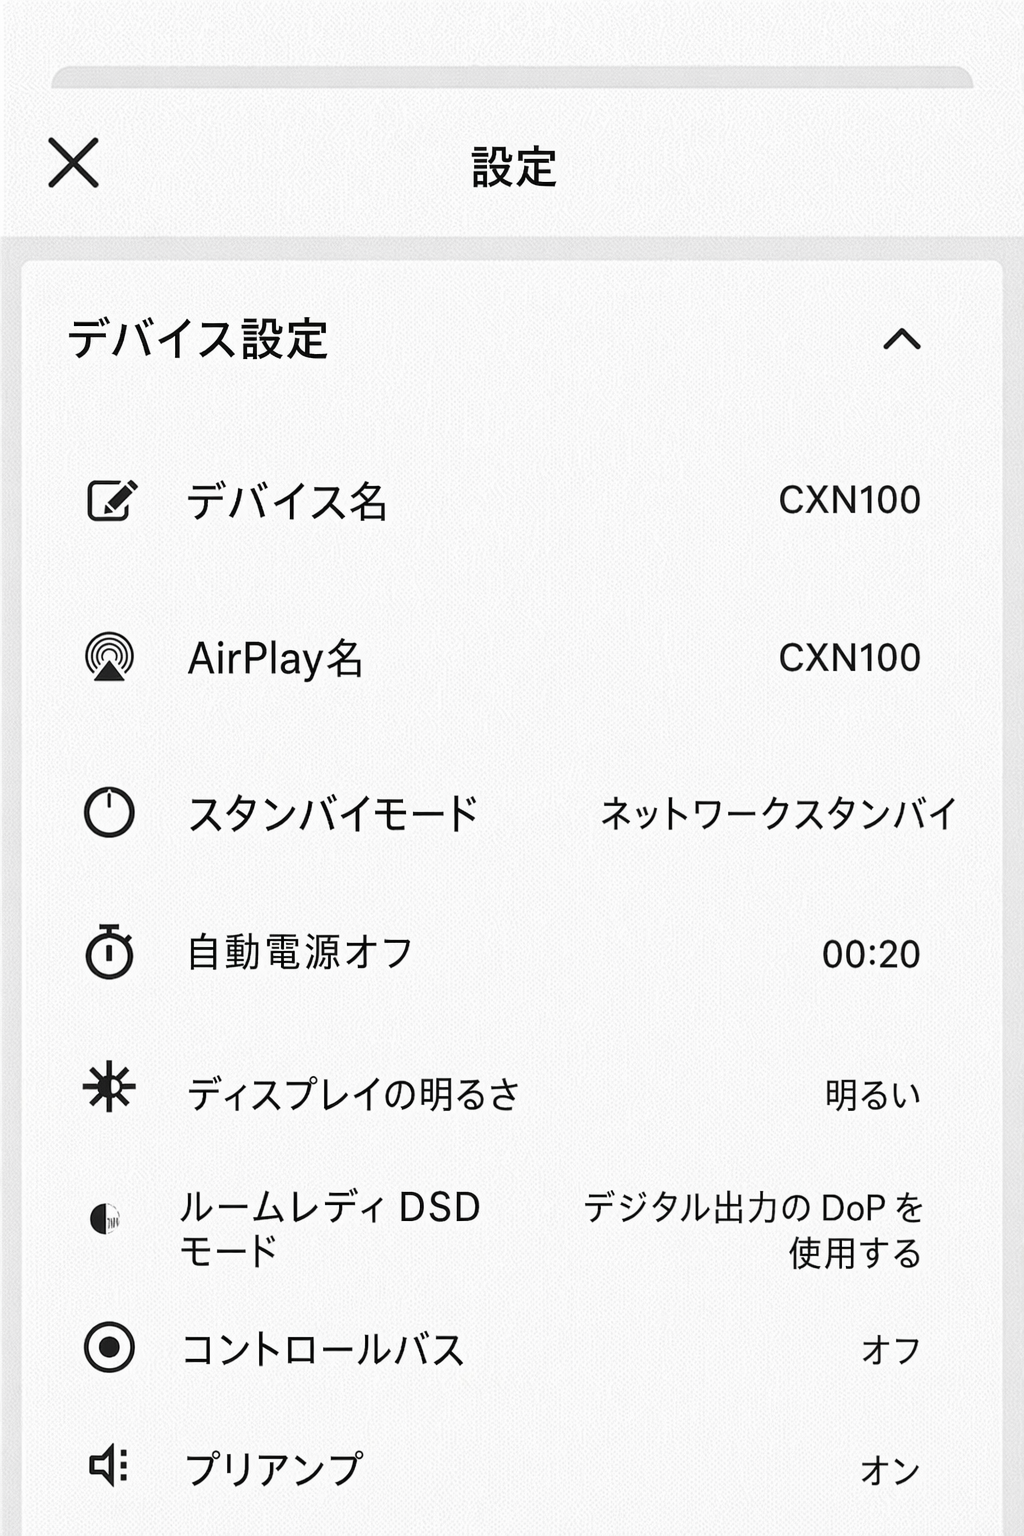
設定
デバイス名
Spotify、Chromecast built-in、TIDAL Connect などのサービス使用時に、StreamMagic アプリや家庭内ネットワーク上で表示される本プレーヤーの名称です。
This is how your player will appear in your StreamMagic app and on your home network when using services like Spotify, Chromecast built- in and TIDAL Connect.
本プレーヤーに固有の名前を設定すると、ストリーミングやスマートホームサービスで識別しやすくなります。
Giving your player a unique name makes it easier to distinguish when using streaming and smart home services.
AirPlay 名
AirPlay または Apple Home アプリの使用時に表示される本プレーヤーの名称です。
This is how your player will appear when using AirPlay or the Apple Home app.
スタンバイモード
本プレーヤーが使用するスタンバイモードの種類を選択します。
This selects what type of standby mode your player will use.
ネットワークスタンバイでは、スタンバイ中も StreamMagic アプリやその他のネットワークサービスから本プレーヤーを操作できます。
Network Standby means your player will still be controllable by the StreamMagic app and other network services while in standby.
ECO モードを選択すると、スタンバイ時の消費電力をさらに抑えられます。ただし、電源をオンにするにはフロントパネルまたはリモコンを使用する必要があります。スタンバイ中はアプリや他のネットワークサービスから操作できません。
If ECO mode is chosen, your player will use even less power in standby but will need to be switched on either by the front panel or the remote control. It will not be controllable via the app or other network services while in standby.
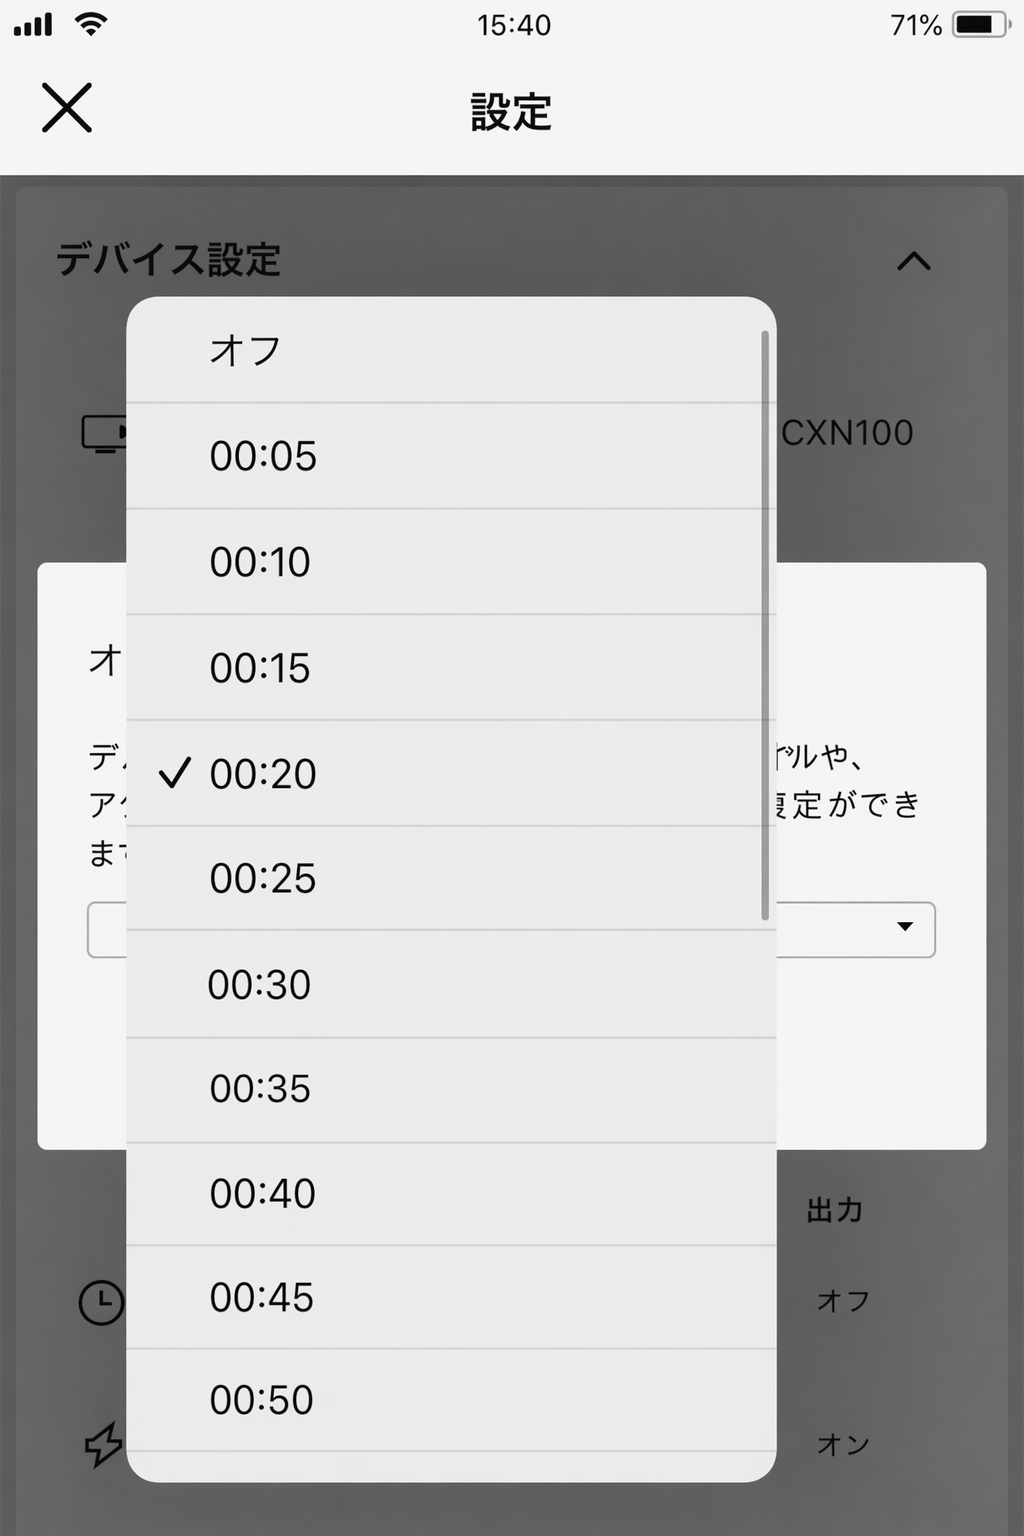
自動電源オフ
本プレーヤーが操作されずに放置された際、スタンバイに移行するまでの待機時間を設定します。
This sets how long your player will wait while inactive before switching to standby.
ディスプレイの明るさ
本プレーヤーのディスプレイの明るさを設定します。「オフ」に設定すると、操作後に数秒間だけ表示された後、ディスプレイはオフになります。Roon
This sets the brightness of your player’s display. If set to ‘Off’ the display will show for a few seconds after any change and then switch off.Roon
Ready DSD
Roon による DSD コンテンツの提供方式を選択できます。
This will allow you to choose how Roon provides DSD content.
デジタル出力に DoP を使用 ― DoP 形式のネイティブ DSD に対応する機器の場合。デジタル出力に PCM を使用 ― ネイティブ DSD に対応しない機器の場合。
Use DoP for digital output – If your device does support native DSD in DoP format. Use PCM for digital output – If your device doesn’t support native DSD.
コントロールバス
本機がコントロールバスコネクターで Cambridge Audio 製アンプに接続されている場合、音量コマンドを直接アンプへ送信できます。詳細は本マニュアルの「接続方法」セクション内の「コントロールバス」を参照してください。
If your device is connected to a Cambridge Audio amplifier using a control bus connector, volume commands can be sent directly to the amplifier. For more information, please refer to the Getting Connected section of this manual under ‘Control Bus’ here.
プリアンプ
プリアンプモードが有効な場合、本機のアナログ出力の音量をアプリまたはロータリーダイヤルで調整できます。
With Pre-Amp mode enabled, the volume of the device's analogue outputs can be controlled using the app or rotary dial.
注記: プリアンプモードと音量調整は、アナログ出力で接続している場合のみ有効化できます。
Note: Pre-Amp mode and volume control can only be enabled when connected via the analogue outputs.
音量上限
AirPlay、Spotify、TIDAL Connect、Google Cast などのストリーミングサービスが設定できる最大音量を設定します。フロントパネル、リモコン、StreamMagic アプリの音量操作は、この設定を上書きできます。
This sets the maximum volume that other streaming services like AirPlay, Spotify, TIDAL Connect and Google Cast and set. The front panel, remote control and StreamMagic app volume controls can override this setting.
アーリーアップデート
「オン」に設定すると、一般公開前の最新ファームウェアを試用できます。
Setting this to ‘On’ will let you try out the latest firmware ahead of general release.
ファームウェア
本プレーヤー用の新しいファームウェアを確認し、利用可能な場合は適用します。
This will check for and apply any new firmware available for your player.
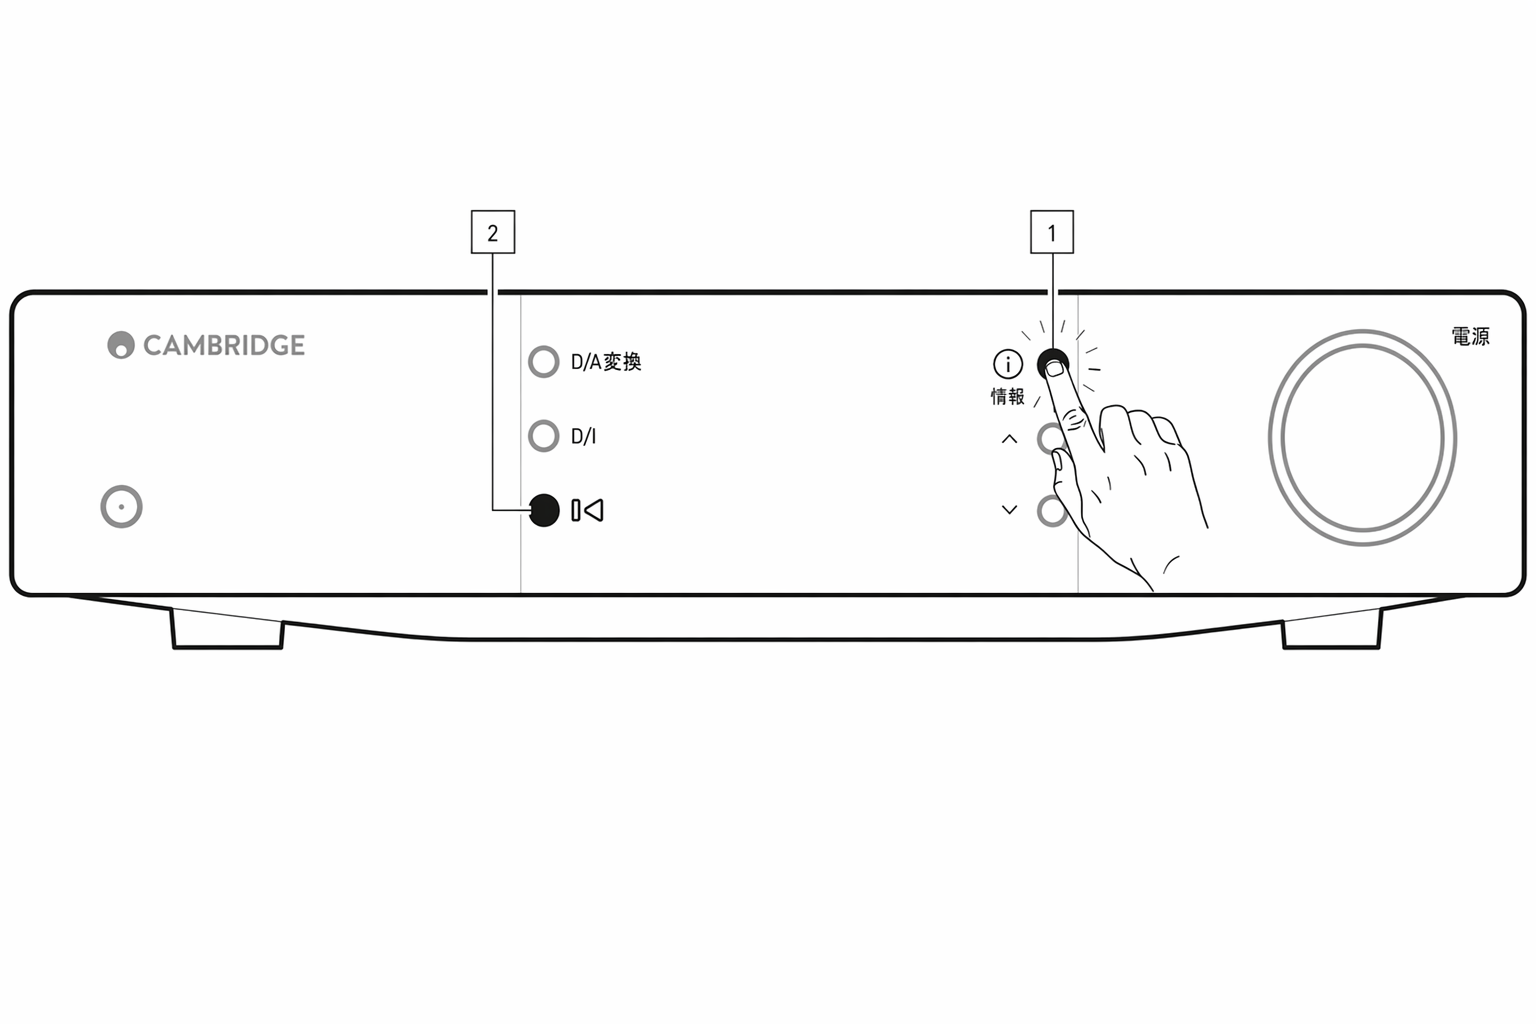
Info 画面でも新しいアップデートを確認でき、以下の手順で本機のファームウェアを手動で更新できます。
You can also check for new updates on the info screen and manually update the unit’s firmware by following the steps below:
- フロントパネルの「i」(Info)ボタンを長押しします。
- ディスプレイの指示に従い、「再生/一時停止」ボタンを押して新しいファームウェアを確認します。新しいバージョンが利用可能な場合は、更新が適用されます。

ネットワークスタンバイのまま一晩放置すると、本プレーヤーが新しいアップデートを確認し、適用します。
When left in network standby overnight your player will check and apply any new updates.
注記: ファームウェアアップデートを実行するには、ネットワークプレーヤーがインターネットに接続されている必要があります。最適なパフォーマンスを維持するため、ネットワークプレーヤーは常時接続しておいてください。
Note: Your network player must be connected to the internet to carry out firmware updates. You should keep your network player connected to ensure optimal performance.
再起動
本機が再起動し、ネットワークおよびアプリとの接続が一時的に切断されます。
This will restart your device and it will briefly lose connection with your network and the app.
工場出荷時リセット
本プレーヤーを工場出荷時の設定に戻します。
This will return your player to its factory settings.
Info 画面から以下の手順でも実行できます。
You can also do this from the info screen by following the steps below:
- フロントパネルの「i」(Info)ボタンを長押しします。
- ディスプレイの指示に従い、「リバーススキップ」ボタンを長押しして工場出荷時リセットを実行します。
Info 画面
Info 画面には、本プレーヤーに関する便利な情報が表示されます。また、本プレーヤーの問題解決に役立つ操作も実行できます。
The info screen shows useful information about your player, it also allows you to carry out some actions to help resolve problems with your player.

技術仕様
D/A コンバーター(DAC) ESS ES9028Q2M
D/A convertersESS ES9028Q2M
THD @ 1kHz 0dBFs < 0.0005 %
THD @ 1kHz 0dBFs< 0.0005 %
THD @ 20kHz 0dBFs < 0.0005 %
THD @ 20kHz 0dBFs< 0.0005 %
周波数特性 20Hz〜20kHz ±0.1dB
Frequency response20Hz-20kHz +/- 0.1dB
S/N 比(REF 1W) > 120dB
Signal to noise ratio (REF 1W)> 120dB
クロストーク @ 1kHz < −120dB
Crosstalk @ 1kHz< -120dB
デジタル出力
Digital outputs
S/PDIF 同軸 16/24 ビット、32〜192kHz
S/PDIF Coaxial 16/24-bit, 32-192kHz
TOSLINK 光 16/24 ビット、32〜96kHz
TOSLINK Optical 16/24-bit, 32-96kHz
オーディオフォーマット WAV(非圧縮 PCM 16〜32 ビット、32〜768kHz)、FLAC(ロスレス圧縮 PCM 16〜32 ビット、32〜768kHz)、Apple Lossless(ALAC。ロスレス圧縮 PCM 16〜24 ビット、32〜192kHz)、AIFF(非圧縮 PCM 16〜32 ビット、32〜768kHz)、Microsoft® Windows Media™ Audio(WMA 9 Standard)32〜320kbps、MP3(CBR または VBR)16〜320kbps、AAC、HE AAC、AAC+(CBR または VBR)16〜320kbps、OGG Vorbis 32〜320kbps。ネイティブ DSD64〜DSD512 に対応。
AUDIO FORMATSWAV containing uncompressed, PCM 16-32 bit 32-768kHz, FLAC containing losslessly compressed, PCM 16-32 bit 32-768kHz, Apple Lossless (ALAC) containing losslessly compressed PCM 16-24 bit 32-192kHz, AIFF containing uncompressed, PCM 16-32 bit 32-768kHz, Microsoft® Windows Media TM Audio (WMA 9 Standard) 32-320kbps, MP3 (CBR or VBR) 16-320kbps, AAC, HE AAC and AAC+, (CBR or VBR) 16-320kbps, OGG Vorbis 32-320kbps.Native DSD64 to DSD512 support.
ストリーミングプロトコル RTSP(Real Time Streaming Protocol)、MMS(Microsoft Media Server Protocol)、HTTP(Hyper Text Transfer Protocol)。
Streaming protocolsRTSP (Real Time Streaming Protocol), MMS (Microsoft Media Server Protocol), HTTP (Hyper Text Transfer Protocol).
Bluetooth 5.0 A2DP/AVRCP、SBC、aptX、aptX HD Bluetooth コーデックに対応
Bluetooth5.0 A2DP/AVRCP supporting SBC, aptX and aptX HD codecs
接続性 UPnP、ローカル USB メディア、AirPlay、Google Cast、インターネットラジオ、Spotify Connect、TIDAL、Qobuz、Deezer、Roon Ready。
ConnectivityUPnP, Local USB media, Airplay , Google Cast , Internet Radio, Spotify Connect, TIDAL, Qobuz, Deezer, Roon Ready.
プレイリスト ASX(Microsoft® プレイリスト形式)、M3U、PLS
PlaylistASX (Microsoft® playlist format) M3U, PLS
Wi-Fi IEEE 802.11 b/g/n または AC(2.4GHz および 5GHz)
Wi-FiIEEE 802.11 b/g/n or AC (2.4GHz and 5GHz)
Wi-Fi 暗号化 WEP、WPA、WPA2
Wi-Fi encryptionWEP, WPA, WPA2
Ethernet IEEE 802.3、10 Base-T または 100 Base-T
EthernetIEEE 802.3, 10 Base-T or 100 Base-T
USB1 x USB 2.0(電流制限 1A)
USB1 x USB 2.0 current limited to 1A
ファイルシステム FAT32、NTFS、Ext4、exFAT
File systemsFAT32, NTFS, Ext4, ExFAT
電源入力電圧 100〜240 VAC(スイッチモード)スタンバイ消費電力
Mains inlet voltage100-240 VAC (switch mode) standby consumption
ECO モード < 0.5W
ECO Mode <0.5W
ネットワークスタンバイモード > 2W
Network Standby Mode>2W
最大消費電力 30W
Max power consumption30W
寸法 89 × 430 × 325mm(3.5 × 16.9 × 12.8 インチ)
Dimensions89 x 430 x 325mm (3.5 x 16.9 x 12.8")
質量 4.15kg(9.1 ポンド)
Weight4.15kg (9.1Ibs)
ソース品質マトリクス
| ソース | 配信方式 | 最大解像度 |
|---|---|---|
| Spotify Connect | モバイル/デスクトップアプリ | 320kbps |
| Spotify AirPlay | モバイル/デスクトップアプリ | 320kbps |
| Spotify Chromecast | モバイル/デスクトップアプリ | 320kbps |
| Spotify Bluetooth | モバイル/デスクトップアプリ | aptX HD |
| TIDAL Connect | モバイル/デスクトップアプリ | 24bit/192 kHz |
| TIDAL(StreamMagic アプリ経由) | StreamMagic アプリ | 24bit/192 kHz |
| TIDAL AirPlay | AirPlay 2 | 16bit/44kHz |
| TIDAL Chromecast | Chromecast | 24bit/48 kHz |
| TIDAL Bluetooth | Bluetooth | aptX HD |
| TIDAL Roon | Roon エンドポイント | 24bit/192 kHz |
| TIDAL Roon | USB Class 2 | 24bit/192 kHz |
| TIDAL デスクトップアプリ | USB Class 2 | 24bit/192 kHz |
| Qobuz(StreamMagic アプリ経由) | StreamMagic アプリ | 24bit/192 kHz |
| Qobuz AirPlay | AirPlay 2 | 16bit/44kHz |
| Qobuz Chromecast | Chromecast | 24bit/48 kHz |
| Qobuz Bluetooth | Bluetooth | aptX HD |
| Qobuz Roon | Roon エンドポイント | 24bit/192 kHz |
| Qobuz Roon | USB Class 2 | 24bit/192 kHz |
| Qobuz デスクトップアプリ | USB Class 2 | 24bit/192 kHz |
| サードパーティアプリ(AirPlay 経由) | AirPlay 2 | 16bit/44kHz |
| サードパーティアプリ(Chromecast 経由) | Chromecast | 24bit/48 kHz |
| サードパーティアプリ(Bluetooth 経由) | Bluetooth | aptX HD |
トラブルシューティング
ネットワークプレーヤーをネットワークに接続できない場合、次の手順で問題を解決できることがあります。
If you have trouble connecting the Network Player to your network, these steps may help to resolve the problem:
- 本マニュアルの「ネットワークへの接続」の手順に従っていることを確認してください。
- Wi-Fi アンテナ 2 本が本体リア部に確実に接続されていることを確認してください。
- モバイルデバイスが、ネットワークプレーヤーを接続したいネットワークと同じネットワークに接続されていることを確認してください。
- モバイルデバイスにインストールされている VPN やアンチウイルスアプリを削除してください。ネットワーク上の他の機器をアプリが認識できなくなる場合があります。
- ネットワーク構成に含まれるスイッチやエクステンダー類を取り外してください。
- 本機をルーターに Ethernet ケーブルで直接接続してください。
- 本機で工場出荷時リセットを実行し、ネットワークセットアップ手順を再度試してください。
- DHCP サーバーが利用可能であること、または本プレーヤーに静的 IP アドレスを設定済みであることを確認してください。静的 IP アドレスは、StreamMagic アプリの「Network」設定で本機に設定できます。
- ルーターを再起動するか、工場出荷時リセットを実行してください。
StreamMagic アプリがネットワークプレーヤーに接続できない場合、次の手順で問題を解決できることがあります。
If you have trouble connecting the StreamMagic app to your Network Player, these steps may help to resolve the problem:
- モバイルデバイスが、ネットワークプレーヤーを接続したいネットワークと同じネットワークに接続されていることを確認してください。
- モバイルデバイスにインストールされている VPN やアンチウイルスアプリを削除してください。ネットワーク上の他の機器をアプリが認識できなくなる場合があります。
- StreamMagic アプリに、ネットワーク上の機器へのアクセスを許可していることを確認してください。モバイルデバイスのアプリ設定から確認できます。
- Wi-Fi アンテナ 2 本が本体リア部に確実に接続されていることを確認してください。
- デバイス上の他のアプリやソースが本機を認識できるか確認してください。認識できる場合は、デバイス上の何かが StreamMagic アプリによるネットワークプレーヤーの認識を妨げていると考えられます。
- 別のモバイルデバイスに StreamMagic アプリをダウンロードしてください。
- ネットワーク構成に含まれるスイッチ、エクステンダー、ブースター類を取り外してください。
ネットワークソースの再生中にネットワークプレーヤーで音切れが発生する場合、次の手順で問題を解決できることがあります。
If your Network Player is experiencing audio dropouts during playback from a network source, these steps may help to resolve the problem:
- Wi-Fi アンテナ 2 本が本体リア部に確実に接続されていることを確認してください。
- ネットワーク構成に含まれるスイッチ、エクステンダー、ブースター類を取り外してください。
- 本機をルーターに Ethernet ケーブルで直接接続してください。
- ネットワークルーターをリセットしてください。
- 本マニュアルの手順に従って、ネットワークプレーヤーで工場出荷時リセットを実行してください。
ネットワークプレーヤーがネットワークには正常に接続できるものの、特定のインターネットラジオ局を再生できない場合、次のいずれかが原因として考えられます。
If your Network Player can connect to the network successfully but is unable to play particular Internet Radio stations, it may be due to one of the following causes:
- 現在の時間帯に放送していない局です(異なるタイムゾーンの可能性があります)。
- その局はすでに放送を終了しています。
- 当社データベース内のリンクが古くなっています。(次の FAQ の手順に従って、ラジオ局の追加や更新を依頼できます。)
- サーバー(多くの場合は別の国にあります)とお客様との間のインターネット接続が遅くなっています。
- デバイス上で StreamMagic アプリを削除し、再インストールしてください。
- ラジオのプリセットを再生している場合は、StreamMagic アプリでプリセットを削除し、再登録してください。
UPnP 再生で問題が発生する場合は、次の項目を確認してください。
If you have problems with UPnP playback check the following:
- 使用する UPnP サーバーソフトウェアが、アクセスしようとしているファイル形式を配信できることを確認してください。サーバーによっては FLAC を配信しないものもあります。
- 本ネットワークプレーヤーで再生できるのは DRM 非適用ファイルのみです。DRM 制御のかかったファイルは EXN100 では再生できません。
- 24 ビットの WAV または FLAC コンテンツを再生する場合、帯域幅を考慮すると、安定動作のために有線 Ethernet 接続が推奨されます。
- ネットワークプレーヤーが、アクセスしようとしているファイル形式を再生できることを確認してください。現在、WMA、AAC、HE AAC、AAC+、MP3、OGG Vorbis、FLAC、WAV、ALAC、AIFF の再生に対応しています。
- PC または NAS ドライブが、ネットワークプレーヤーと同じネットワークに接続されていることを確認してください。
- ネットワークプレーヤー用の PC/NAS ドライブの設定手順に従っていることを確認してください。詳細は次の FAQ を参照してください。
USB メディア再生で問題が発生する場合は、次の項目を確認してください。
If you have problems with USB Media playback check the following:
- ネットワークプレーヤーが、アクセスしようとしているファイル形式を再生できることを確認してください。現在、WMA、AAC、HE AAC、AAC+、MP3、OGG Vorbis、FLAC、WAV、ALAC、AIFF の再生に対応しています。
- 本ネットワークプレーヤーで再生できるのは DRM 非適用ファイルのみです。DRM 制御のかかったファイルは EXN100 では再生できません。USB ソケットから給電する機器を接続する場合は、必要電流が 1A を超えないことを確認してください。
- 機器が FAT32/NTFS/exFAT/Ext4 のいずれかでフォーマットされていることを確認してください。
- USB メディアの整理方法は、コンテンツ閲覧時にネットワークプレーヤーが動的にスキャンする内部データベースのサイズに影響します。アーティストごとにフォルダを作成し、その中にアルバムごとのサブフォルダを作ってトラックを格納することを推奨します。1 つのフォルダに数千曲を入れると、プレーヤーのメディア閲覧が徐々に遅くなります。
Bluetooth デバイスをネットワークプレーヤーに接続できない場合は、次の項目を確認してください。
If you have problems connecting a Bluetooth device to the Network Player, check the following:
- アプリまたはフロントパネルのソースセレクターで、Bluetooth ソースを選択してください。Bluetooth ソースを選択していない場合、本プレーヤーに Bluetooth デバイスをペアリングできません。
- 付属の Bluetooth アンテナが本プレーヤーのリア部に接続されていることを確認してください。
- お使いの機器が、すでに別の Bluetooth スピーカーやヘッドホンに接続されていないことを確認してください。
- 本プレーヤーがすでに別の Bluetooth デバイスに接続されていないことを確認してください。
音が出ない:
There is no sound:
- 本機がスタンバイモードになっていないことを確認してください。
- アンプ/DAC が正しく接続されていることを確認してください。
- スピーカーがアンプに正しく接続されていることを確認してください。
- 接続先のアンプ/DAC がミュートモードになっていないことを確認してください。
- プリアンプモードが有効な場合、本プレーヤーがミュートモードになっていないことを確認してください。
- アプリまたはフロントパネルのソースセレクターで、正しいソースが選択されていることを確認してください。
Mac/PC を USB オーディオ入力に接続しても音が出ない:
There is no audio when connecting a Mac/PC to the USB Audio input:
- 本マニュアルの「USB オーディオ」セクションの手順をすべて実施していることを確認してください。
- アプリまたはフロントパネルのソースセレクターで USB オーディオソースを選択していることを確認してください。PC/Mac が USB A から B のケーブルで USB オーディオ入力に接続されていることも確認してください。
- PC を接続する場合は、正しい USB ドライバーをダウンロードしていることを確認してください。ドライバーは https://www.cambridgeaudio.com/gbr/en/driver-updates から入手できます。
eARC 入力に接続したテレビから音が出ない:
There is no sound from a TV connected to the eARC input:
- 当社サポートサイトのトラブルシューティングガイドの手順に従ってください。
よくあるご質問
EXN100 がネットワークに接続されていないとき、接続した USB HD からファイルを再生できますか?
再生できません。接続した USB HD からローカルファイルを再生するには StreamMagic アプリが必要だからです。EXN100 は常時ネットワークに接続しておくことを強く推奨します。
This is not possible as the use of the StreamMagic app is required to be able to play local files from a connected USB HD. Please note that it is strongly recommended that the EXN100 is connected to a network at all times.
EXN100 にはリモコンが付属していますか?
いいえ、EXN100 には専用のリモコンは付属していません。StreamMagic アプリから本機の操作や設定の変更をすべて行えます。
No, the EXN100 does not have its own remote control and does not come with one included. The unit can be fully controlled, and the settings can be adjusted via the StreamMagic app.
本機でリモコンを使用したい場合は、EXN100 に対応する EX シリーズのリモコンを当社ウェブサイトから購入できます。
If you wish to use a remote control with your device, the EX series remote control is compatible with the EXN100 and can be purchased from our website.
フロントパネルからインターネットラジオやストリーミングサービスなどの機能にアクセスできますか?
EXN100 のフロントパネルからはサービスや機能にアクセスできません。StreamMagic アプリから多くの機能にアクセスできます。また、TIDAL、Spotify などの統合サービスには、それぞれの専用アプリからアクセスできます。
It is not possible to access services and features via the front panel of the EXN100. You will be able to access many features via the StreamMagic app, as well as integrated services such as TIDAL, Spotify etc. via their respective apps.
EXN100 の音量はどのように変更しますか?
StreamMagic アプリのデバイス設定でプリアンプモードを有効にすると、本機のアナログ出力の音量をアプリまたはロータリーダイヤルで調整できます。
With Pre-Amp mode enabled within the StreamMagic app device settings, the volume of the device's analogue outputs can be controlled using the app or rotary dial.
注記: プリアンプモードと音量調整は、アナログ出力で接続している場合のみ有効化できます。
Note: Pre-Amp mode and volume control can only be enabled when connected via the analogue outputs.
EXN100 を動作させるには、付属の Wi-Fi アンテナ 2 本を両方接続する必要がありますか?
はい、EXN100 をネットワークに無線で接続する場合、Wi-Fi 機能を完全に有効化し、最も強い無線ネットワーク接続を得るには、付属のアンテナ 2 本を両方接続する必要があります。
Yes, if you are connecting your EXN100 to your network wirelessly, you will need to connect both of the supplied antennas to enable full Wi-Fi functionality and the strongest possible wireless network connection.
Bluetooth 機能は、対応ポートにアンテナを接続した場合にのみ利用可能です。
Bluetooth functionality will also only be possible when one of the antennas is connected to the port with the Bluetooth symbol.
EXN100 の複数の出力を同時に使用できますか?
はい、EXN100 を 1 台の機器にのみ接続する場合、デジタル・アナログを問わず任意の出力を使用できます。EXN100 を複数の機器に同時に接続したい場合は、すべての出力が常に有効なため、最大 4 台の機器を接続して同時に再生できます。
Yes, If you wish to connect the EXN100 to one single device, you can use any output, digital or analogue, that you wish. If, however, you would like to connect the EXN100 to more than one device at a time, you can connect up to four devices and play simultaneously, as all outputs remain active at all times.
EXN100 で音量を調整したい場合は、StreamMagic アプリでプリアンプモードを有効にする必要があります。なお、音量調整はデジタル出力には適用されません。
Please note that if you wish to control the volume via the EXN100, you will need to enable Pre-Amp mode in the StreamMagic app. Volume control does not apply to the digital outputs,
未使用時に EXN100 が電源オフになるのを防ぐには、どうすればよいですか?
EXN100 は 20 分間操作がないと、自動的にスタンバイモードに移行します。この自動電源オフ(APD)機能は、StreamMagic アプリのデバイス設定から無効化できます。
The EXN100 will automatically switch to standby mode after 20 minutes of inactivity. This Automatic Power-Down (APD) feature can be disabled, by navigating to the device settings within the StreamMagic app.
「Automatic Power-Down」を選択することで、この機能を無効にしたり、APD が作動するまでの時間を変更したりできます。
You can either disable this feature or edit the length of time it takes for APD to be triggered, by selecting ‘Automatic Power-Down’.
EXN100 はどの USB HD に対応していますか?
EXN100 の主な用途はネットワーク音楽プレーヤーであり、USB ポートは USB HDD や SSD を手軽に接続するためのものです。そのため、すべての USB HDD および SSD との互換性は保証しかねます。
The primary function of the EXN100 is as a network music player and the USB port is intended for convenient connection of USB HDDs and SSDs. As such, we cannot guarantee compatibility with all USB HDDs and SSDs.
EXN100 は USB メディア入力に接続された大容量ハードドライブを認識します。ただし、一部の大容量ドライブでは、本プレーヤーの USB ポートから十分な電力を供給できないため、専用の電源が必要になる場合があります。
The EXN100 will read large capacity hard drives connected to the USB Media input. Some larger capacity drives, however, may require their own power supply, as the player's USB port may not provide enough power for the drive to function.
EXN100 は、FAT32、exFAT、NTFS、Ext4 でフォーマットされた USB ハードドライブに対応します。
The EXN100 will support USB hard drives which are formatted to FAT32, exFAT, NTFS and Ext4.